DevOps Category
Operation
実行中のEC2インスタンスのバックアップ
overview
クラウドデザインパターンでは「Snapshotパターン」と呼ばれる。 EC2インスタンスはディスクボリュームに「EBS(Elastic Block Store)」というストレージデバイスを使用しており、 EBSにはある瞬間のスナップショットとしてバックアップを作成する機能がある。作成したデータはS3に保存されるが、 特殊な形式のデータのため、直接S3から取り出すことはできない。作成したデータはEBSとして新たに作成し、 EC2インスタンスにマウントするか、AMIイメージを作成し、新たなEC2インスタンスとし起動できる。 これは次章「 同じ構成のEC2インスタンスを作成する 」にて記述する「Stampパターン」である。
EBSボリュームの作成手順
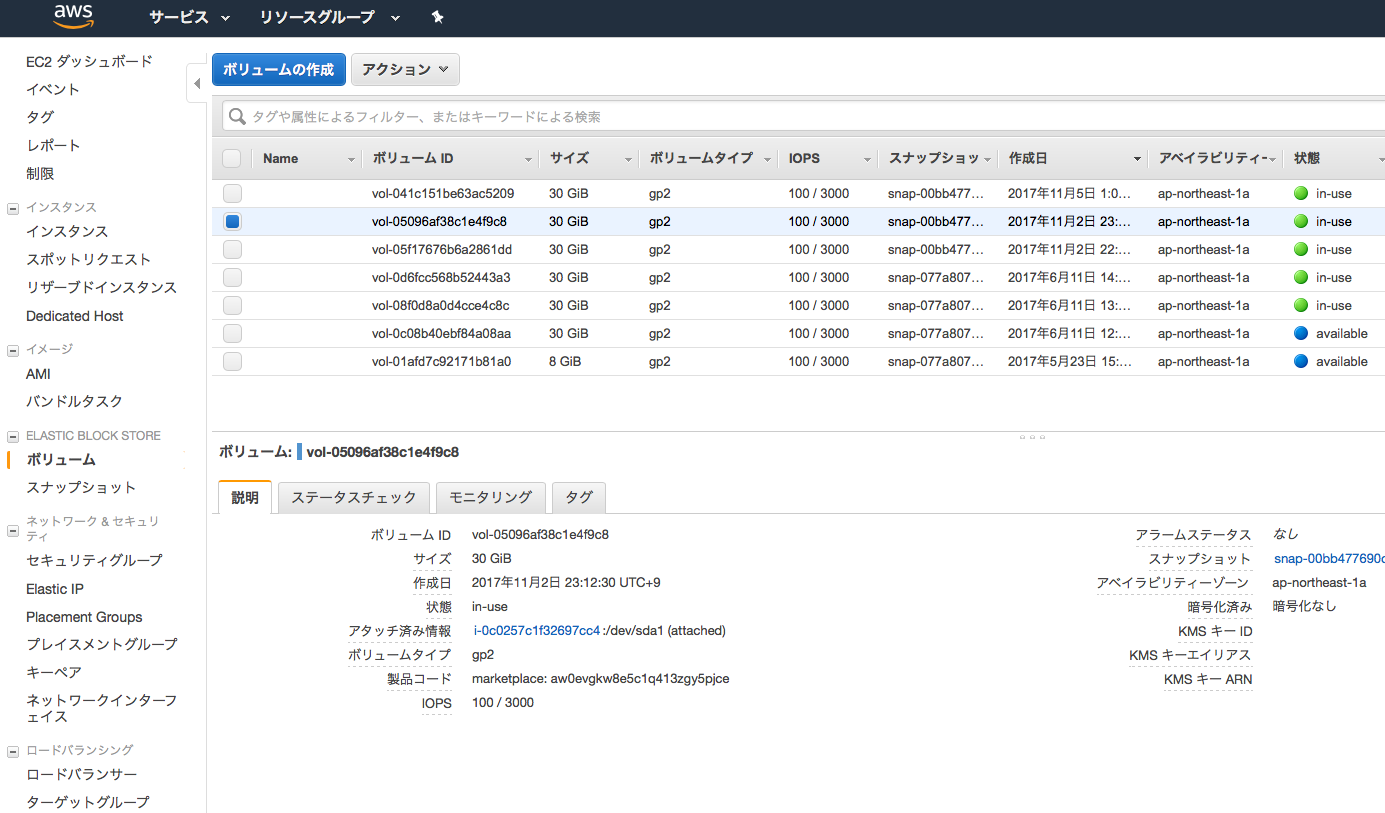
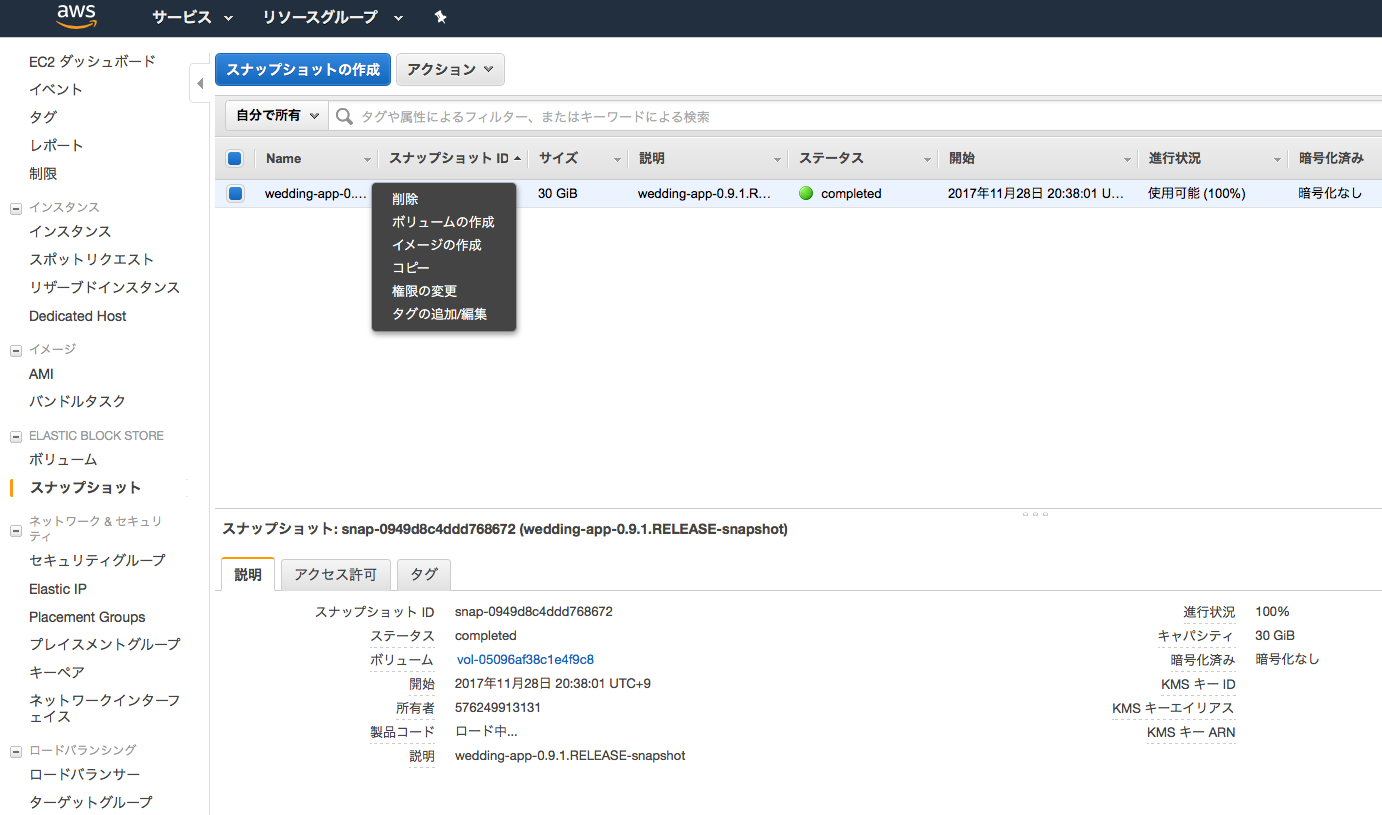
- 対象のストレージの確認
EC2コンソールメニューから、「ボリューム」を選択し、スナップショットを作成する対象のストレージを選択する。
Note
/dev/xvda はXenベースのLinuxシステムにおいて、1台目のハードディスクドライブを指す。
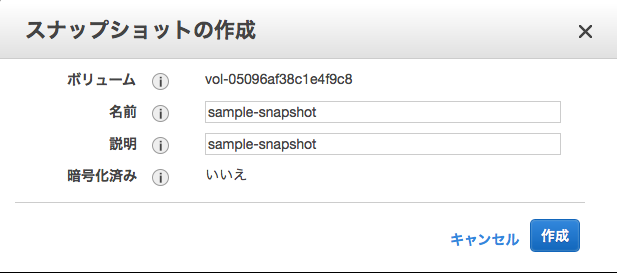
- スナップショットの作成
VolumeIDを右クリックし、「Create Snapshot」を選択する。
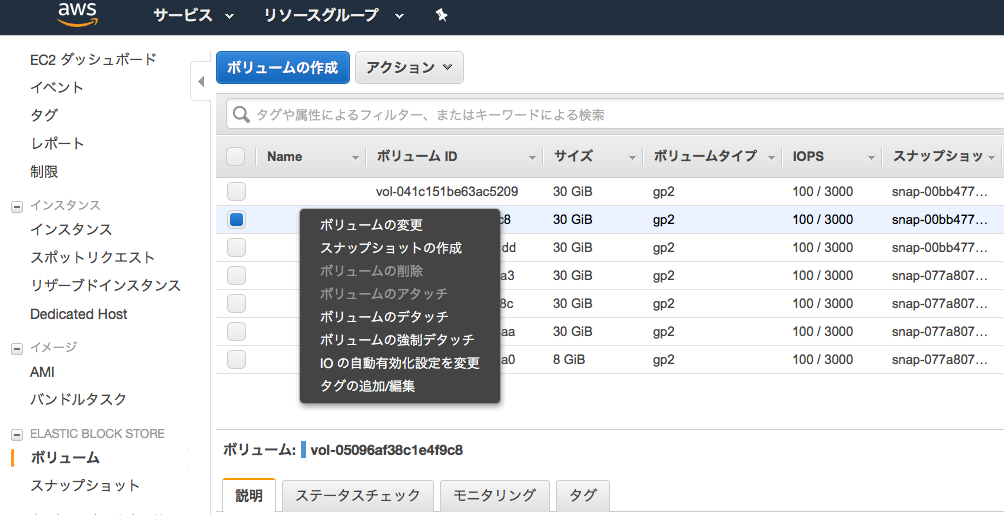
名称を入力する。
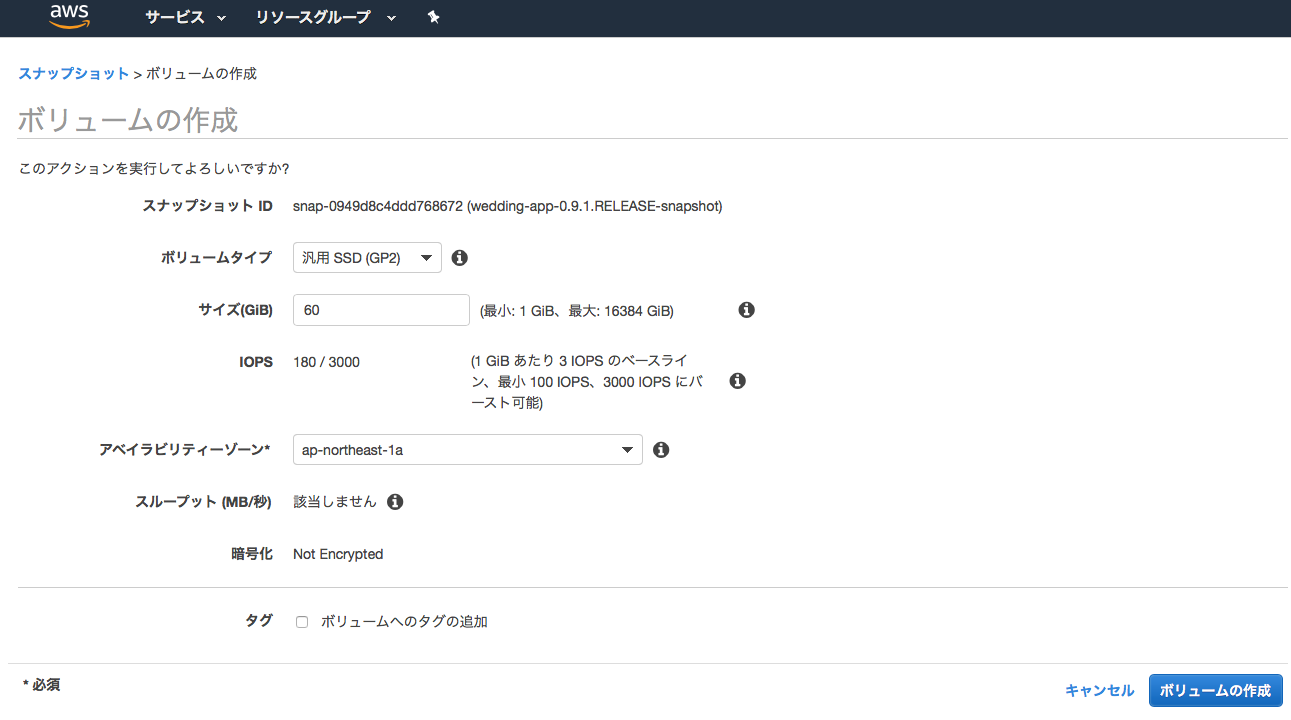
- EBSボリュームを作成する。
作成したスナップショットを右クリックし、「Create Volume」を選択する。
「ディスクの種類」、「ディスクの容量」、「アベイラビリティゾーンを選択する。」
Note
EBSボリュームは同一のアベイラビリティゾーンでしか利用できないため、実行するEC2インスタンスのアベイラビリティゾーンに応じて、作成するゾーンを決定する。
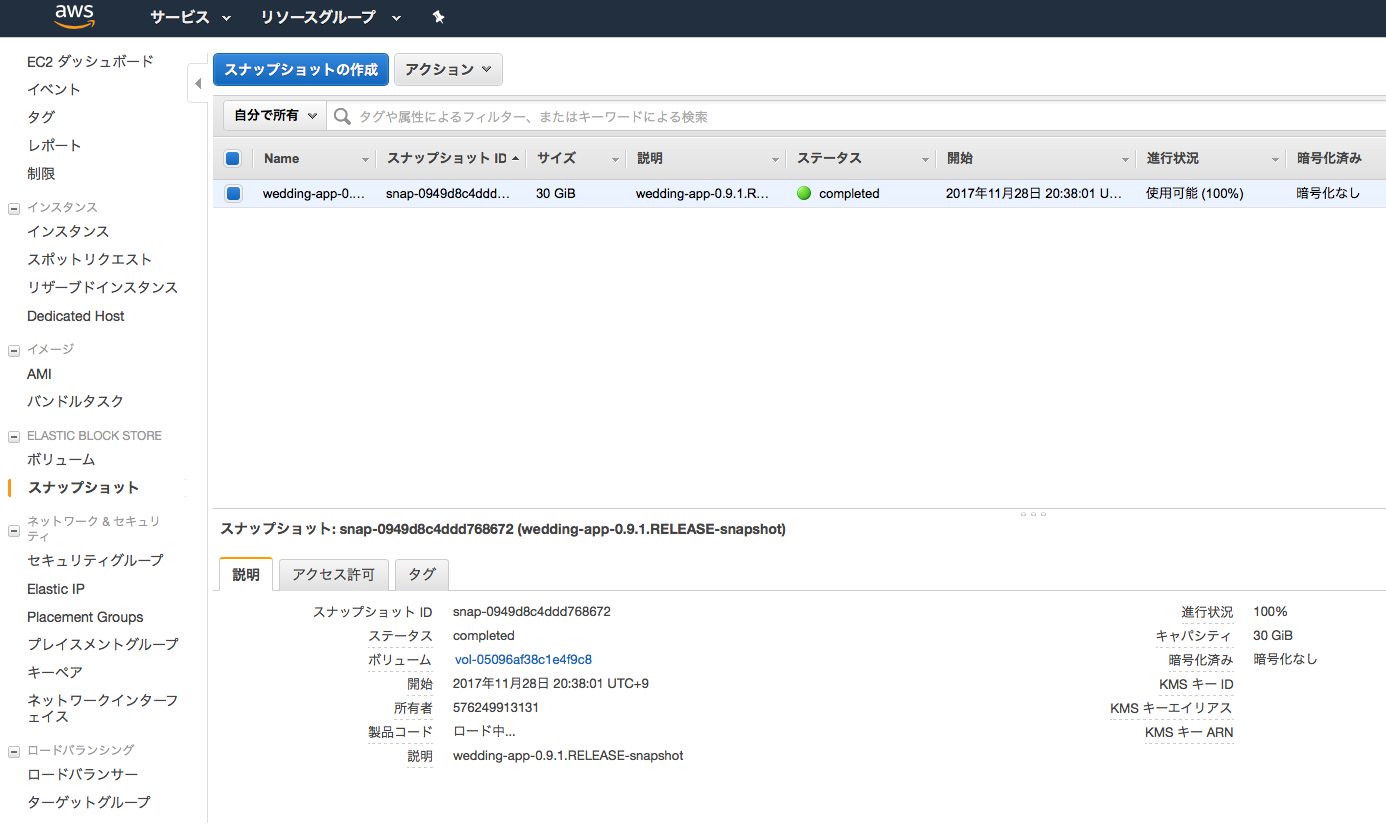
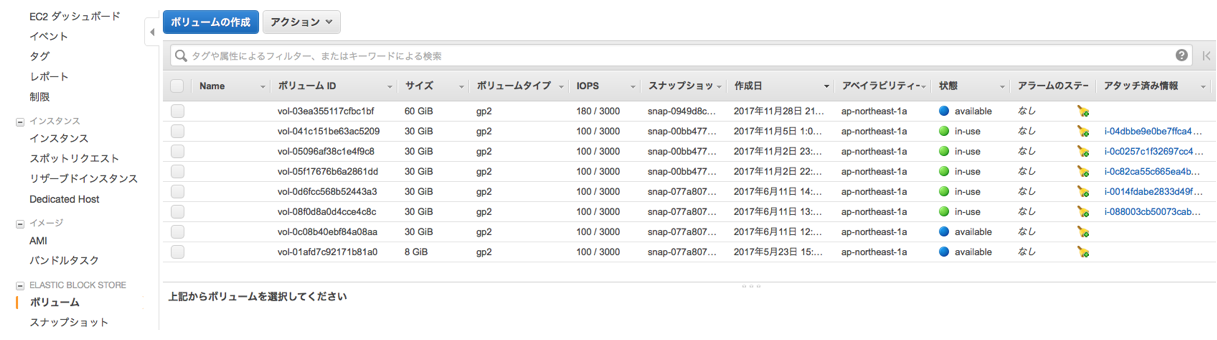
実行すると、ボリュームにEBSがステータスavailabilityで作成される。
Note
スナップショットの選択時に、右クリック「コピー」を選択すると、別のリージョンへボリュームをコピーできる。
Note
EBSスナップショットは * 差分(増分)バックアップ * 圧縮された状態で保存 * S3に3箇所複数される。 * ディスクサイズはフルサイズ表示となるが、実態は差分バックアップのため、サイズが必ずしも実際のデータサイズと一致しているわけではない。
EBSスナップショットからAMIの作成手順
スナップショットを作成したEBSがブート領域を含むのであれば(1台目のディスク)、AMIを作成できる。
- イメージの作成
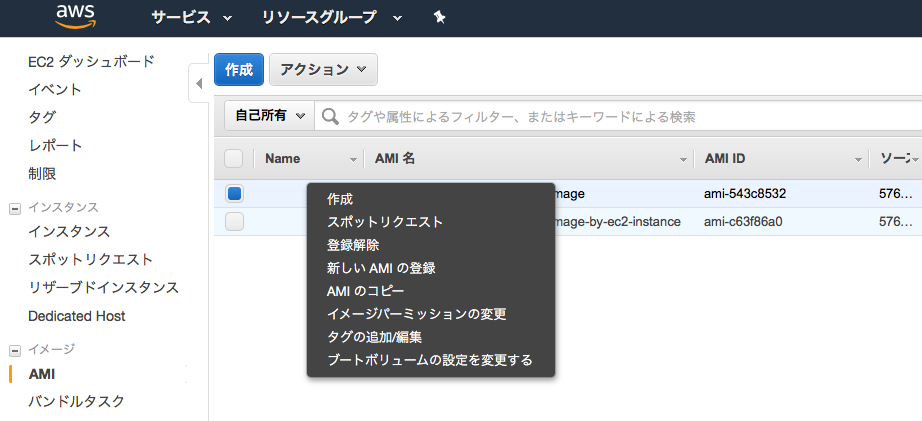
スナップショットを右クリック「イメージの作成」を選択する。
AMIの名称、説明、仮想マシンの種別を入力する。
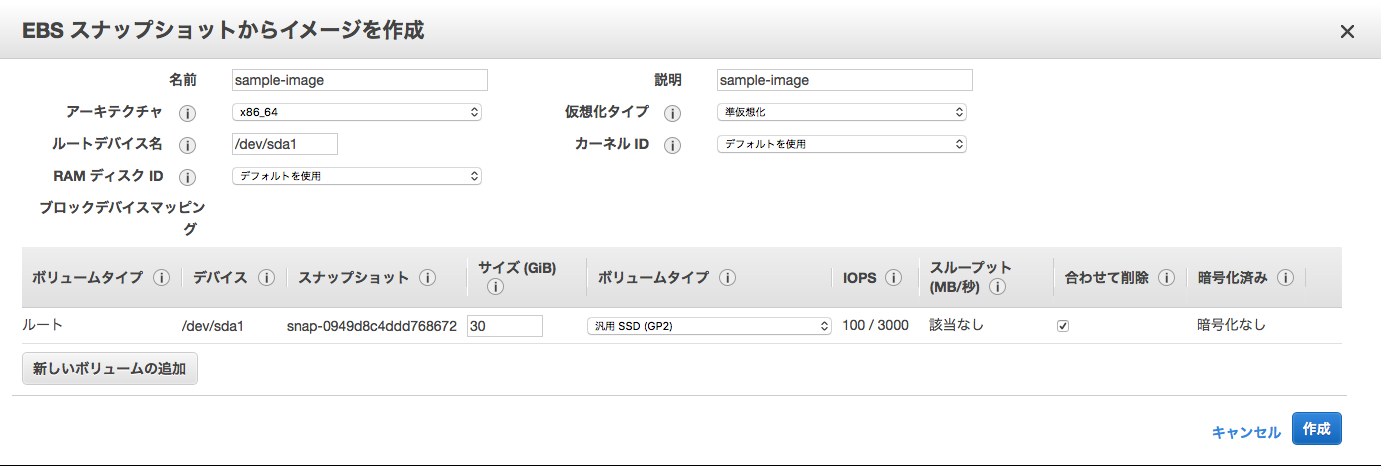
Note
T2インスタンスを使用する場合、「ハードウェアアシストの仮想化(Hardware-assisted virtualization)」を選択すること。
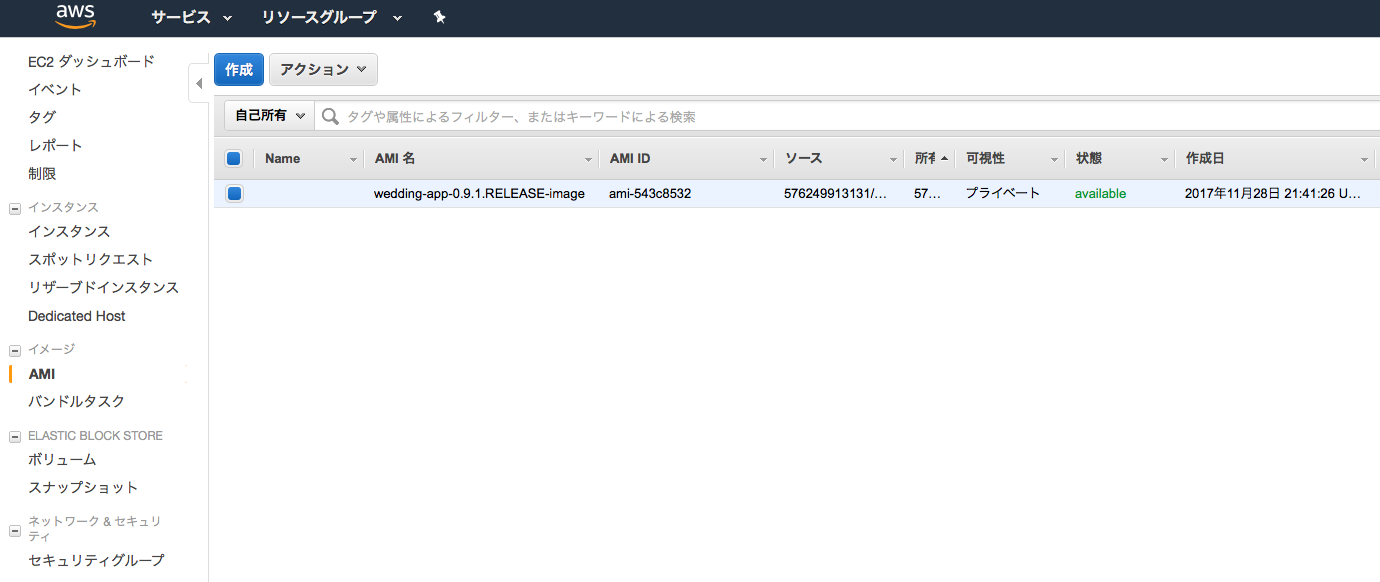
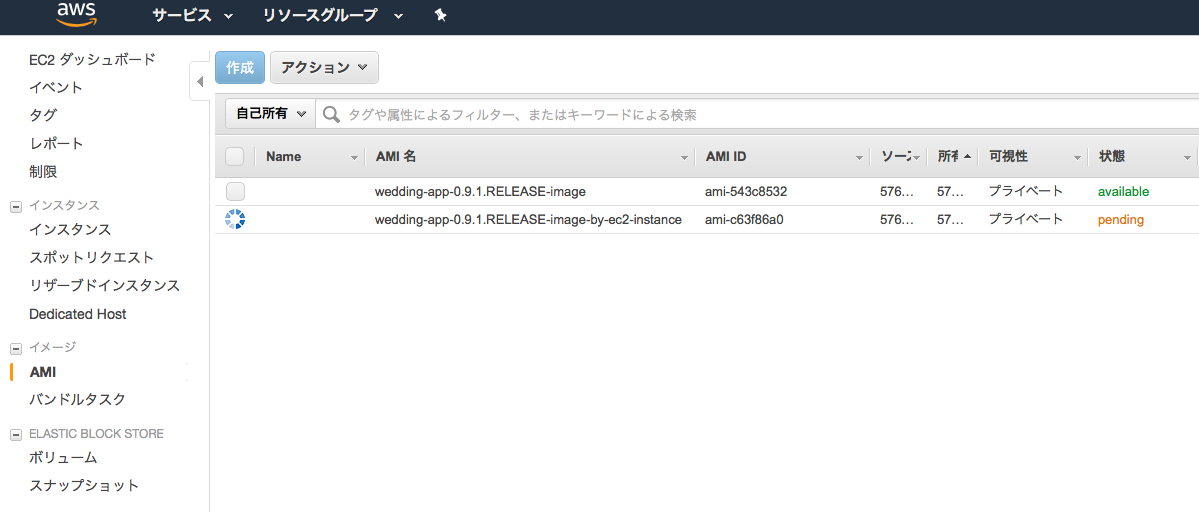
実行すると、AMIにイメージがステータスavailabilityで作成される。
同じ構成のEC2インスタンスを作成する
overview
前節「 EBSスナップショットからAMIの作成手順 」にて、EBSのスナップショットからAMIイメージを作成したが、 稼働中のEC2インスタンスからAMIイメージを作成できる。AMIからEC2インスタンスを作るときは、 CPUやメモリ構成も設定でき、スペックを任意に調整できる。
実行中EC2インスタンスからAMIの作成手順
- AMIイメージの作成
Warning
当オペレーションを実行すると、完全なディスクの複製を作成するために、実行中のEC2インスタンスが再起動するので注意。再起動したくない場合は、再起動しないオプションにチェックを入れて実行すること。
メニュー「インスタンス」から、右クリック「イメージの作成」を選択する。
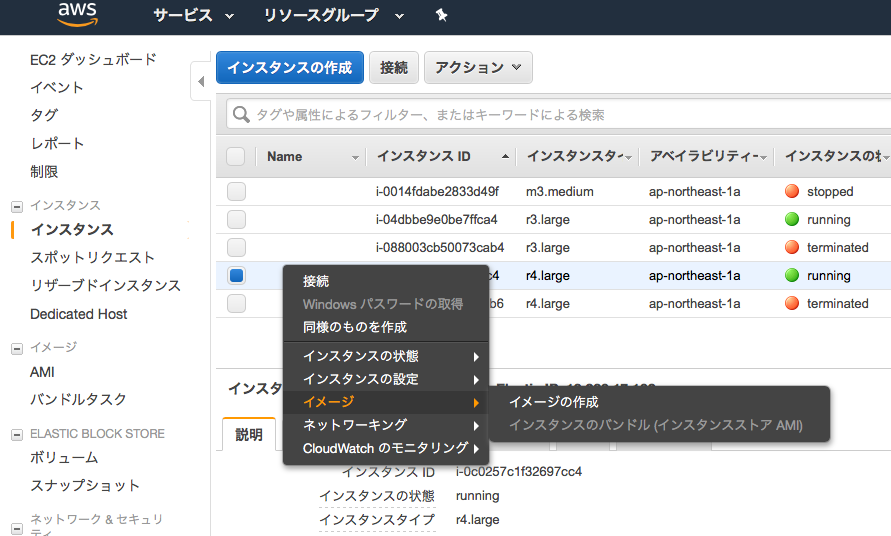
「 EBSスナップショットからAMIの作成手順 」と同様、AMIの名称、説明、仮想マシンの種別を入力する。
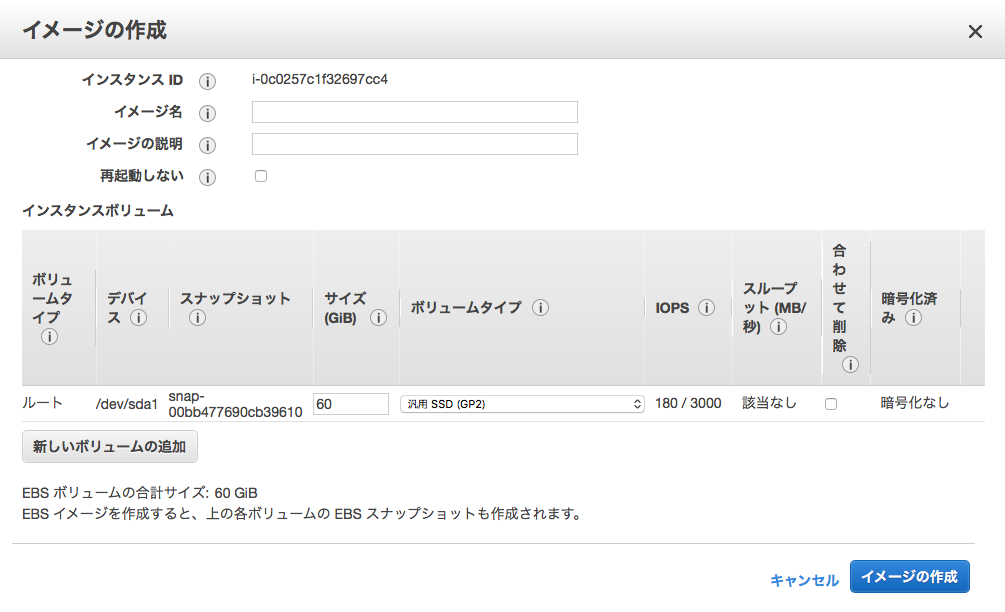
実行すると、AMIにイメージがステータスavailabilityで作成される。
CPUやメモリスペックを上昇させる
Todo
EC2インスタンス起動中にCPUやメモリスペックを変更する手順を記載する。
ディスク容量を増設する
overview
起動中のEC2インスタンスの容量が足りなくなった場合、以下のようなメッセージが表示される。
open /var/lib/docker/image/devicemapper/layerdb/tmp/layer-314207183/diff: no space left on device
dfコマンドでディスク残容量の確認は以下の通り可能であるが、ここでは、起動中のインスタンスのディスク増設する方法を記述する。
[centos@ip-XXX-XXX-XXX-XXX ~]$ df -h
Filesystem      Size  Used Avail Use% Mounted on
/dev/xvda1      8.0G  8.0G   52M 100% /
devtmpfs        7.4G     0  7.4G   0% /dev
tmpfs           7.4G     0  7.4G   0% /dev/shm
tmpfs           7.4G   17M  7.4G   1% /run
tmpfs           7.4G     0  7.4G   0% /sys/fs/cgroup
tmpfs           1.5G     0  1.5G   0% /run/user/1000
EC2ボリュームサイズの拡張
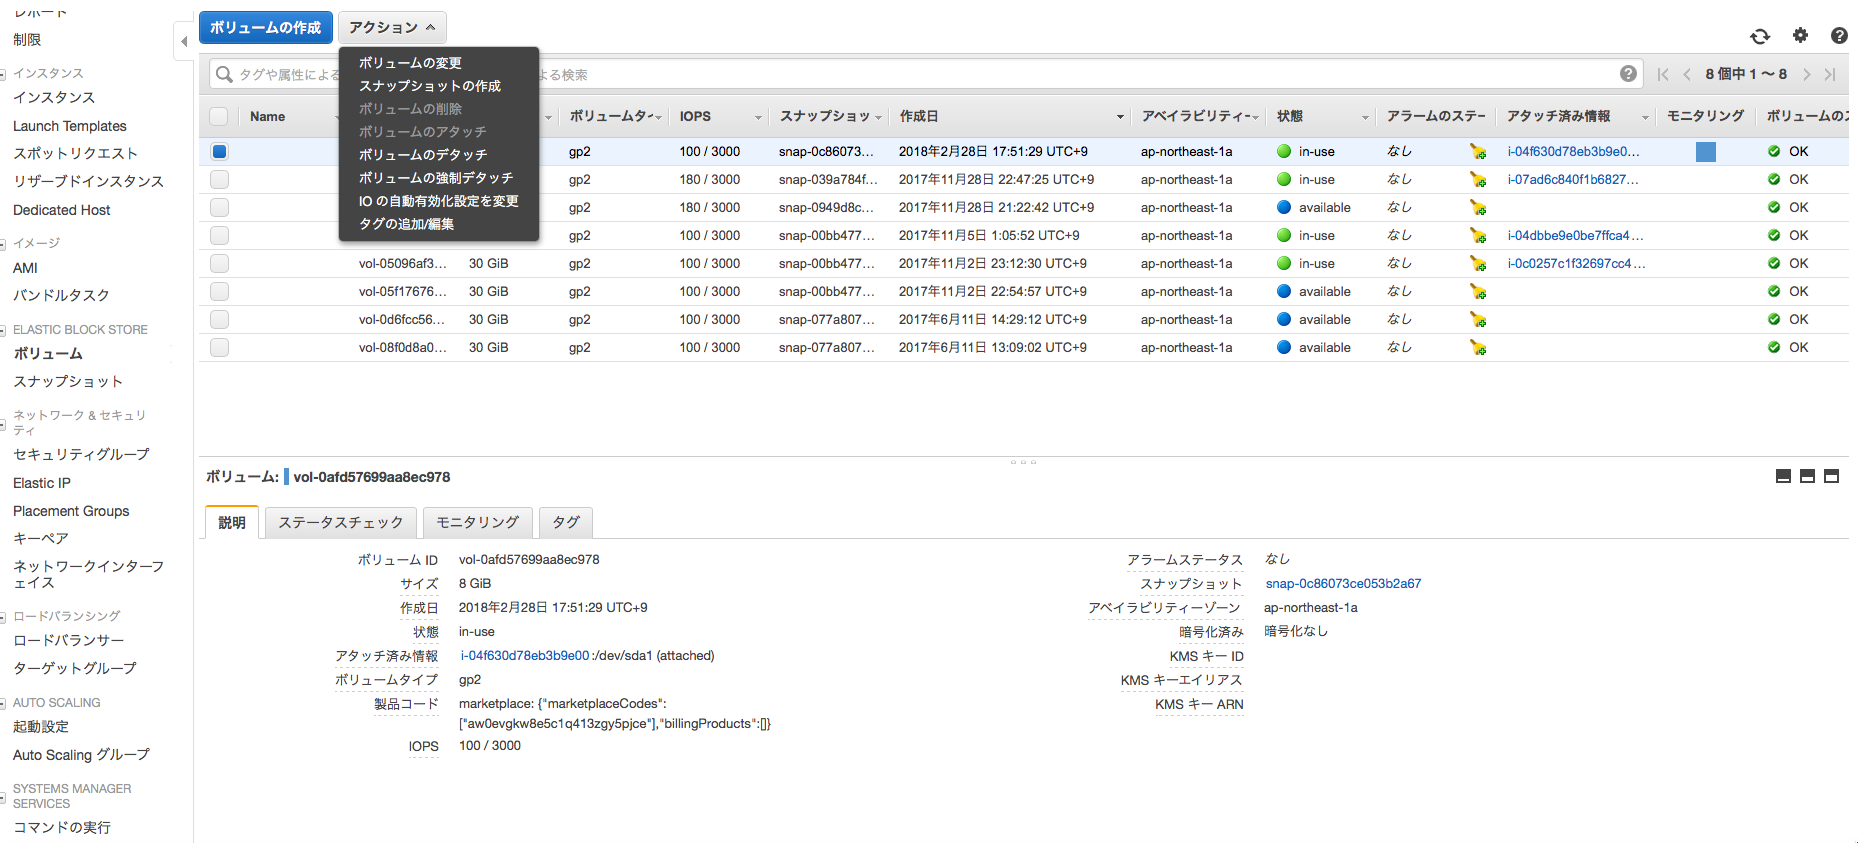
■EC2コンソールメニューからボリュームを選び、拡張したいインスタンスのボリュームを選択する。アクションメニューから、「ボリュームの変更」を選択する。
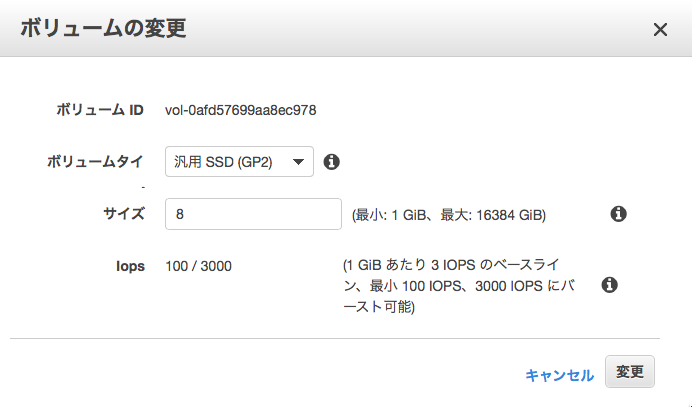
■ボリュームサイズを変更し、「変更」ボタンを押下する。

■EC2インスタンスにSSHでログインし、拡張したボリュームサイズにルートデバイスのパーティションを拡張させる。最初に、現状のディスクの状況を確認する。
# ルートデバイスのパーティションサイズを確認。
[centos@ip-XXX-XXX-XXX-XXX ~]$ lsblk
NAME                         MAJ:MIN RM  SIZE RO TYPE MOUNTPOINT
xvda                         202:0    0   50G  0 disk
└─xvda1                      202:1    0    8G  0 part /
loop0                          7:0    0  100G  0 loop
└─docker-202:1-12881694-pool 253:0    0  100G  0 dm
loop1                          7:1    0    2G  0 loop
└─docker-202:1-12881694-pool 253:0    0  100G  0 dm

# パーティションの占有状況を確認。

[centos@ip-XXX-XXX-XXX-XXX ~]$ df -TH
Filesystem     Type      Size  Used Avail Use% Mounted on
/dev/xvda1     xfs       8.6G  8.6G   58M 100% /
devtmpfs       devtmpfs  8.0G     0  8.0G   0% /dev
tmpfs          tmpfs     8.0G     0  8.0G   0% /dev/shm
tmpfs          tmpfs     8.0G   18M  8.0G   1% /run
tmpfs          tmpfs     8.0G     0  8.0G   0% /sys/fs/cgroup
tmpfs          tmpfs     1.6G     0  1.6G   0% /run/user/1000

# ファイルシステムの確認。

[centos@ip-XXX-XXX-XXX-XXX ~]$ sudo file -s /dev/xvd*
/dev/xvda:  x86 boot sector; partition 1: ID=0x83, active, starthead 32, startsector 2048, 16775168 sectors, code offset 0x63
/dev/xvda1: SGI XFS filesystem data (blksz 4096, inosz 512, v2 dirs)
Warning
AWSの公式ガイド では、XFSファイルシステムのディスク拡張はxfs_growfsコマンドを使用しているが、更新が行われなかったため、fdiskコマンドを使ってパーティションの再作成を行う方法で実施する。
■ fdiskコマンドを使用して、/dev/xvdaのパーティションを作成し直し、再起動する。
[centos@ip-XXX-XXX-XXX-XXX ~]$ sudo fdisk /dev/xvda
Welcome to fdisk (util-linux 2.23.2).

Changes will remain in memory only, until you decide to write them.
Be careful before using the write command.


Command (m for help): p

Disk /dev/xvda: 53.7 GB, 53687091200 bytes, 104857600 sectors
Units = sectors of 1 * 512 = 512 bytes
Sector size (logical/physical): 512 bytes / 512 bytes
I/O size (minimum/optimal): 512 bytes / 512 bytes
Disk label type: dos
Disk identifier: 0x000ae09f

Device Boot      Start         End      Blocks   Id  System
/dev/xvda1   *        2048    16777215     8387584   83  Linux

Command (m for help): d
Selected partition 1
Partition 1 is deleted

Command (m for help): n
Partition type:
p   primary (0 primary, 0 extended, 4 free)
e   extended
Select (default p): p
Partition number (1-4, default 1): 1
First sector (2048-104857599, default 2048):
Using default value 2048
Last sector, +sectors or +size{K,M,G} (2048-104857599, default 104857599):
Using default value 104857599
Partition 1 of type Linux and of size 50 GiB is set

Command (m for help): p

Disk /dev/xvda: 53.7 GB, 53687091200 bytes, 104857600 sectors
Units = sectors of 1 * 512 = 512 bytes
Sector size (logical/physical): 512 bytes / 512 bytes
I/O size (minimum/optimal): 512 bytes / 512 bytes
Disk label type: dos
Disk identifier: 0x000ae09f

Device Boot      Start         End      Blocks   Id  System
/dev/xvda1            2048   104857599    52427776   83  Linux

Command (m for help): w
The partition table has been altered!

Calling ioctl() to re-read partition table.

WARNING: Re-reading the partition table failed with error 16: Device or resource busy.
The kernel still uses the old table. The new table will be used at
the next reboot or after you run partprobe(8) or kpartx(8)
Syncing disks.

[centos@ip-XXX-XXX-XXX-XXX ~]$ reboot

# 再起動後、パーティションのサイズ変更を確認。
[centos@ip-XXX-XXX-XXX-XXX ~]$ df -TH
Filesystem     Type      Size  Used Avail Use% Mounted on
/dev/xvda1     xfs        54G  8.6G   46G  16% /
devtmpfs       devtmpfs  8.0G     0  8.0G   0% /dev
tmpfs          tmpfs     8.0G     0  8.0G   0% /dev/shm
tmpfs          tmpfs     8.0G   18M  8.0G   1% /run
tmpfs          tmpfs     8.0G     0  8.0G   0% /sys/fs/cgroup
tmpfs          tmpfs     1.6G     0  1.6G   0% /run/user/1000

[centos@ip-XXX-XXX-XXX-XXX ~]$ lsblk
NAME                         MAJ:MIN RM  SIZE RO TYPE MOUNTPOINT
xvda                         202:0    0   50G  0 disk
└─xvda1                      202:1    0   50G  0 part /
loop0                          7:0    0  100G  0 loop
└─docker-202:1-12881694-pool 253:0    0  100G  0 dm
loop1                          7:1    0    2G  0 loop
└─docker-202:1-12881694-pool 253:0    0  100G  0 dm
冗長化構成のアプリケーションをアップデートする
overview
ロードバランサーを使用して冗長化構成したアプリケーションをサービス停止せずにアップデートする。 片系のアプリケーションサーバをターゲットグループから除外した後、アプリケーションをアップデートし、 再度ターゲットグループに組み込む。その後もう片系のアプリケーションサーバを同様にターゲットグループから削除し、 アップデートを行い、組み戻しを行う。
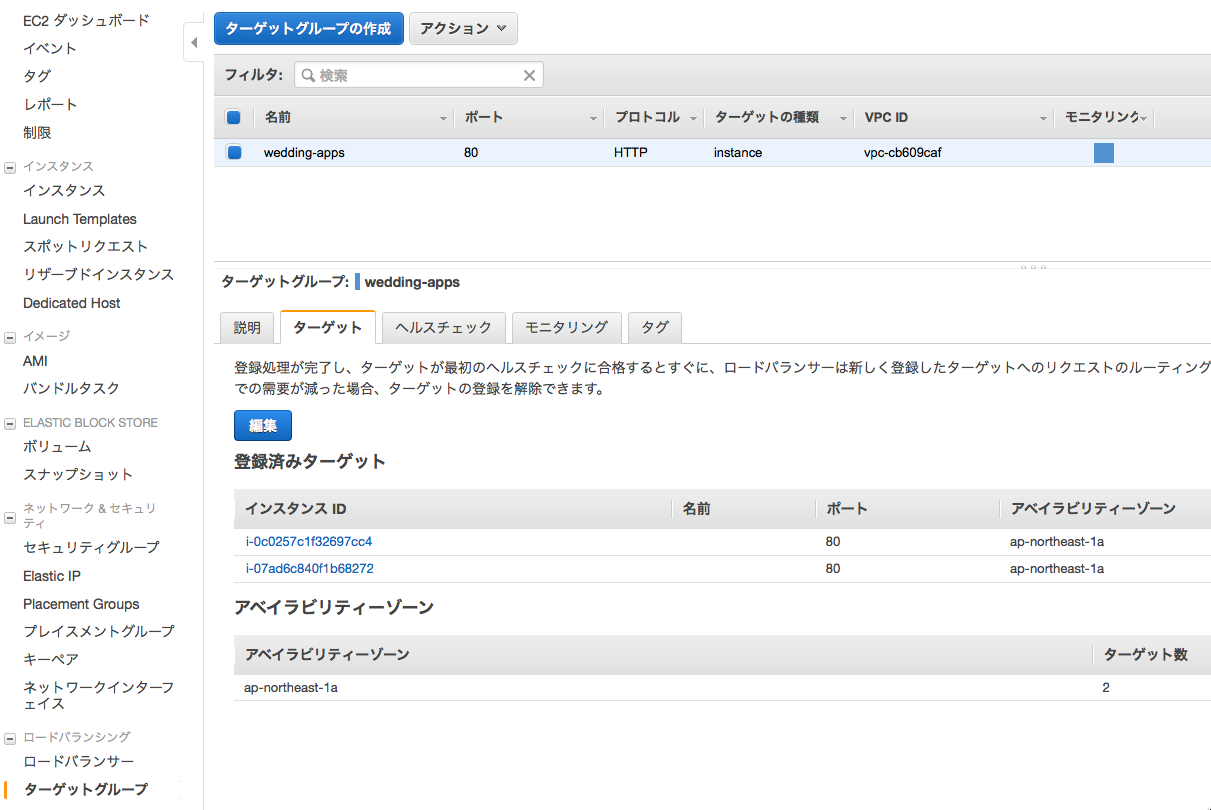
インスタンスのDrain
- APサーバのインスタンスをターゲットグループから除外
コンソールのメニュー「ターゲットグループ」にて、ターゲットタブから編集ボタンを押下する。
- アップデート対象のアプリケーションインスタンスを選択し、削除ボタンを押下する。
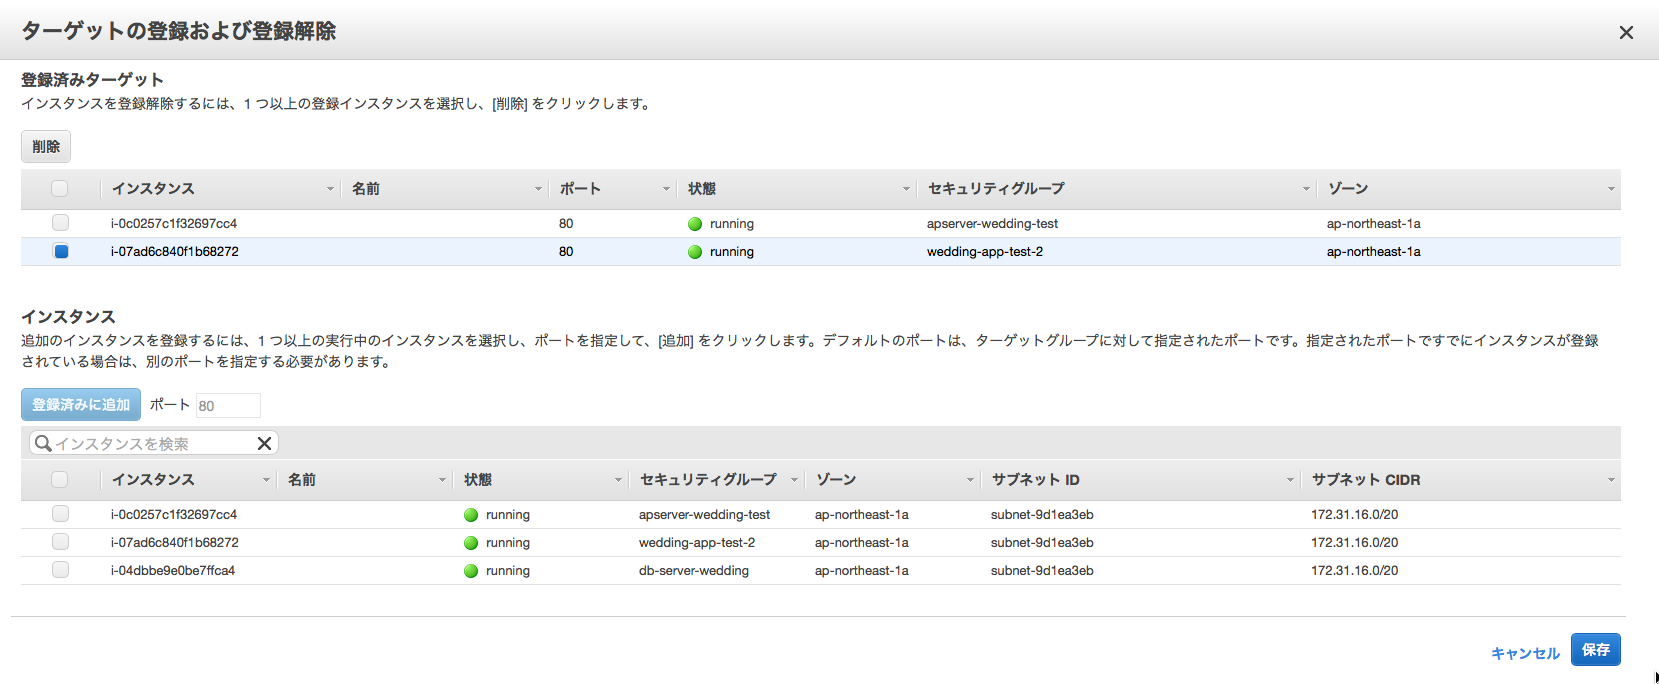
Note
削除したインスタンスはロードバランサーがターゲットのリクエストルーティングを即時指定するが、deregistration_delay.timeout_secondsとして設定した時間、Connection Dranining状態として、セッションが維持される。
CodeBuild
Overview
AWS CodeBuildはクラウドでアプリケーションのビルドを行う従量課金型サービスで、buildspec.ymlに記述した内容に従ってビルド実行する。 ビルドの元になるソースコードはS3に保存したものに加え、AWS CodeCommit、GitHub、BitBucketなどの各Gitベースのバージョン管理システムをサポートする。 Jenkins Agentでも同様の処理を行えるものの、クラウドでマネージドな環境下で行われるため、大規模開発でのコミットやプルリクエスト後のテスト、ビルド処理をマシンリソースを気にせず実行できることがメリットである。
アプリケーションのビルド
- サービスメニューから「CodeBuild」を選択し、「今すぐ始める」ボタンを押下する。
- ビルドプロジェクトの設定を行う。ここでは、GitHub上にコミットしたSpringBootベースのアプリケーション をビルドするため、以下の通り設定する。
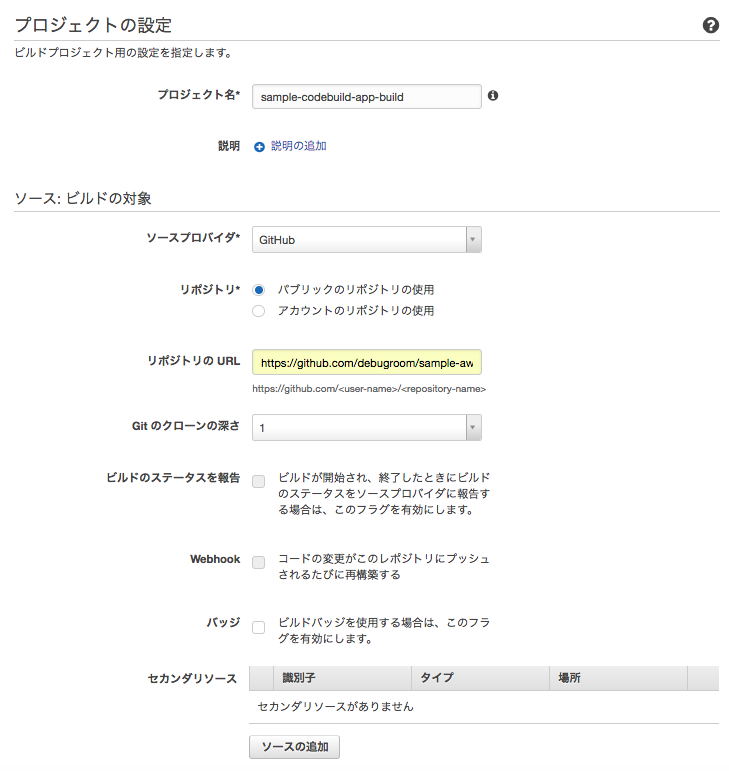
[プロジェクトの設定]
- プロジェクト名:任意のプロジェクト名を設定(ここではsample-codebuild-build-app)
[ソース:ビルドの対象]
- ソースプロバイダ:Github(ログインするOAuth認証があるため、適宜ログイン)
- レポジトリ:パブリックレポジトリ
- レポジトリのURL:https:github.com/<user-name>/<repository-name>で指定
- Gitのクローンの深さ:1(コミットされた最新履歴からのバージョン)
- WebHook:コードがコミットされるたび、ビルド指定したければチェック
- バッジ:ビルドバッジを有効化する場合チェック
Note
ソースコードレポジトリに応じて、リファレンスのソースプロバイダの表でXがついている箇所の設定 を参照すること
Note
ビルドバッジはビルドステータスを個別定義・明示化するオプションである。詳しくは リファレンス を参照のこと。
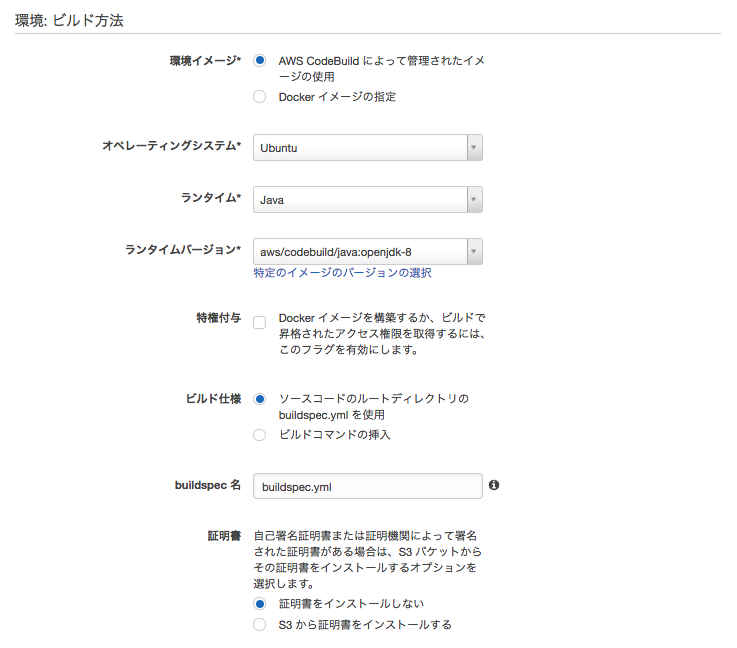
[環境:ビルド方法]
- 環境イメージ:AWS CodeBuildによって管理されたイメージの使用
- オペレーティングシステム:Ubuntu
- ランタイム:Java
- ランタイムバージョン:aws/codebuild/java:openjdk-8
- ビルド仕様:ソースコードのルートディレクトリのbuildspec.xmlを使用
- buildspec名:buildspec.xml
- 証明書:証明書をインストールしない
Note
buildspecはコミットしたアプリケーションのルートディレクトリに配置しておく。内容を以下の通り記述する。
version: 0.2

phases:
  build:
    commands:
      - echo Build started on `date`
      - mvn test
  post_build:
    commands:
      - echo Build completed on `date`
      - mvn package
artifacts:
  files:
    - target/sample-aws-codebuild-0.0.1-SNAPSHOT.jar

[アーティファクト:このビルドプロジェクトからアーティファクトを配置する場所]
- タイプ:アーティファクトなし
Note
ビルドテストのみを実行する場合や、コンテナへプッシュする場合は指定しなくて良い。
[キャッシュ]
- タイプ:キャッシュなし
Note
キャッシュを使用すると、S3に再利用可能なビルド環境が保存され高速化される。
[サービスロール]
- アカウントでサービスロールを作成
[VPC]
- NoVPC
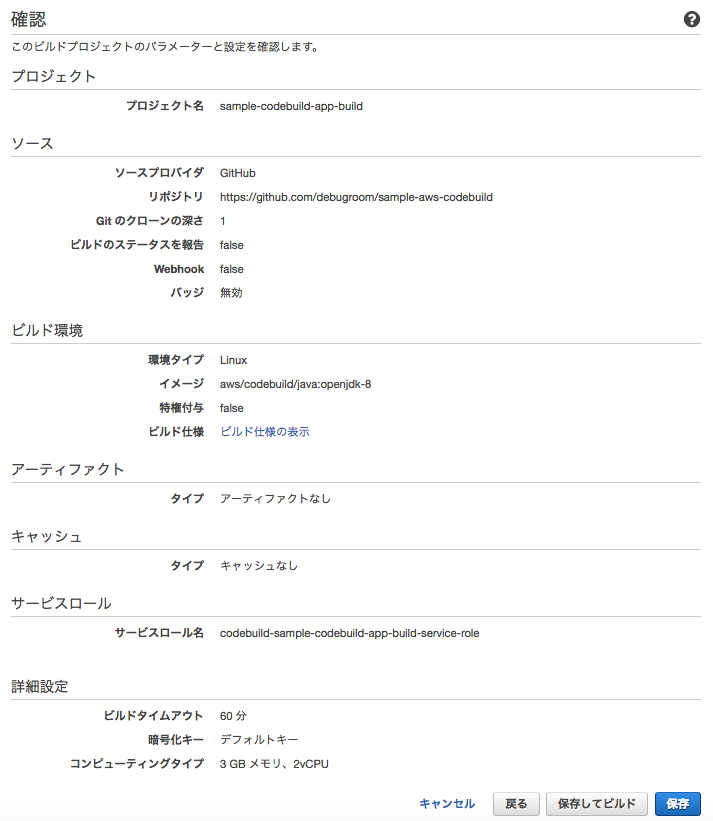
- 設定内容を確認し、「保存してビルド」ボタンを押下する。
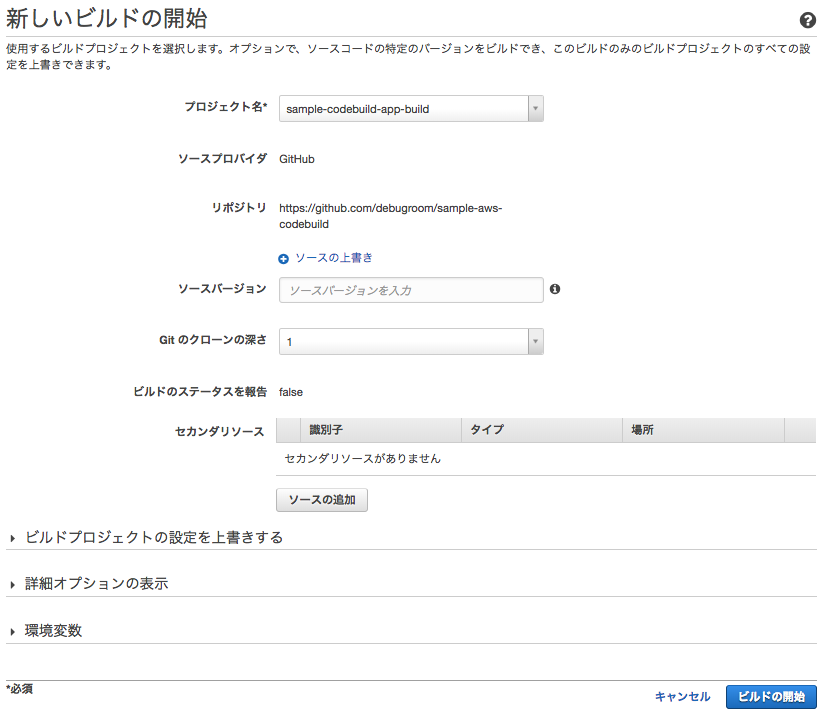
- ビルドの開始ボタンを押下する。
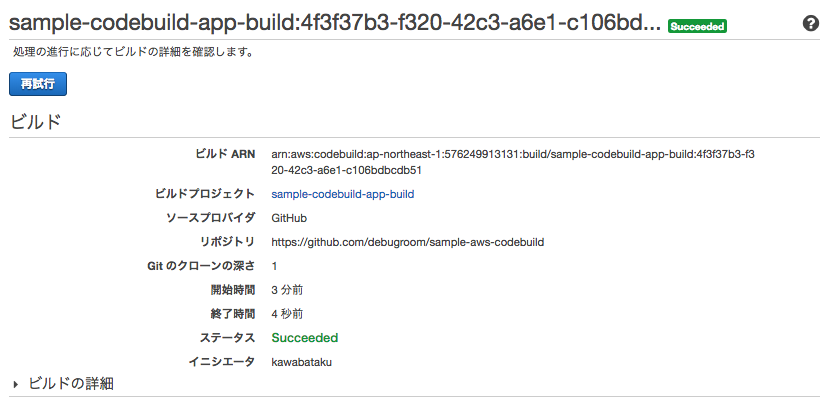
- ビルド結果を確認する。
CodeBuild Localの利用
2018年5月に、CodeBuildをローカル環境で動かすDockerイメージが公開された 。このサポートにより、Dockerがインストールされたマシンでbuildspec.ymlのデバッグやテストが可能である。
事前準備
CodeBuild Localを利用するには、事前に以下を実施しておく必要がある。
- 実際にビルド実行環境コンテナイメージ(DefaultではUbuntu)を作成
- 環境コンテナを起動するためのエージェントコンテナイメージをプル
なお、CodeBuild Localを実行する際は2のコンテナイメージをDocker runするかたちになるが、実行スクリプトが提供されているため、このスクリプトに1のコンテナイメージ名やアーティファクトの出力先フォルダ、認証情報など情報を渡して実行することになる。
Note
2のコンテナイメージを作成するためのDockerfileはAWSから公開されていない模様。
1の手順としては、公式サイト の手順に習い、ターミナルなどを使って、適当なディレクトリで、ビルド実行環境のコンテナイメージがあるaws-codebuild-docker-imagesのレポジトリをGit cloneする。 ビルド用のコンテナ(starndard:2.0)イメージを構築するDockerfileがあるディレクトリへ移動し、docker buildコマンドを実行する。
$ git clone https://github.com/aws/aws-codebuild-docker-images.git
$ cd aws-codebuild-docker-images
$ cd ubuntu/standard/2.0
$ docker build -t aws/codebuild/standard:2.0 .
続いて、2.環境コンテナを起動するためのエージェントコンテナイメージをプルする。
$ docker pull amazon/aws-codebuild-local:latest --disable-content-trust=false
CodeBuild Localの実行
Git cloneしたaws-codebuild-docker-imagesの中にlocal_builds/codebuild_build.shがあるので、buildspec.ymlがあるディレクトリへコピーする。 今回、buildspec.ymlとしては、マルチプロジェクト構成のMavenプロジェクトで、プロジェクトルート配下のcommonプロジェクトに対し、mvn packageコマンドを実行し、Sonarqubeへscan結果を送信するものを用いる。 なお、buildspec.ymlから環境変数として、SonarqubeServerのURL(SONAR_HOST_URL)とトークン(SONAR_LOGIN_COMMON)をAWS Systems Managerから取得する。なお、パラメータストアの設定は 標準パラメータストアの設定 を参照のこと。
Note
AWS Systems Managerパラメータストアを利用して環境変数を取得する場合、認証情報のユーザに権限を付与しておくこと。
version: 0.2
env:
  parameter-store:
    SONAR_HOST_URL: "SONAR_HOST_URL"
    SONAR_LOGIN: "SONAR_LOGIN_COMMON"
phases:
  install:
    runtime-versions:
      docker: 18
  build:
    commands:
      - mvn -f common/pom.xml package sonar:sonar -Dsonar.host.url=${SONAR_HOST_URL} -Dsonar.login=${SONAR_LOGIN}
artifacts:
  files:
    - common/target/mynavi-sample-continuous-integration-common-0.0.1-SNAPSHOT.jar
buildspec.ymlおよびcodebuild_build.shはcommonプロジェクト配下にあるが、CodeBuildによってGitHubからクローンされるビルド対象のアプリケーションソースコードのルートディレクトリ(ビルドコマンドを実行するディレクトリ)を起点として、コピーしたcodebuild_build.shにオプションパラメータを与えて実行する。
$ common/codebuild_build.sh -i aws/codebuild/standard:2.0 -a common/target/ -c -b common/buildspec.yml
なお、上記で実行したスクリプトの各オプションの説明は以下の通り。
| オプション | 説明 |
| iオプション(必須) | 事前準備で作成したCodeBuildでビルドするコンテナイメージを指定する。 |
| aオプション(必須) | アーティファクトを出力するディレクトリを指定する。 |
| cオプション | AWS認証情報を指定する(デフォルトでは~/.aws/credentialsの認証情報が使用される) |
| bオプション | buildspec.ymlを指定する。 |
スクリプトを実行すると、以下の通り、CodeBuildがローカルのDocker環境で実行されるようになる。
Build Command:

docker run -it -v /var/run/docker.sock:/var/run/docker.sock -e "IMAGE_NAME=aws/codebuild/standard:2.0" -e "ARTIFACTS=/Users/kawabatakouhei/Documents/repos/git/debugroom/mynavi-sample-continuous-integration/common/target/" -e "SOURCE=/Users/kawabatakouhei/Documents/repos/git/debugroom/mynavi-sample-continuous-integration" -e "BUILDSPEC=/Users/kawabatakouhei/Documents/repos/git/debugroom/mynavi-sample-continuous-integration/common/buildspec.yml" -e "AWS_CONFIGURATION=/Users/kawabatakouhei/.aws" -e "INITIATOR=kawabatakouhei" amazon/aws-codebuild-local:latest

Removing agent-resources_build_1 ... done
Removing agent-resources_agent_1 ... done
Removing network agent-resources_default
Removing volume agent-resources_source_volume
Removing volume agent-resources_user_volume
Creating network "agent-resources_default" with the default driver
Creating volume "agent-resources_source_volume" with local driver
Creating volume "agent-resources_user_volume" with local driver
Creating agent-resources_agent_1 ... done
Creating agent-resources_build_1 ... done
Attaching to agent-resources_agent_1, agent-resources_build_1
agent_1  | [Container] 2019/06/27 19:25:01 Waiting for agent ping

// omit

agent_1  | [INFO] ------------------------------------------------------------------------
agent_1  | [INFO] BUILD SUCCESS
agent_1  | [INFO] ------------------------------------------------------------------------
agent_1  | [INFO] Total time:  03:09 min
agent_1  | [INFO] Finished at: 2019-06-27T19:29:04Z
agent_1  | [INFO] ------------------------------------------------------------------------
agent_1  |
agent_1  | [Container] 2019/06/27 19:29:04 Phase complete: BUILD State: SUCCEEDED
agent_1  | [Container] 2019/06/27 19:29:04 Phase context status code:  Message:
agent_1  | [Container] 2019/06/27 19:29:04 Entering phase POST_BUILD
agent_1  | [Container] 2019/06/27 19:29:04 Phase complete: POST_BUILD State: SUCCEEDED
agent_1  | [Container] 2019/06/27 19:29:04 Phase context status code:  Message:
agent_1  | [Container] 2019/06/27 19:29:04 Expanding base directory path: .
agent_1  | [Container] 2019/06/27 19:29:04 Assembling file list
agent_1  | [Container] 2019/06/27 19:29:04 Expanding .
agent_1  | [Container] 2019/06/27 19:29:04 Expanding artifact file paths for base directory .
agent_1  | [Container] 2019/06/27 19:29:04 Assembling file list
agent_1  | [Container] 2019/06/27 19:29:04 Expanding common/target/mynavi-sample-continuous-integration-common-0.0.1-SNAPSHOT.jar
agent_1  | [Container] 2019/06/27 19:29:04 Found 1 file(s)
agent_1  | [Container] 2019/06/27 19:29:04 Preparing to copy secondary artifacts
agent_1  | [Container] 2019/06/27 19:29:04 No secondary artifacts defined in buildspec
agent_1  | [Container] 2019/06/27 19:29:04 Phase complete: UPLOAD_ARTIFACTS State: SUCCEEDED
agent_1  | [Container] 2019/06/27 19:29:04 Phase context status code:  Message:
CodePipeline
Overview
CodePipelineはアプリケーションのソースコードコミット→テスト→ビルド→ステージングデプロイ→プロダクションデプロイといった一連のソフトウェアリリースプロセスを自動化し、継続的インテグレーション・デリバリを実現するツールである。 CodeCommitやS3、CodeBuild、CodeDeployといったAWSリソースはもちろんのこと、GitHubやJenkins、DockerHubとも連携し、アプリケーションの構築にかかる一連の流れを自動化できる。
ECSアプリケーションのステージングリリースの自動化
ここでは、CodePipeLineを使って、SpringBootベースのアプリケーションをGitHub上にソースコードコミットし、Dockerコンテナを用いてテスト・ビルドを行い、構築したアプリケーションコンテナを、DockerHub上にプッシュした後、EC2起動型のECSステージング環境へのデプロイする作業を自動化する設定例を記述する。 なお、Dockerコンテナを使用したテスト・ビルドについては前章「 CodeBuild 」で実行した通り、AWS CodeBuildを利用する。
事前準備
CodePipeLineでステージング環境へのリリースを自動化する設定を行う前に、以下を準備しておく。
- リリースするSpringBootアプリケーション及びCodeBuild設定
- ステージング環境とするEC2起動型のECSコンテナ環境の構築
- ロードバランサーの設定
上記のポイントについて順次記載する。
- リリースするSpringBootアプリケーション及びCodeBuildの設定
最終的なソースコードは GitHub 上にコミットしているが、 ルートディレクトリの配下にCodeBuildで使用するbuildspec.ymlと、buildspec.yml内でDockerコマンドで実行されるビルド用のDockerfileを作成しておく。 なお、各環境変数のパラメータはCodePipelineの設定時に指定する。
version: 0.2

phases:
  pre_build:
    commands:
#      - echo Logging in to Amazon ECR...
#      - $(aws ecr get-login --no-include-email --region $AWS_DEFAULT_REGION)
      - echo Logging in to Docker Hub...
      - docker login -u $USER -p $PASSWORD $DOCKER_REPO
  build:
    commands:
      - echo Build started on `date`
      - echo Building the Docker image...
      - docker build -t $IMAGE_REPO_NAME:$IMAGE_TAG .
#    - docker tag $IMAGE_REPO_NAME:$IMAGE_TAG $AWS_ACCOUNT_ID.dkr.ecr.$AWS_DEFAULT_REGION.amazonaws.com/$IMAGE_REPO_NAME:$IMAGE_TAG
      - docker tag $IMAGE_REPO_NAME:$IMAGE_TAG $IMAGE_REPO_NAME:$IMAGE_TAG
  post_build:
    commands:
      - echo Build completed on `date`
      - echo Pushing the Docker image...
#      - docker push $AWS_ACCOUNT_ID.dkr.ecr.$AWS_DEFAULT_REGION.amazonaws.com/$IMAGE_REPO_NAME:$IMAGE_TAG
      - docker push $IMAGE_REPO_NAME:$IMAGE_TAG
      - printf '[{"name":"sample-aws-codepipeline","imageUri":"%s"}]' $IMAGE_REPO_NAME:$IMAGE_TAG > imagedefinitions.json
artifacts:
  files:
    - imagedefinitions.json
Note
buildspec.yml内では、コンテナをDockerHubへプッシュした後に、ECSコンテナの構築でコンテナイメージをPullするために必要な「imagedefinitions.json」を出力している。 タスク定義で指定するコンテナ名とURLをJSON形式で表現したファイルである。
Warning
「imagedefinitions.json」で”name”指定する値は、ECSタスク定義名ではなく、タスク定義で定義したコンテナ名を設定する必要がある。
Dockerfileは最終的にECSコンテナのイメージとなる。CentOS7をベースとして、JDKとMavenをインストールし、対象のソースコードをクローンしてビルドした後、タイムゾーンとロケールを変更してアプリケーションを実行する。
# Dockerfile for sample service using embedded tomcat server

FROM centos:centos7
MAINTAINER debugroom

RUN yum install -y \
    java-1.8.0-openjdk \
    java-1.8.0-openjdk-devel \
    wget tar iproute git

RUN wget http://repos.fedorapeople.org/repos/dchen/apache-maven/epel-apache-maven.repo -O /etc/yum.repos.d/epel-apache-maven.repo
RUN sed -i s/\$releasever/6/g /etc/yum.repos.d/epel-apache-maven.repo
RUN yum install -y apache-maven
ENV JAVA_HOME /etc/alternatives/jre
RUN git clone https://github.com/debugroom/sample-aws-codepipeline.git /var/local/sample-aws-codepipeline
RUN mvn install -f /var/local/sample-aws-codepipeline/pom.xml

RUN rm -f /etc/rpm/macros.image-language-conf && \
    sed -i '/^override_install_langs=/d' /etc/yum.conf && \
    yum -y reinstall glibc-common && \
    yum clean all

ENV LANG="ja_JP.UTF-8" \
    LANGUAGE="ja_JP:ja" \
    LC_ALL="ja_JP.UTF-8"

RUN cp /etc/localtime /etc/localtime.org
RUN ln -sf  /usr/share/zoneinfo/Asia/Tokyo /etc/localtime

EXPOSE 8080

CMD java -jar -Dspring.profiles.active=production /var/local/sample-aws-codepipeline/target/sample-aws-codepipeline-0.0.1-SNAPSHOT.jar
Note
説明は割愛するが、アプリケーションは、http://<loadbalancerのURL>/aws-code-pipeline/api/v1/usersでユーザの一覧を返すAPIを持つアプリケーションで、テストコードを含めコミットしている。
- ステージング環境とするEC2起動型のECSコンテナ環境の構築
「 Elastic Container Service 」で構築したECSクラスタ、ロードバランサを利用する。ECSタスク定義・サービス定義は、アプリケーションを一度CodePipelineでビルド設定した後に行うため、ECSクラスタ・ロードバランサはそのまま利用し、アプリケーションの振り分け先であるターゲットグループのみ新規作成しておく。
EC2のサービスメニュー > ターゲットグループを選択し、「ターゲットグループの作成」を押下して、以下のように入力してターゲットグループを作成する。
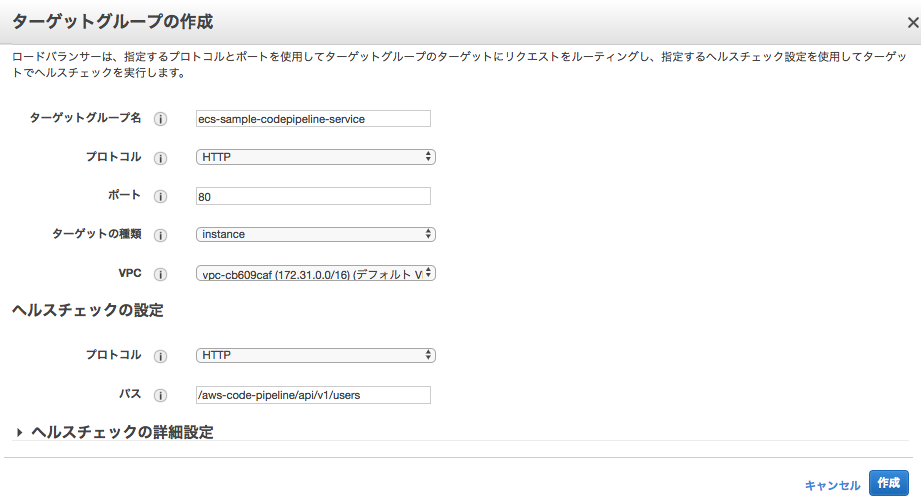
- ターゲットグループ名:任意
- プロトコル:HTTP
- ポート:80
- VPC:任意(あらかじめ作ったもの)
[ヘルスチェックの設定]
- プロトコル:HTTP
- パス:http://<loadbalancerのURL>/aws-code-pipeline/api/v1/users(アプリケーションの正常応答するURL)
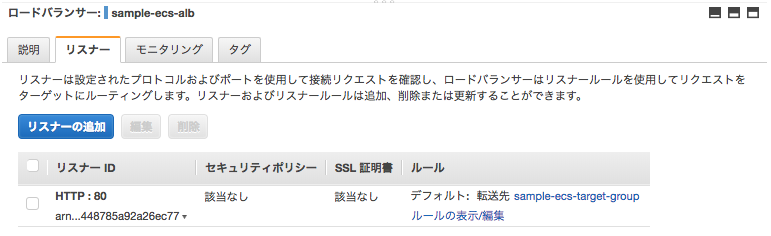
- ロードバランサの設定
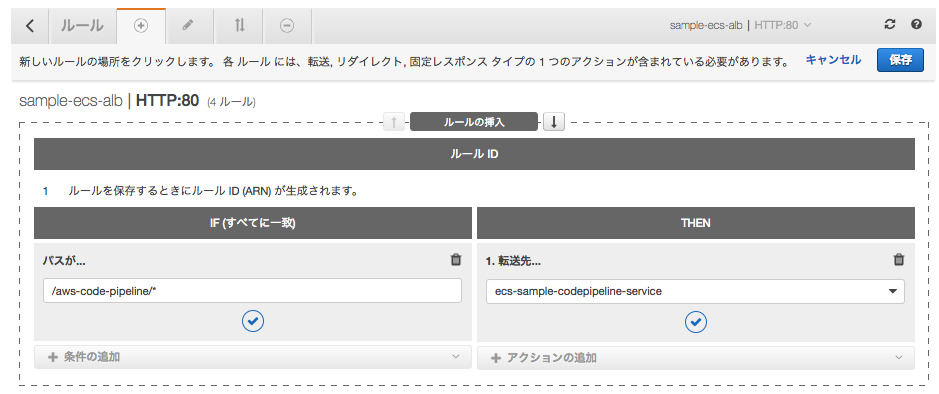
作成したアプリケーションのURLのパスが来た場合に、上記で作成したターゲットグループへ振り分けられるよう設定を行う。
EC2サービスメニュー > ロードバランサーを選択し、指定するロードバランサーを選んで、リスナータブで「ルールの表示/編集」を選択する。
プラスボタンを押下してルールを追加する。
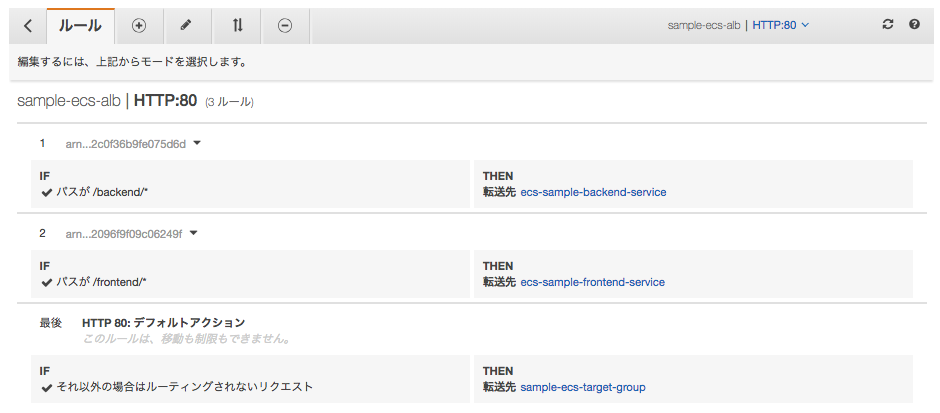
作成したアプリケーションのパスルールに一致したら、上記で作成したターゲットグループに向くよう設定しておく。
CodePipeLineの設定(ソース・ビルド)
ステージング環境へのリリースまで設定するためには一度、ECSのタスク定義と、サービス設定をおこなっていく必要があるため、 まずCodePipeLineでGitHubからソースコードコミットし、Dockerコンテナでテスト・ビルド後、DockerHubへプッシュするところまでを設定し、起動する。
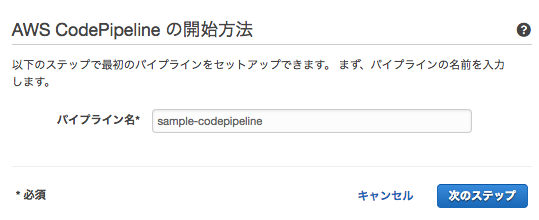
■サービス「CodePipeline」を選択し、「今すぐ始める」ボタンを押下する。
■パイプライン名を任意に設定し、「次のステップへ」ボタンを押下する。
■ソースプロバイダをGitHubに設定し、GitHubに接続した後、レポジトリ及びブランチを指定する。
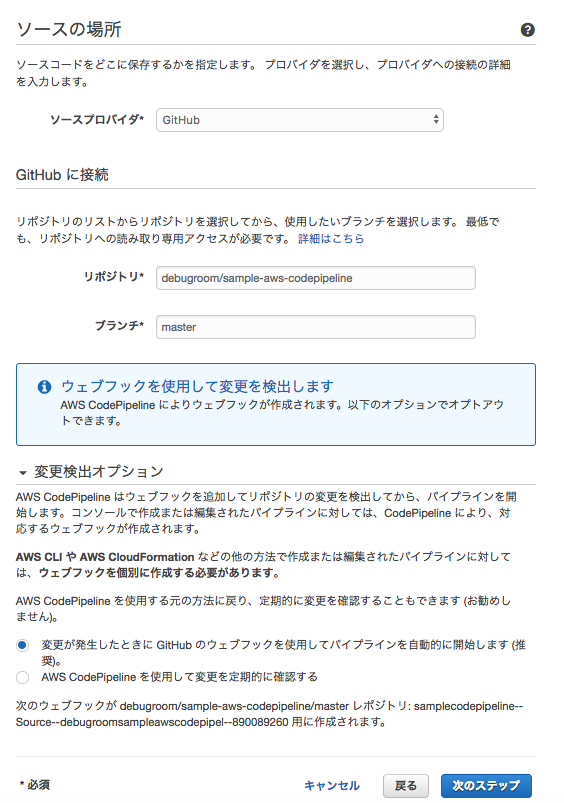
Note
上記のサンプルでは、masterブランチを指定しているが、実際の環境ではmasterブランチをproductionに、developブランチをstagingなどに設定することを推奨する。
■ビルドプロバイダに「AWS CodeBuild」を選択し、以下の通り、設定する。
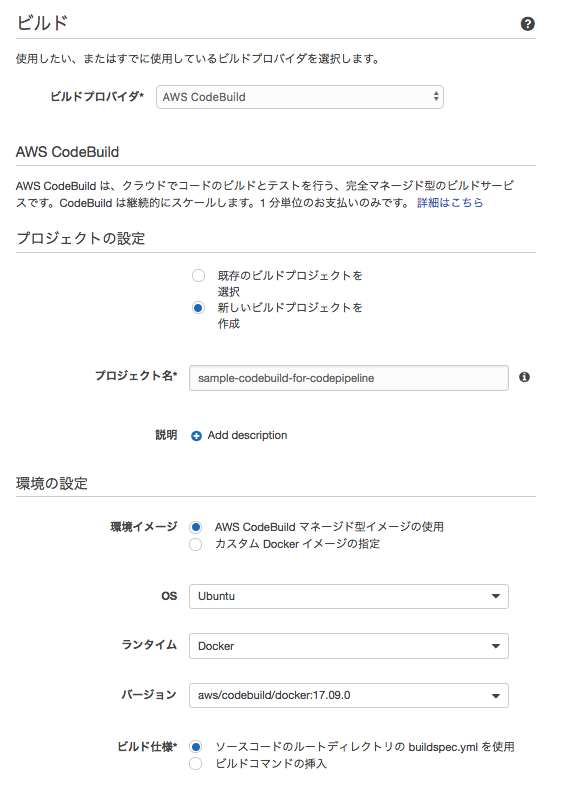
[プロジェクトの設定]
- 新しいビルドプロジェクトを選択
- プロジェクト名:任意のプロジェクト名を設定
[環境の設定]
- 環境イメージ:AWS CodeBuildマネージド型イメージの使用
- OS:Ubuntu
- ランタイム:DOCKER
- バージョン:aws/codebuild/docker:YY.MM.X
- ビルド仕様:ソースコードのルートディレクトリのbuildspec.ymlを使用
Note
ここで指定しているDocker環境はECSコンテナをビルドするための設定のため、Ubuntuを使用する設定で問題ない。
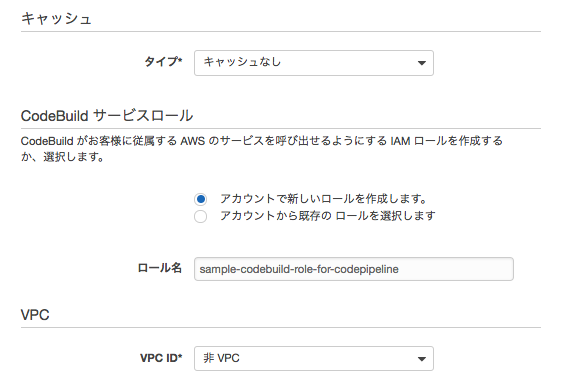
[キャッシュ]
- タイプ:キャッシュ指定なし
[コンテナサービスロール]
- アカウントで新しいロールを作成します。
- ロール名:任意の名前を設定
[VPC]
- VPC ID:非VPC
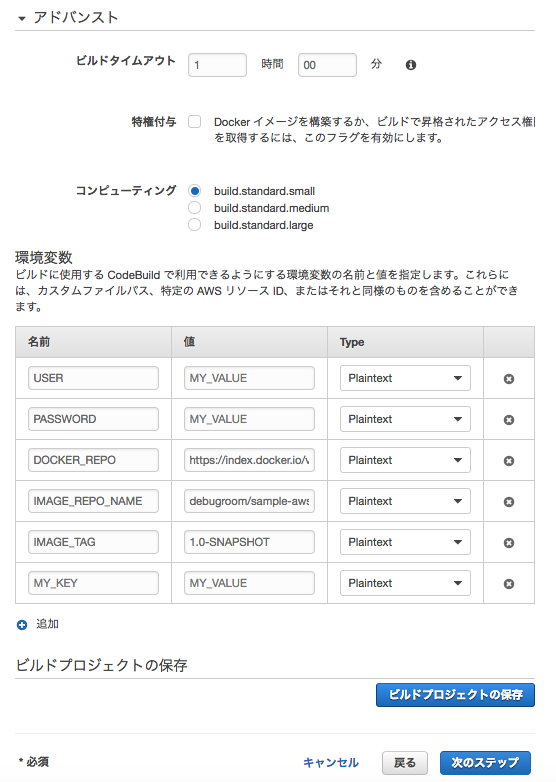
[アドバンスト]
- ビルドタイムアウト:1時間
- コンピューティング:build.standard.small
Note
コンテナのローリングアップデートに時間を要する場合があるので、ある程度タイムアウトの時間を確保しておく
[環境変数] 「 事前準備 」で作成したDockerfileの実行に必要な環境変数を設定。
- USER:DockerHubにログインするユーザ名
- PASSWORD:DockerHubにログインするユーザのパスワード
- DOCKER_REPO:DockerHubのURL
- IMAGE_REPO_NAME:Dockerイメージ名
- IMAGE_TAG:イメージタグ(バージョン)
Note
DockerHubのURLは、省略しても良いがデフォルトは https://index.docker.io/v1/ である。
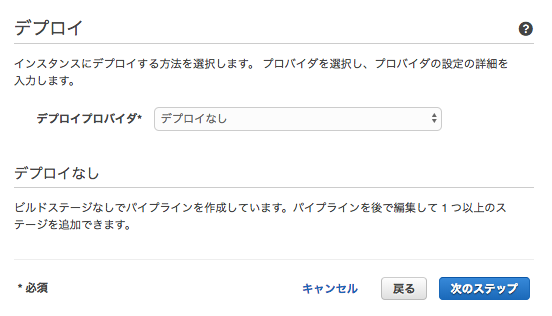
■デプロイプロバイダには「デプロイなし」を指定し、「次のステップ」ボタンを押下する。
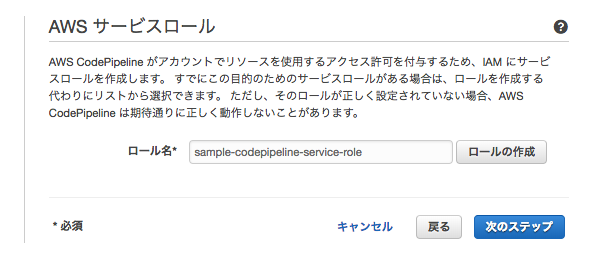
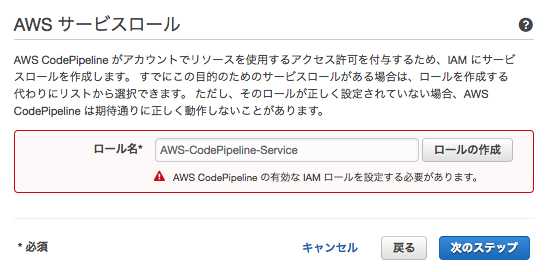
■任意のロール名を入力し、「ロールの作成」ボタンを押下して、サービスロールを作成し、「次のステップ」を押下する。
Note
適切な権限を持つロールを設定しないとエラーになるので注意
■設定内容を確認し、「パイプラインの作成」を押下する。
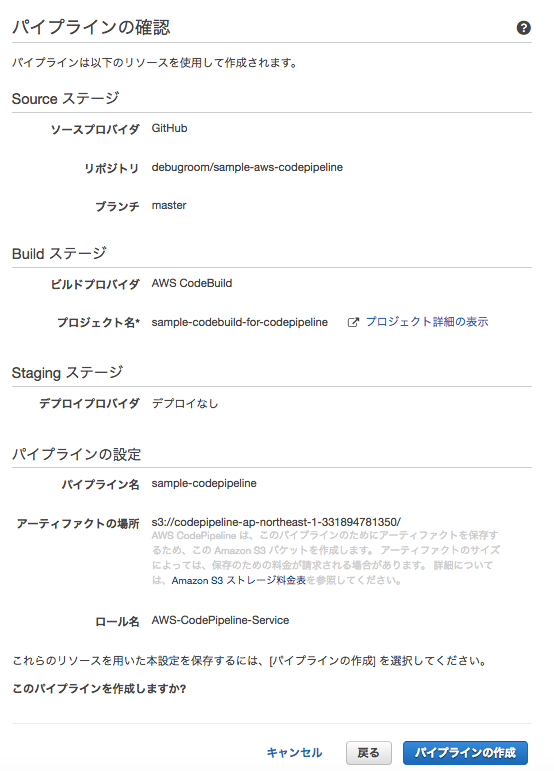
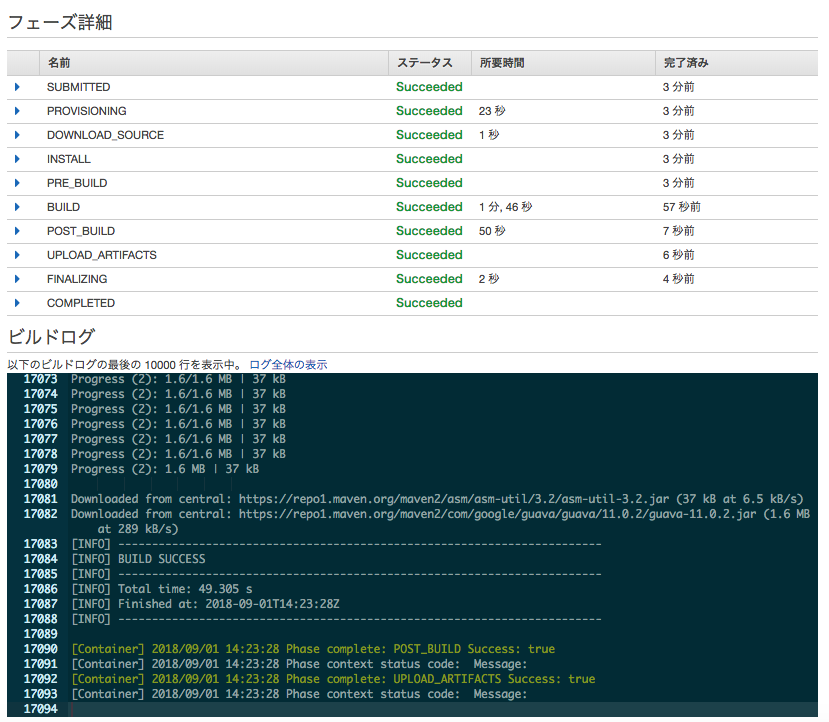
■ソースコードがチェックアウトされ、コンテナのビルドが実行される。正常終了すると、DockerHubにコンテナイメージがプッシュされる。

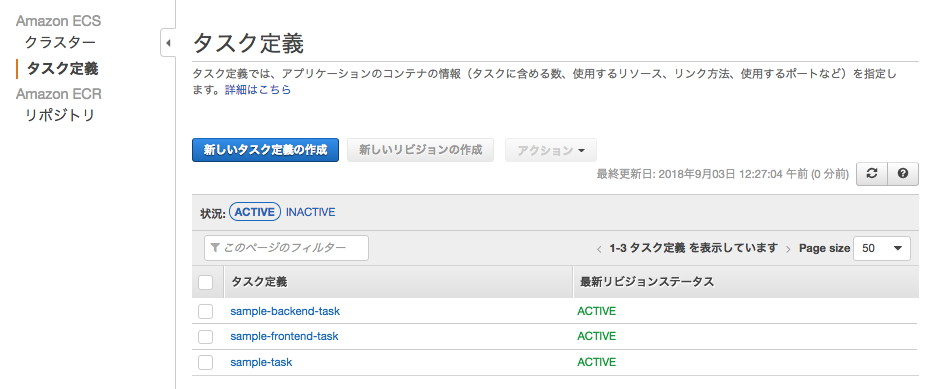
ECSタスク定義
プッシュしたコンテナイメージの設定情報からECSのタスク定義を行う。CodepipeLineが実行されるたび、ECSタスクのリビジョンがアップデートされる形となる。
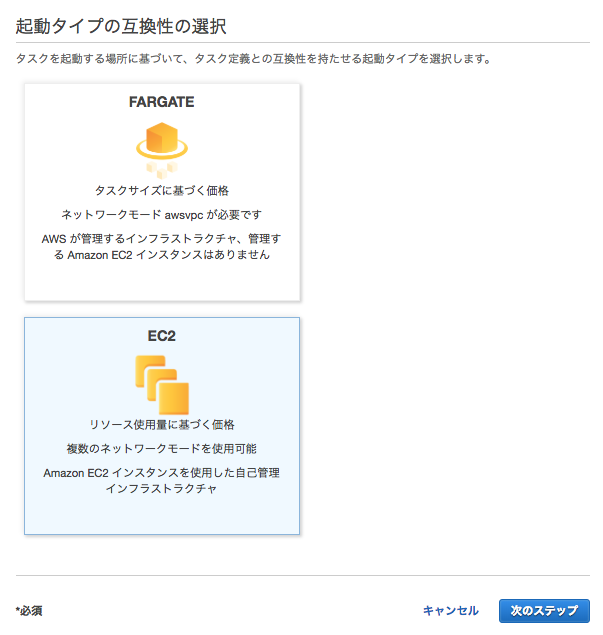
■ECSサービスメニューから、タスク定義を選択し、「新しいタスク定義の作成」ボタンを押下する。
■起動モードはEC2を選択する。
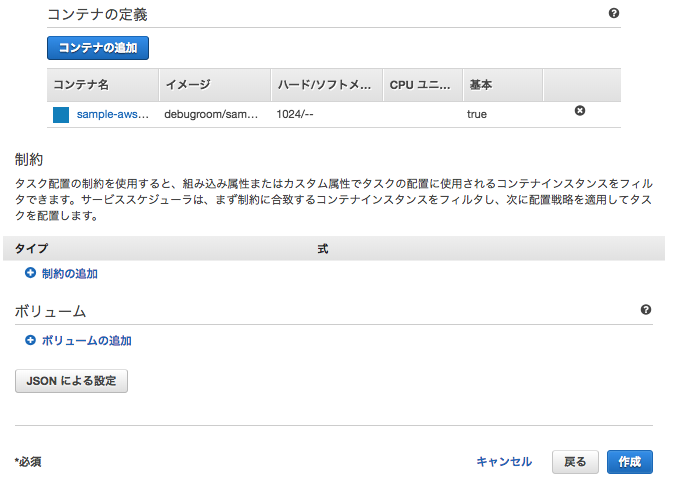
■タスクとコンテナの定義について以下の通り、設定を行う。
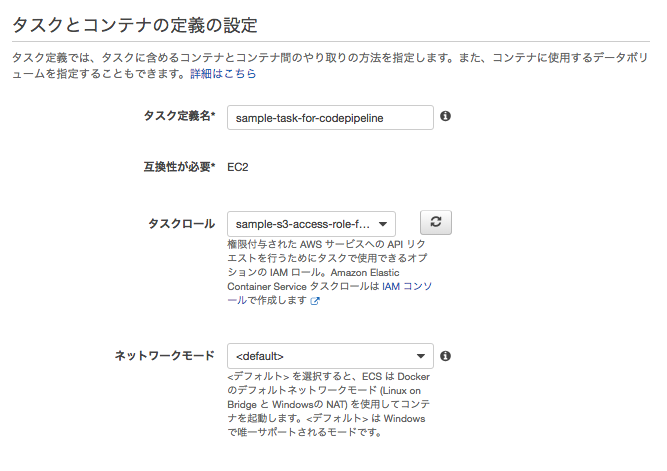
[タスクとコンテナの定義の設定]
- タスク定義名:任意
- タスクロール:任意(ECSアプリケーションが必要な権限を設定)
- ネットワークモード:デフォルト
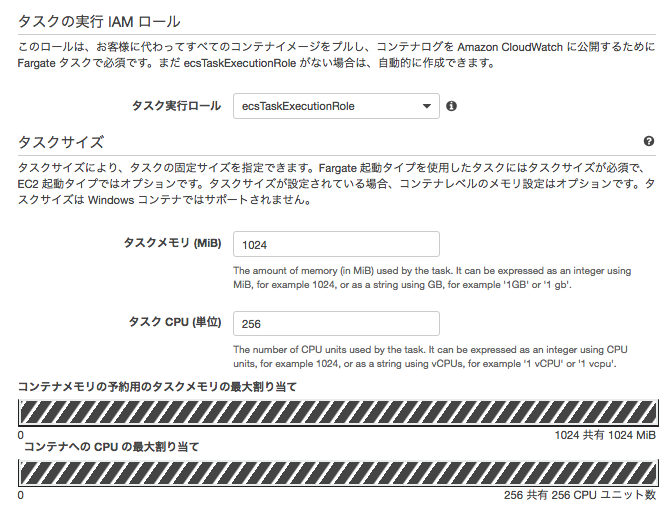
[タスクの実行のIAMロール]
- タスク実行ロール: EC2起動型-タスクの定義 で作成したECS Task用のIAM ロールを設定。
[タスクサイズ]
- タスクメモリ:1024MiB
- タスクCPU:256
Warning
Spring Boot Applicationで構成する場合は1GB以上のメモリを割り当てておくこと。512MB程度で起動すると、アプリケーションの規模が多くなったときに、起動に時間がかかり、ヘルスチェックでエラー検出し、コンテナの無限ループ起動を誘発してしまうため。
■ コンテナ定義を以下の通り設定する。
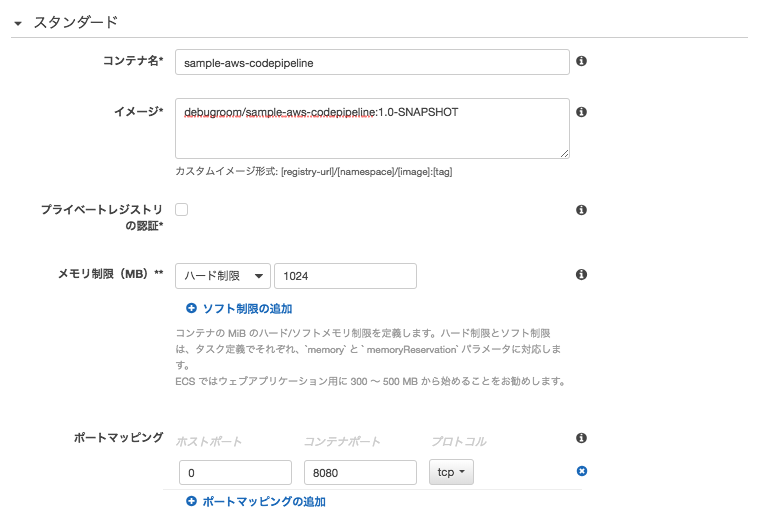
[スタンダード]
- コンテナ名:任意
- イメージ:前章で作成したコンテナイメージのURL・タグ名を指定
- メモリ制限:1024MiB
- ポートマッピング
- ホストポート:0
- コンテナポート:8080
Warning
コンテナ名は 事前準備 のbuildspec.ymlで指定した、imagedefinitions.jsonのname属性の値と同じにしておく必要がある。
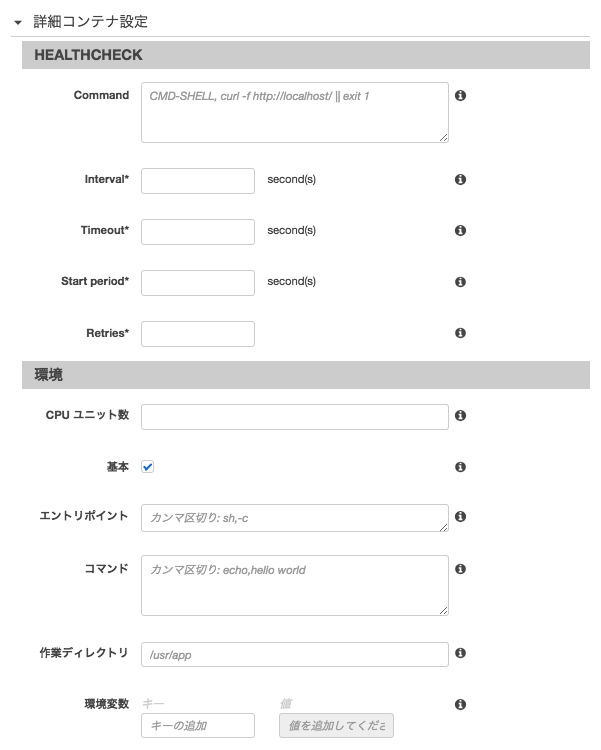
[詳細コンテナの設定]
- 特にここでは設定しない

[ネットワークの設定]
- 特にここでは設定しない
[ストレージとログ]
- 特にここでは設定しない
[セキュリティ]
- 特にここでは設定しない
[リソースの制限]
- 特にここでは設定しない
[DOCKERラベル]
- 特にここでは設定しない
■制約等は特に設定せず、「作成」ボタンを押下する。
ECSサービス設定
前章 ECSタスク定義 を元にECSサービスを設定し、ECSコンテナを起動させておく。CodePipeLineが実行されると最新のリビジョンにアップデートされたコンテナイメージがローリングアップデートされることになる。
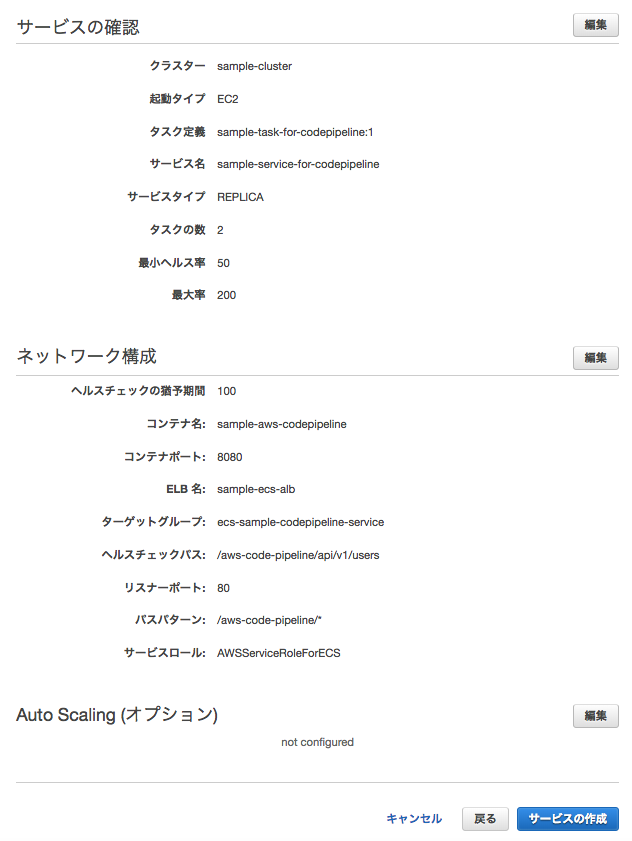
■ECSサービスメニューから「クラスター」を選び、作成してあるECSクラスタ「sample-cluster」を選択する。
■サービスタブから、「作成」ボタンを押下し、サービスを新規作成する。
■以下の通り、サービスの新規設定を行う。
[サービスの設定]
- 起動タイプ:EC2
- タスク定義:前章「 ECSタスク定義 」で作成したタスクを指定
- クラスター:選択したクラスタを指定
- サービス名:任意
- サービスタイプ:REPLICA
- タスクの数:2
- 最小ヘルス率:50
- 最大率:200
[タスクの配置]
- 配置テンプレート:AZバランススプレッド
Note
設定オプションについては、EC2起動型-サービスの定義 も参照のこと。
[ヘルスチェックの猶予期間]
- ヘルスチェックの猶予期間:100
Note
SpringBootアプリケーションだと設定したメモリ・CPU、アプリの規模によっては時間がかかるため、適宜猶予期間を設定しておくこと。
[Elastic Load Balancing(オプション)]
- ELBタイプ:ApplicationLoadBalancer
- サービス用のIAMロールの選択: EC2起動型-タスクの定義 で作成したECS Task用のIAM ロールを設定。
- ELB名: EC2起動型-ロードバランサ作成 で設定したALBを選択
■ 事前準備 で作成したロードバランサを指定し、「次のステップ」ボタンを押下する。

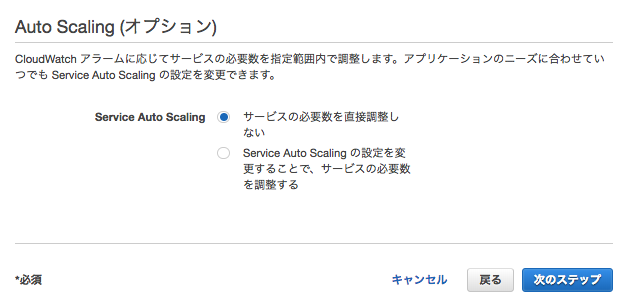
■ AutoScalingオプションは、「サービスの必要数を直接調整しない」を設定し、「次のステップ」を押下する。
■設定値を確認し、「サービスの作成」ボタンを押下する。
CodePipeLineの設定(ECSデプロイ)
作成したECSタスク定義・サービス定義の内容に従い、ステージング環境へECSコンテナをデプロイする設定を行う。
■ CodePipeLineの設定(ソース・ビルド) で作成したCodePipeline定義を開き、「編集」ボタンを押下する。
■ ビルドの後にステージングデプロイ用のアクションを追加し、「アクションの追加」ボタンを押下する。
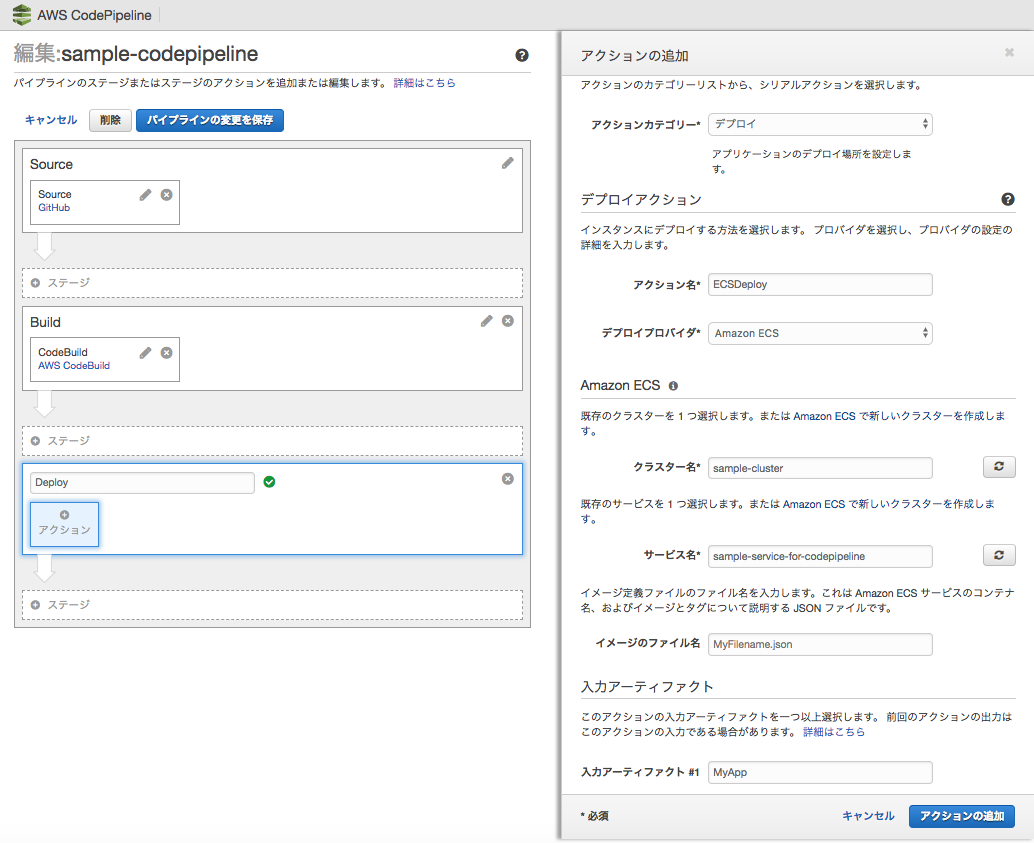
詳細なオプションは、以下の設定通り行う。
- アクションカテゴリ:デプロイ
[デプロイアクション]
- デプロイアクション:任意の名前
- デプロイプロバイダ:AmazonECS
[AmazonECS]
AWS CLI
Overview
AWS CLIはAWSが提供するコマンドラインインターフェイスである。
AWS CLIのインストール
ここでは、手元にあるローカルマシンとしてMacOSにCLIをインストールする。公式サイト AWS CLIのインストール では、CLIのインストールはpipコマンドを用いてインストールを行なっているため、事前にpythonを実行できる環境を構築しておくこと。
Note
MacOS Sierra以降はHomebrewからpythonをインストールする。以下のコマンドにより、標準インストールされているpython(/usr/bin/python)ではなく、/usr/local/bin/pythonが使用されるようになる。
1 2 | brew update
brew install python
|
pipを利用してCLIをインストールする。
1 | pip3 install awscli --upgrade --user
|
インストール後に.bash_profileにパスを通しておく。
1 | export PATH="/Users/XXXXXXXX/Library/Python/3.6/bin/:$PATH"
|
コマンドが正常実行できることを確認する。
1 2 | aws --version
aws-cli/1.16.241 Python/3.6.5 Darwin/18.7.0 botocore/1.12.231
|
なお、認証情報を~/.aws/configおよび、~/.aws/credentialsに保存しておくこと。
CloudFormation
Overview
CloudFormationは、JSONとYAML形式のテンプレートを使用して、AWSリソースの起動、設定、接続を行うサービスである。 CloudFormationは以下のフォーマットで記述される。
AWSTemplateFormatVersion: "version date"
Description: String
Metadata: template metadata
Parameters: set of parameters
Mappings: set of mappings
Conditions: set of conditions
Transform: set of transforms
Resources: set of resources
Outputs: set of outputs
Note
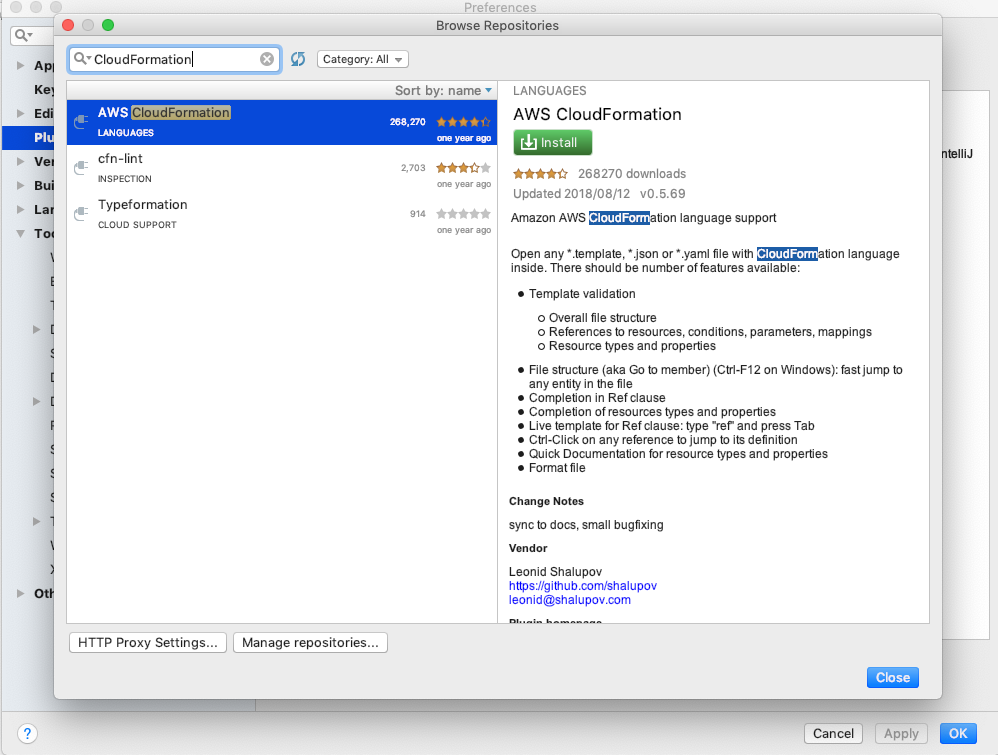
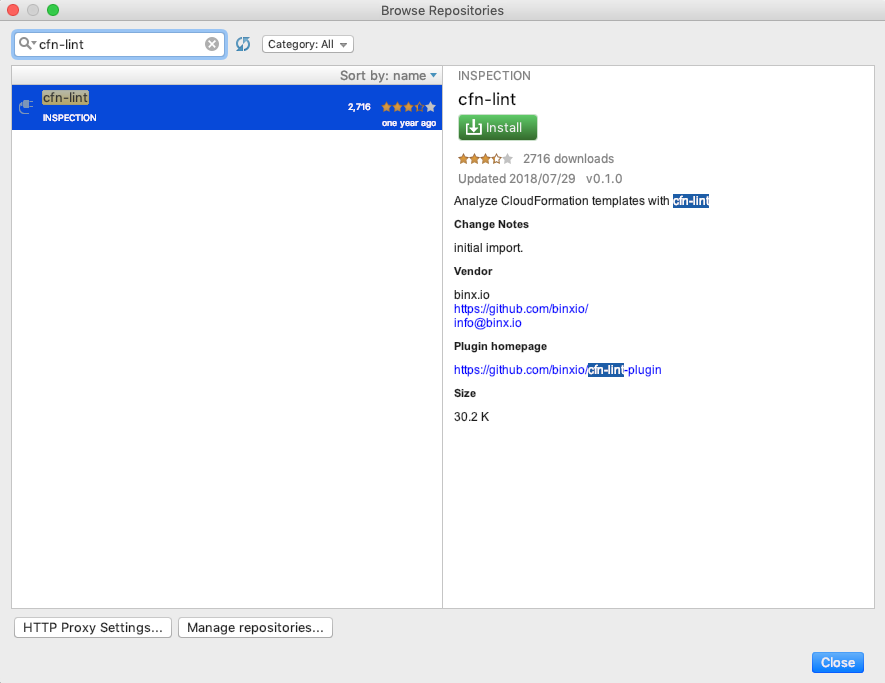
intelliJ IDEAにCloudFormationのプラグインがあり、バリデーション機能などを有している。当プラグインでは、簡単な構文チェックなどは行えるが、必須・任意パラメータの有無などの検証はできないため、cfn-python-lintというAWSから提供されているプラグインも合わせて導入する。
pipコマンドにて、cfn-lintをインストールする。
> pip intall cfn-lint
IntelliJ IDEAに各プラグインを導入する。
cfn-lintプラグインの設定で実行コマンドも設定しておく。
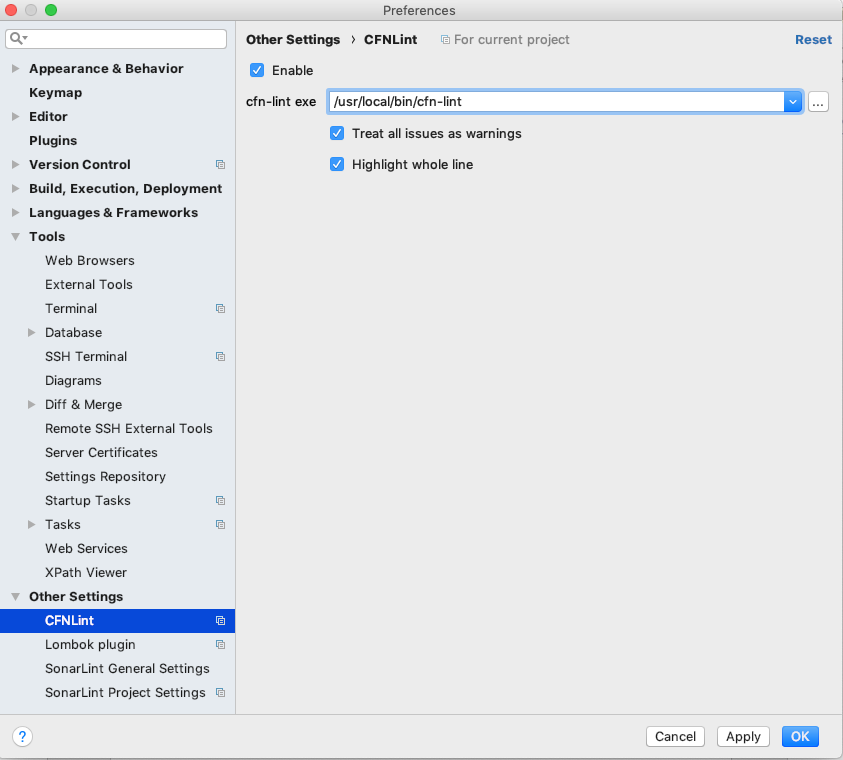
Warning
IntelliJ IDEAのバージョンとcfn-lintのバージョンには注意する。2019.9時点で最新版のIDEAとcfn-lintの最新版は互換性がない状態。IntelliJのバージョンを2019.1にする必要がある。
Stackの作成
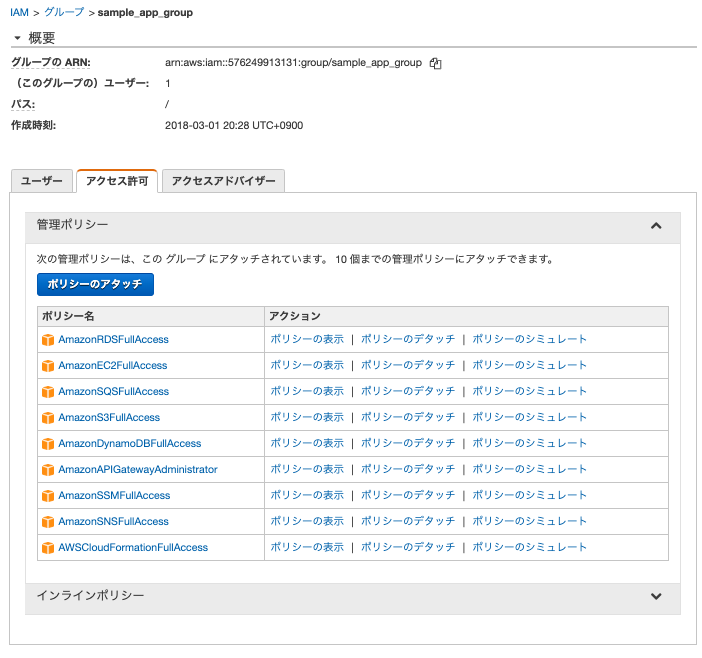
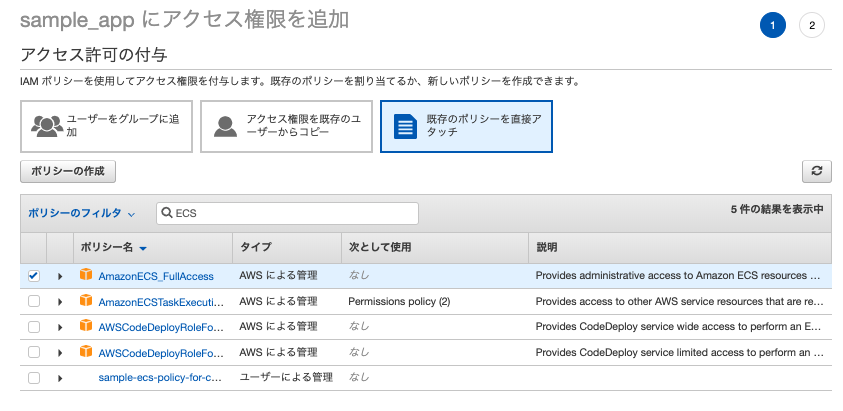
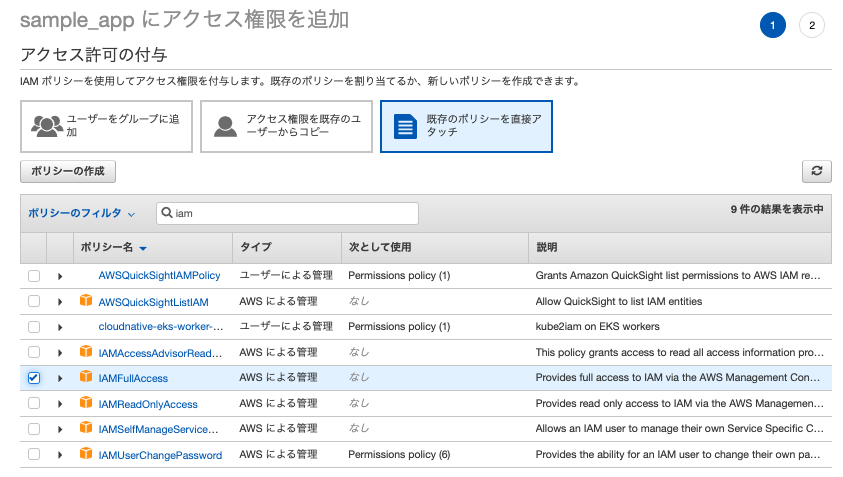
CloudFormationでテンプレートを作成し、Stackを作成する。Stackの作成はAWS CLIを通じて実行する。事前に AWS CLIのインストール に従って、 AWS CLIをインストールしておくこと。 またCLIを実行するユーザには、CloudFormationのアクセス権限を付与しておく必要がある。IAMサービスから、CLIで実行するユーザにCloudFormationのアクセス権限を付与しておくこと。
Note
ECSクラスタを作成するStackを実行する場合は、ECSのアクセス権限を付与しておく必要がある。IAMロールを作成する場合も同様。
VPCStackの作成
VPCおよびパブリック、プライベートを2つずつ持ち、インターネットGWをアタッチしたStackを作成する。テンプレートは以下の通り。
AWSTemplateFormatVersion: '2010-09-09'

Description: Sample CloudFormation template with YAML - VPC

Resources:
  SampleCloudFormationVPC:
    Type: AWS::EC2::VPC
    Properties:
      CidrBlock: 172.100.0.0/16
      InstanceTenancy: default
      EnableDnsSupport: true
      EnableDnsHostnames: true
      Tags:
        - Key: Name
          Value: SampleCloudFormationVPC

  PublicSubnet1:
    Type: AWS::EC2::Subnet
    Properties:
      CidrBlock: 172.100.1.0/24
      VpcId: !Ref SampleCloudFormationVPC
      AvailabilityZone: !Select [ 0, !GetAZs '' ]
      Tags:
        - Key: Name
          Value: PublicSubnet1

  PublicSubnet2:
    Type: AWS::EC2::Subnet
    Properties:
      CidrBlock: 172.100.2.0/24
      VpcId: !Ref SampleCloudFormationVPC
      AvailabilityZone: !Select [ 1, !GetAZs '' ]
      Tags:
        - Key: Name
          Value: PublicSubnet2

  PrivateSubnet1:
    Type: AWS::EC2::Subnet
    Properties:
      CidrBlock: 172.100.3.0/24
      VpcId: !Ref SampleCloudFormationVPC
      AvailabilityZone: !Select [ 0, !GetAZs '' ]
      Tags:
        - Key: Name
          Value: PrivateSubnet1

  PrivateSubnet2:
    Type: AWS::EC2::Subnet
    Properties:
      CidrBlock: 172.100.4.0/24
      VpcId: !Ref SampleCloudFormationVPC
      AvailabilityZone: !Select [ 1, !GetAZs '' ]
      Tags:
        - Key: Name
          Value: PrivateSubnet2

  SampleCloudFormationIGW:
    Type: AWS::EC2::InternetGateway
    Properties:
      Tags:
        - Key: Name
          Value: SampleCloudFormationIGW

  SampleCloudFormationIGWAttach:
    Type: AWS::EC2::VPCGatewayAttachment
    Properties:
      InternetGatewayId: !Ref SampleCloudFormationIGW
      VpcId: !Ref SampleCloudFormationVPC

  PublicRouteTable:
    Type: AWS::EC2::RouteTable
    Properties:
      VpcId: !Ref SampleCloudFormationVPC
      Tags:
        - Key: Name
          Value: Public Route

  PublicRoute:
    Type: AWS::EC2::Route
    DependsOn: SampleCloudFormationIGW
    Properties:
      RouteTableId: !Ref PublicRouteTable
      DestinationCidrBlock: 0.0.0.0/0
      GatewayId: !Ref SampleCloudFormationIGW

  PublicSubnet1Association:
    Type: AWS::EC2::SubnetRouteTableAssociation
    Properties:
      SubnetId: !Ref PublicSubnet1
      RouteTableId: !Ref PublicRouteTable

  PublicSubnet2Association:
    Type: AWS::EC2::SubnetRouteTableAssociation
    Properties:
      SubnetId: !Ref PublicSubnet2
      RouteTableId: !Ref PublicRouteTable

Outputs:
  VPCID:
    Description: VPC ID
    Value: !Ref SampleCloudFormationVPC
    Export:
      Name: !Sub ${AWS::StackName}-VPCID

  PublicSubnet1:
    Description: PublicSubnet1
    Value: !Ref PublicSubnet1
    Export:
      Name: !Sub ${AWS::StackName}-PublicSubnet1

  PublicSubnet2:
    Description: PublicSubnet2
    Value: !Ref PublicSubnet2
    Export:
      Name: !Sub ${AWS::StackName}-PublicSubnet2

  PrivateSubnet1:
    Description: PrivateSubnet1
    Value: !Ref PrivateSubnet1
    Export:
      Name: !Sub ${AWS::StackName}-PrivateSubnet1

  PrivateSubnet2:
    Description: PrivateSubnet2
    Value: !Ref PrivateSubnet2
    Export:
      Name: !Sub ${AWS::StackName}-PrivateSubnet2
作成したテンプレートを使ってAWS CLI経由でStack作成コマンドを実行する。コマンドが長くなりがちなため、シェルスクリプトを作成し実行する。
#!/usr/bin/env bash

stack_name="sample-cloudformation-vpc-1"
template_path="sample-vpc-cfn.yml"

if [ "$stack_name" == "" -a "$template_path" == "" ]; then
  echo "$0 stack-name template-path"
  exit 1
fi

aws cloudformation create-stack --stack-name ${stack_name} --template-body file://${template_path}
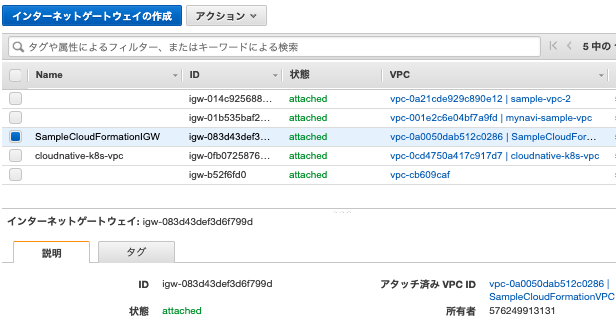
コマンドを実行すると、マネジメントコンソール上にStackがステータス”CREATE_IN_PROGRESS”で表示される。問題なく作成が完了すると、”CREATE_COMPLETE” となる。
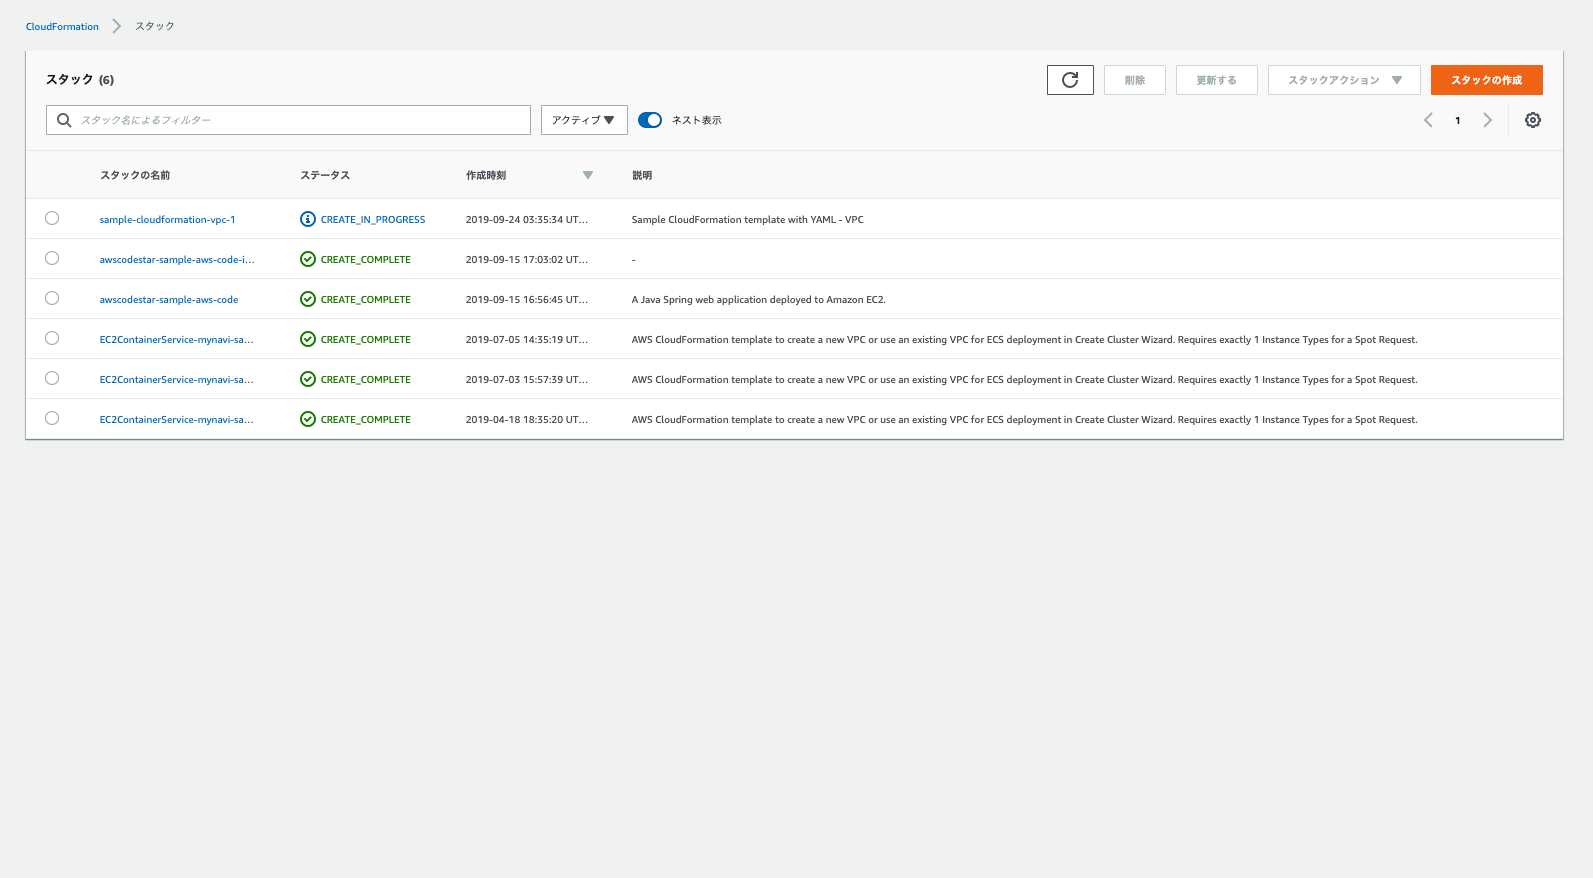
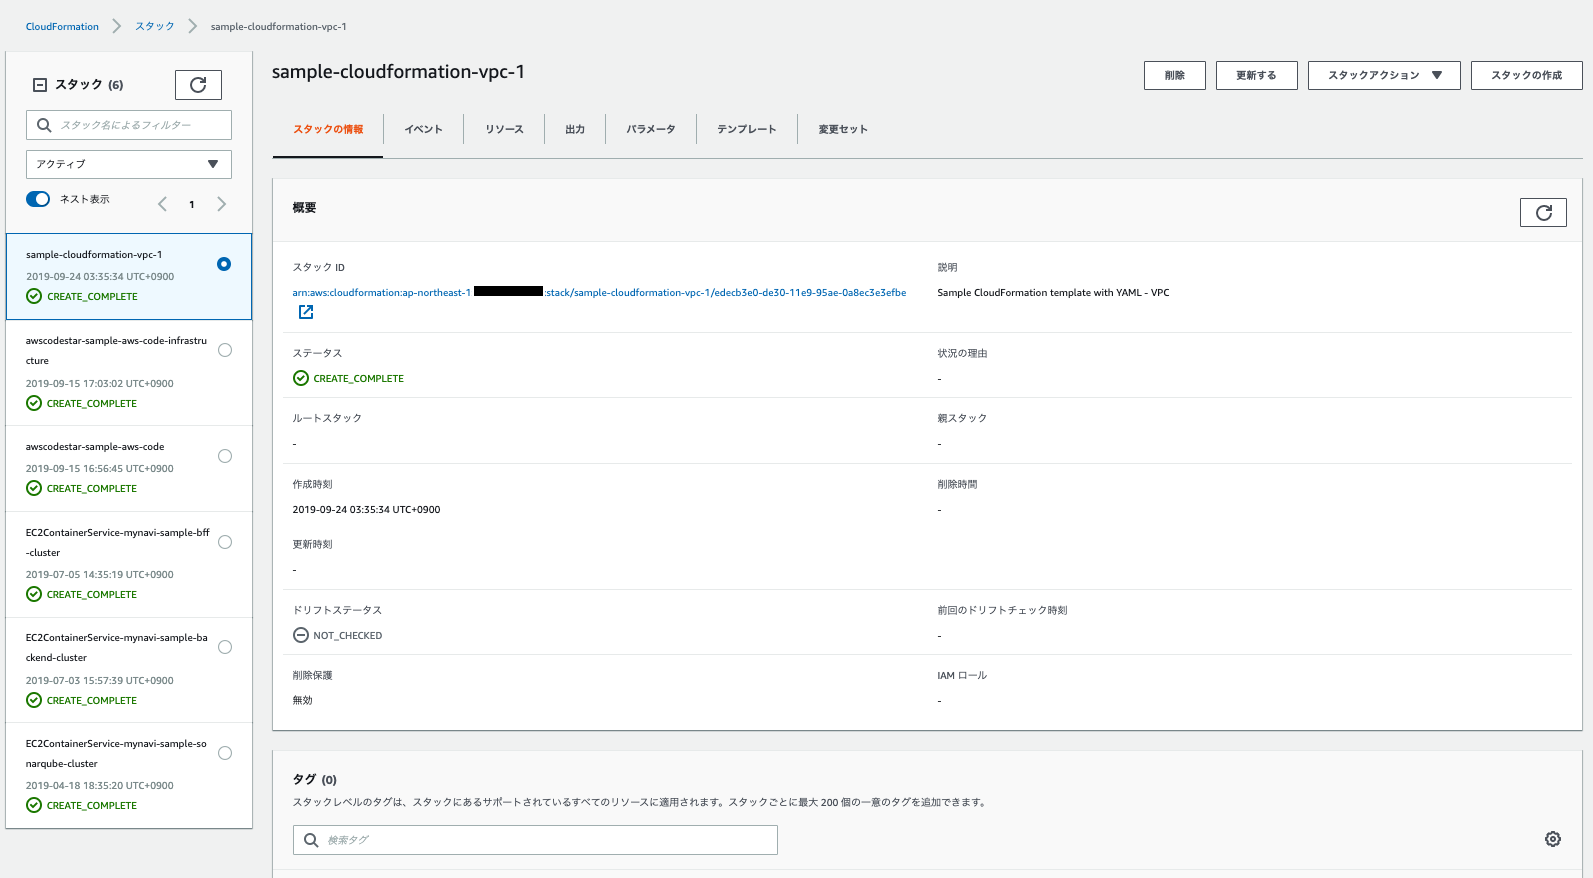
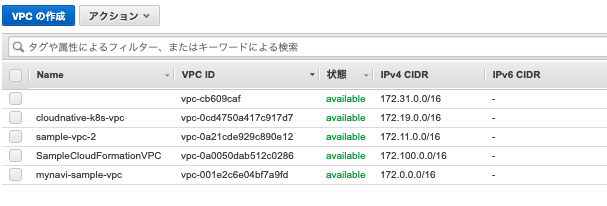
VPCメニューからも作成したリソースを確認できる。
NatGatewayStackの作成
前節で作成した、VPCのプライベートサブネットにアタッチするNAT Gatewayを設定するStackを作成する。テンプレートは以下の通り。
AWSTemplateFormatVersion: '2010-09-09'

Description: Sample CloudFormation template with YAML - NatGateway

Parameters:
  StackName:
    Description: Target VPC Stack Name
    Type: String
    MinLength: 1
    MaxLength: 255
    AllowedPattern: ^[a-zA-Z][-a-zA-Z0-9]*$
    Default: sample-cloudformation-vpc-1

Resources:
  SampleCloudFormationNatGWEIP:
    Type: AWS::EC2::EIP
    Properties:
      Domain:
        Fn::ImportValue: !Sub ${StackName}-VPCID

  SampleCloudFormationNatGW:
    Type: AWS::EC2::NatGateway
    Properties:
      AllocationId: !GetAtt SampleCloudFormationNatGWEIP.AllocationId
      SubnetId:
        Fn::ImportValue: !Sub ${StackName}-PublicSubnet1
      Tags:
        - Key: Name
          Value: SampleCloudFormationNatGW

  MainRouteTable:
    Type: AWS::EC2::RouteTable
    Properties:
      VpcId:
        Fn::ImportValue: !Sub ${StackName}-VPCID
    Tags:
      - Key: Name
        Value: Private Route

  MainRoute:
    Type: AWS::EC2::Route
    Properties:
      RouteTableId: !Ref MainRouteTable
      DestinationCidrBlock: 0.0.0.0/0
      NatGatewayId: !Ref SampleCloudFormationNatGW

  PrivateSubnet1Association:
    Type: AWS::EC2::SubnetRouteTableAssociation
    Properties:
      SubnetId:
        Fn::ImportValue: !Sub ${StackName}-PrivateSubnet1
      RouteTableId: !Ref MainRouteTable

  PrivateSubnet2Association:
    Type: AWS::EC2::SubnetRouteTableAssociation
    Properties:
      SubnetId:
      Fn::ImportValue: !Sub ${StackName}-PrivateSubnet2
      RouteTableId: !Ref MainRouteTable
Note
CloudFormationはデフォルトで作成されるルートテーブルの操作はできないため、プライベートサブネットへの関連付けは別途ルートテーブルを作成し、明示的にNATGatewayへの関連付けを行う。
SecurityGroupStackの作成
次節以降、作成するALBやECSクラスター向けのセキュリティグループを作成するStackを構築する。テンプレートは以下の通り。
AWSTemplateFormatVersion: '2010-09-09'

Description: Sample CloudFormation template with YAML - SecurityGroup

Parameters:
  StackName:
    Description: Target VPC Stack Name
    Type: String
    MinLength: 1
    MaxLength: 255
    AllowedPattern: ^[a-zA-Z][-a-zA-Z0-9]*$
    Default: sample-cloudformation-vpc-1

Resources:
  SampleCloudFormationSecurityGroupPublicALB:
    Type: AWS::EC2::SecurityGroup
    Properties:
      GroupName: SampleCloudFormationSecurityGroupPublicALB
      GroupDescription: http access
      VpcId:
        Fn::ImportValue: !Sub ${StackName}-VPCID
      Tags:
        - Key : Name
          Value: SampleCloudFormationSecurityGroupPublicALB

  SampleCloudFormationSecurityGroupInggressPublicALB:
    Type: AWS::EC2::SecurityGroupIngress
    Properties:
      GroupId: !Ref SampleCloudFormationSecurityGroupPublicALB
      IpProtocol: tcp
      FromPort: 80
      ToPort: 80
      CidrIp: 0.0.0.0/0

  SampleCloudFormationSecurityGroupPrivateALB:
    Type: AWS::EC2::SecurityGroup
    Properties:
      GroupName: SampleCloudFormationSecurityGroupPrivateALB
      GroupDescription: http access
      VpcId:
        Fn::ImportValue: !Sub ${StackName}-VPCID
      Tags:
        - Key : Name
          Value: SampleCloudFormationSecurityGroupPrivateALB

  SampleCloudFormationSecurityGroupIngressPrivateALB:
    Type: AWS::EC2::SecurityGroupIngress
    Properties:
      GroupId: !Ref SampleCloudFormationSecurityGroupPrivateALB
      IpProtocol: tcp
      FromPort: 80
      ToPort: 80
      CidrIp: 172.100.0.0/16

  SampleCloudFormationSecurityGroupFrontendEcsCluster:
    Type: AWS::EC2::SecurityGroup
    Properties:
      GroupName: SampleCloudFormationSecurityGroupFrontendEcsCluster
      GroupDescription: http access only alb
      VpcId:
        Fn::ImportValue: !Sub ${StackName}-VPCID
      Tags:
        - Key : Name
          Value: SampleCloudFormationSecurityGroupFrontendEcsCluster

  SampleCloudFormationSecurityGroupIngressFrontendEcsCluster:
    Type: AWS::EC2::SecurityGroupIngress
    Properties:
      GroupId: !Ref SampleCloudFormationSecurityGroupFrontendEcsCluster
      IpProtocol: tcp
      FromPort: 32768
      ToPort: 61000
      SourceSecurityGroupId: !Ref SampleCloudFormationSecurityGroupPublicALB

  SampleCloudFormationSecurityGroupIngressForSSHFrontendEcsCluster:
    Type: AWS::EC2::SecurityGroupIngress
    Properties:
      GroupId: !Ref SampleCloudFormationSecurityGroupFrontendEcsCluster
      IpProtocol: ssh
      FromPort: 22
      ToPort: 22
      CidrIp: 0.0.0.0/0

  SampleCloudFormationSecurityGroupBackendEcsCluster:
    Type: AWS::EC2::SecurityGroup
    Properties:
      GroupName: SampleCloudFormationSecurityGroupBackendEcsCluster
      GroupDescription: http access only alb
      VpcId:
        Fn::ImportValue: !Sub ${StackName}-VPCID
      Tags:
        - Key : Name
          Value: SampleCloudFormationSecurityGroupBackendEcsCluster

  SampleCloudFormationSecurityGroupIngressBackendEcsCluster:
    Type: AWS::EC2::SecurityGroupIngress
    Properties:
      GroupId: !Ref SampleCloudFormationSecurityGroupBackendEcsCluster
      IpProtocol: tcp
      FromPort: 32768
      ToPort: 61000
      SourceSecurityGroupId: !Ref SampleCloudFormationSecurityGroupPrivateALB

Outputs:
  SampleCloudFormationSecurityGroupPublicALB:
    Description: Security Group for Public ALB
    Value: !Ref SampleCloudFormationSecurityGroupPublicALB
    Export:
      Name: !Sub ${StackName}-SecurityGroupPublicALB

  SampleCloudFormationSecurityGroupPrivateALB:
    Description: Security Group for Private ALB
    Value: !Ref SampleCloudFormationSecurityGroupPrivateALB
    Export:
      Name: !Sub ${StackName}-SecurityGroupPrivateALB

  SampleCloudFormationSecurityGroupFrontendEcsCluster:
    Description: Security Group for Frontend ECS Cluster
    Value: !Ref SampleCloudFormationSecurityGroupFrontendEcsCluster
    Export:
      Name: !Sub ${StackName}-SecurityGroupFrontendEcsCluster

  SampleCloudFormationSecurityGroupBackendEcsCluster:
    Description: Security Group for Backend ECS Cluster
    Value: !Ref SampleCloudFormationSecurityGroupBackendEcsCluster
    Export:
      Name: !Sub ${StackName}-SecurityGroupBackendEcsCluster
ApplicationLoadBalancerStackの作成
パブリック・プライベートサブネットに各々配置するECSクラスタ向けのALBを作成するスタックを構築する。テンプレートは以下の通り。
AWSTemplateFormatVersion: '2010-09-09'

Description: Sample CloudFormation template with YAML - ApplicationLoadBalancer

Parameters:
  StackName:
    Description: Target VPC Stack Name
    Type: String
    MinLength: 1
    MaxLength: 255
    AllowedPattern: ^[a-zA-Z][-a-zA-Z0-9]*$
    Default: sample-cloudformation-vpc-1

Resources:
  SampleCloudFormationFrontendALB:
    Type: AWS::ElasticLoadBalancingV2::LoadBalancer
    Properties:
      Name: FrontendALB
      Subnets:
        - Fn::ImportValue: !Sub ${StackName}-PublicSubnet1
        - Fn::ImportValue: !Sub ${StackName}-PublicSubnet2
      SecurityGroups:
        - Fn::ImportValue: !Sub ${StackName}-SecurityGroupPublicALB

  SampleCloudFormationPublicALBTargetGroup:
    Type: AWS::ElasticLoadBalancingV2::TargetGroup
    Properties:
      Name: sample-cfn-public-tg-default
      VpcId:
        Fn::ImportValue: !Sub ${StackName}-VPCID
      Port: 80
      Protocol: HTTP
      HealthCheckPath: /index.html
      HealthyThresholdCount: 2
      TargetGroupAttributes:
        - Key: deregistration_delay.timeout_seconds
          Value: '20'

  SampleCloudFormationPublicALBListener:
    Type: AWS::ElasticLoadBalancingV2::Listener
    Properties:
      LoadBalancerArn: !Ref SampleCloudFormationFrontendALB
      Port: 80
      Protocol: HTTP
      DefaultActions:
        - Type: forward
          TargetGroupArn: !Ref SampleCloudFormationPublicALBTargetGroup

  SampleCloudFormationBackendALB:
    Type: AWS::ElasticLoadBalancingV2::LoadBalancer
    Properties:
      Name: BackendALB
      Subnets:
        - Fn::ImportValue: !Sub ${StackName}-PrivateSubnet1
        - Fn::ImportValue: !Sub ${StackName}-PrivateSubnet2
      SecurityGroups:
        - Fn::ImportValue: !Sub ${StackName}-SecurityGroupPrivateALB

  SampleCloudFormationPrivateALBTargetGroupDefault:
    Type: AWS::ElasticLoadBalancingV2::TargetGroup
    Properties:
      Name: sample-cfn-private-tg-default
      VpcId:
        Fn::ImportValue: !Sub ${StackName}-VPCID
      Port: 80
      Protocol: HTTP
      HealthCheckPath: /index.html
      HealthyThresholdCount: 2
      TargetGroupAttributes:
        - Key: deregistration_delay.timeout_seconds
          Value: '20'

  SampleCloudFormationPrivateALBTargetGroupServiceA:
    Type: AWS::ElasticLoadBalancingV2::TargetGroup
    Properties:
      Name: sample-cfn-private-tg-serviceA
      VpcId:
        Fn::ImportValue: !Sub ${StackName}-VPCID
      Port: 80
      Protocol: HTTP
      HealthCheckPath: /index.html
      HealthyThresholdCount: 2
      TargetGroupAttributes:
        - Key: deregistration_delay.timeout_seconds
          Value: '20'

  SampleCloudFormationPrivateALBTargetGroupServiceB:
    Type: AWS::ElasticLoadBalancingV2::TargetGroup
    Properties:
      Name: sample-cfn-private-tg-serviceB
      VpcId:
        Fn::ImportValue: !Sub ${StackName}-VPCID
      Port: 80
      Protocol: HTTP
      HealthCheckPath: /index.html
      HealthyThresholdCount: 2
      TargetGroupAttributes:
        - Key: deregistration_delay.timeout_seconds
          Value: '20'

  SampleCloudFormationPrivateALBListener:
    Type: AWS::ElasticLoadBalancingV2::Listener
    Properties:
      LoadBalancerArn: !Ref SampleCloudFormationBackendALB
      Port: 80
      Protocol: HTTP
      DefaultActions:
        - Type: forward
          TargetGroupArn: !Ref SampleCloudFormationPrivateALBTargetGroupDefault

  SampleCloudFormationPrivateALBListenerRuleServiceA:
    Type: AWS::ElasticLoadBalancingV2::ListenerRule
    Properties:
      Actions:
        - Type: forward
          TargetGroupArn: !Ref SampleCloudFormationPrivateALBTargetGroupServiceA
      Conditions:
        - Field: path-pattern
          PathPatternConfig:
            Values:
              - /serviceA/*
      ListenerArn: !Ref SampleCloudFormationPrivateALBListener
      Priority: 1

  SampleCloudFormationPrivateALBListenerRuleServiceB:
    Type: AWS::ElasticLoadBalancingV2::ListenerRule
    Properties:
      Actions:
        - Type: forward
          TargetGroupArn: !Ref SampleCloudFormationPrivateALBTargetGroupServiceB
      Conditions:
        - Field: path-pattern
          PathPatternConfig:
            Values:
              - /serviceB/*
      ListenerArn: !Ref SampleCloudFormationPrivateALBListener
      Priority: 2

  Outputs:
    SampleCloudFormationPublicALBDNS:
      Description: Public DNS Name
      Value: !GetAtt SampleCloudFormationFrontendALB.DNSName
      Export:
        Name: !Sub ${StackName}-PublicALBDNS

    SampleCloudFormationPrivateALBDNS:
      Description: Private DNS Name
      Value: !GetAtt SampleCloudFormationBackendALB.DNSName
      Export:
        Name: !Sub ${StackName}-PrivateALBDNS
ECSClusterStackの作成
パブリック・プライベートサブネットに各々配置するECSクラスタを作成するスタックを構築する。テンプレートは以下の通り。
AWSTemplateFormatVersion: '2010-09-09'

Description: Sample CloudFormation template with YAML - ECS Cluster

Parameters:
  StackName:
    Description: Target VPC Stack Name
    Type: String
    MinLength: 1
    MaxLength: 255
    AllowedPattern: ^[a-zA-Z][-a-zA-Z0-9]*$
    Default: sample-cloudformation-vpc-1
  ECSAMI:
    Description: AMI ID
    Type: AWS::SSM::Parameter::Value<AWS::EC2::Image::Id>
    Default: /aws/service/ecs/optimized-ami/amazon-linux-2/recommended/image_id
  InstanceType:
    Description: EC2 instance type
    Type: String
    Default: r4.large
  DesiredCapacity:
    Type: Number
    Default: '1'
    Description: Number of EC2 instances to launch in your ECS cluster.
  EC2InstanceMaxSizeOfECS:
    Type: Number
    Default: '3'
    Description: Maximum number of EC2 instances that can be launched in your ECS cluster.
  KeyPairName:
    Type: AWS::EC2::KeyPair::KeyName
    Default: test
    Description: Key pair setting to ECS Cluster

Resources:
  SampleCloudFormationECSRole:
    Type: AWS::IAM::Role
    Properties:
      Path: /
      AssumeRolePolicyDocument:
        Statement:
          - Action: sts:AssumeRole
            Effect: Allow
            Principal:
              Service: ec2.amazonaws.com
      ManagedPolicyArns:
        - arn:aws:iam::aws:policy/service-role/AmazonEC2ContainerServiceforEC2Role

  SampleCloudFormationECSInstanceProfile:
    Type: AWS::IAM::InstanceProfile
    Properties:
      Path: /
      Roles:
        - !Ref SampleCloudFormationECSRole

  SampleCloudFormationFrontendECSCluster:
    Type: AWS::ECS::Cluster
    Properties:
      ClusterName: sample-frontend-cluster
      Tags:
        - Key: Name
          Value: SampleCloudFormationFrontendECSCluster

  SampleCloudFormationBackendECSCluster:
    Type: AWS::ECS::Cluster
    Properties:
      ClusterName: sample-backend-cluster

  SampleCloudFormationFrontendECSAutoScalingGroup:
    Type: AWS::AutoScaling::AutoScalingGroup
    Properties:
      VPCZoneIdentifier:
        - Fn::ImportValue: !Sub ${StackName}-PublicSubnet1
        - Fn::ImportValue: !Sub ${StackName}-PublicSubnet2
      LaunchConfigurationName: !Ref SampleCloudFormationFrontendECSLaunchConfiguration
      MinSize: '0'
      MaxSize: !Ref EC2InstanceMaxSizeOfECS
      DesiredCapacity: !Ref DesiredCapacity
      Tags:
        - Key: Name
          Value: SampleCloudFormationFrontendECSCluster
          PropagateAtLaunch: true
    CreationPolicy:
      ResourceSignal:
        Timeout: PT5M
    UpdatePolicy:
      AutoScalingReplacingUpdate:
        WillReplace: true

  SampleCloudFormationFrontendECSLaunchConfiguration:
    Type: AWS::AutoScaling::LaunchConfiguration
    Properties:
      ImageId: !Ref ECSAMI
      InstanceType: !Ref InstanceType
      IamInstanceProfile: !Ref SampleCloudFormationECSInstanceProfile
      KeyName: !Ref KeyPairName
      SecurityGroups:
        - Fn::ImportValue: !Sub ${StackName}-SecurityGroupFrontendEcsCluster
      AssociatePublicIpAddress: true
      UserData:
        Fn::Base64: !Sub |
          #!/bin/bash -xe
          echo ECS_CLUSTER=${SampleCloudFormationFrontendECSCluster} >> /etc/ecs/ecs.config
          yum install -y aws-cfn-bootstrap
          /opt/aws/bin/cfn-signal -e $? --stack ${AWS::StackName} --resource SampleCloudFormationFrontendECSAutoScalingGroup --region ${AWS::Region}

  SampleCloudFormationBackendECSAutoScalingGroup:
    Type: AWS::AutoScaling::AutoScalingGroup
    Properties:
      VPCZoneIdentifier:
        - Fn::ImportValue: !Sub ${StackName}-PrivateSubnet1
        - Fn::ImportValue: !Sub ${StackName}-PrivateSubnet2
      LaunchConfigurationName: !Ref SampleCloudFormationBackendECSLaunchConfiguration
      MinSize: '0'
      MaxSize: !Ref EC2InstanceMaxSizeOfECS
      DesiredCapacity: !Ref DesiredCapacity
      Tags:
        - Key: Name
          Value: SampleCloudFormationBackendECSCluster
          PropagateAtLaunch: true
    CreationPolicy:
      ResourceSignal:
        Timeout: PT5M
    UpdatePolicy:
      AutoScalingReplacingUpdate:
        WillReplace: true

  SampleCloudFormationBackendECSLaunchConfiguration:
    Type: AWS::AutoScaling::LaunchConfiguration
    Properties:
      ImageId: !Ref ECSAMI
      InstanceType: !Ref InstanceType
      IamInstanceProfile: !Ref SampleCloudFormationECSInstanceProfile
      KeyName: !Ref KeyPairName
      SecurityGroups:
        - Fn::ImportValue: !Sub ${StackName}-SecurityGroupBackendEcsCluster
      AssociatePublicIpAddress: false
      UserData:
        Fn::Base64: !Sub |
          #!/bin/bash -xe
          echo ECS_CLUSTER=${SampleCloudFormationBackendECSCluster} >> /etc/ecs/ecs.config
          yum install -y aws-cfn-bootstrap
          /opt/aws/bin/cfn-signal -e $? --stack ${AWS::StackName} --resource SampleCloudFormationBackendECSAutoScalingGroup --region ${AWS::Region}

Outputs:
  SampleCloudFormationFrontendECSCluster:
    Description: Frontend ECS Cluster
    Value: !Ref SampleCloudFormationFrontendECSCluster
    Export:
      Name: !Sub ${StackName}-FrontendEcsCluster

  SampleCloudFormationBackendECSCluster:
    Description: Backend ECS Cluster
    Value: !Ref SampleCloudFormationBackendECSCluster
    Export:
      Name: !Sub ${StackName}-BackendEcsCluster
Note
ECSクラスタは起動構成(LaunchConfiguration)・オートスケーリンググループにより実行する。
Note
LaunchConfiguration.UserDataプロパティに指定しているのはクラスタとなるEC2インスタンスを起動する際の初期実行スクリプトである。ここでは、初期スクリプト内で、cfn-signalスクリプトを実行し、CloudFormationに起動完了シグナルを送信している。詳細は、 公式ページ cfn-signal を参照のこと。
Note
CreationPolicy.ResourceSignal.Timeoutプロパティ属性で設定した時間内にクラスタとなるインスタンスが起動できないと 「Failed to receive X resource signal(s) within the specified duration」が発生し、スタック実行がロールバックされる。 ECSクラスタ起動時にCloudFormationがシグナルを受信しなかったため生じる汎用的なメッセージであり、時間内に起動できない理由は別に存在するため、適宜、パブリックアドレスの割り当てオプション、セキュリティグループの設定やVPCのルーティングなど見直すこと。詳細は、 公式ページ も参照のこと。
ECSTaskStackの作成
パブリック・プライベートサブネットに各々配置するECSタスクを作成するスタックを構築する。テンプレートは以下の通り。
AWSTemplateFormatVersion: '2010-09-09'

Description: Sample CloudFormation template with YAML - ECS Task Definition

Parameters:
  StackName:
    Description: Target VPC Stack Name
    Type: String
    MinLength: 1
    MaxLength: 255
    AllowedPattern: ^[a-zA-Z][-a-zA-Z0-9]*$
    Default: sample-cloudformation-vpc-1

Resources:
  SampleCloudFormationECSTaskExecutionRole:
    Type: AWS::IAM::Role
    Properties:
      Path: /
      AssumeRolePolicyDocument:
        Statement:
          - Action: sts:AssumeRole
            Effect: Allow
            Principal:
              Service: ecs-tasks.amazonaws.com
    ManagedPolicyArns:
      - arn:aws:iam::aws:policy/service-role/AmazonECSTaskExecutionRolePolicy

  SampleCloudFormationBackendECSTaskDefinition:
    Type: AWS::ECS::TaskDefinition
      Properties:
        Family: sample-cloudformation-task-backend
        RequiresCompatibilities:
          - EC2
        Memory: '1024'
        Cpu: '512'
        NetworkMode: bridge
        ExecutionRoleArn: !Ref SampleCloudFormationECSTaskExecutionRole
        ContainerDefinitions:
          - Name: sample-ecs-backend
            Image: debugroom/sample-aws-ecs-backend:1.0-SNAPSHOT
            PortMappings:
              - ContainerPort: 8081
                HostPort: 0
            Memory: 1024

  SampleCloudFormationFrontendECSTaskDefinition:
    Type: AWS::ECS::TaskDefinition
    Properties:
      Family: sample-cloudformation-task-frontend
      RequiresCompatibilities:
        - EC2
      Memory: '1024'
      Cpu: '512'
      NetworkMode: bridge
      ExecutionRoleArn: !Ref SampleCloudFormationECSTaskExecutionRole
      ContainerDefinitions:
         - Name: sample-ecs-frontend
           Image: debugroom/sample-aws-ecs-frontend:1.0-SNAPSHOT
           PortMappings:
             - ContainerPort: 8080
               HostPort: 0
           Environment:
             - Name: SERVICE_DNS
               Value:
               Fn::ImportValue: !Sub ${StackName}-PrivateALBDNS
           Memory: 1024

Outputs:
  SampleCloudFormationFrontendECSTaskDefinition:
    Description: Frontend ECS Task Definition
    Value: !Ref SampleCloudFormationFrontendECSTaskDefinition
    Export:
      Name: !Sub ${StackName}-FrontendEcsTaskDefinition

  SampleCloudFormationBackendECSTaskDefinition:
    Description: Backend ECS Task Definition
    Value: !Ref SampleCloudFormationBackendECSTaskDefinition
    Export:
      Name: !Sub ${StackName}-BackendEcsTaskDefinition
ECSServiceStackの作成
パブリック・プライベートサブネットに各々配置するECSのサービスを作成するスタックを構築する。テンプレートは以下の通り。
AWSTemplateFormatVersion: '2010-09-09'

Description: Sample CloudFormation template with YAML - ECS Service Launch

Parameters:
  StackName:
    Description: Target VPC Stack Name
    Type: String
    MinLength: 1
    MaxLength: 255
    AllowedPattern: ^[a-zA-Z][-a-zA-Z0-9]*$
    Default: sample-cloudformation-vpc-1
  DesiredCount:
    Description: Number of container service to launch in ECS cluster
    Type: Number
    Default: '1'

Resources:
  SampleCloudFormationFrontendECSService:
    Type: AWS::ECS::Service
    Properties:
    Cluster:
      Fn::ImportValue: !Sub ${StackName}-FrontendEcsCluster
    DesiredCount: !Ref DesiredCount
    TaskDefinition:
      Fn::ImportValue: !Sub ${StackName}-FrontendEcsTaskDefinition
    LaunchType: EC2
    LoadBalancers:
      - ContainerName: sample-ecs-frontend
        ContainerPort: 8080
        TargetGroupArn:
          Fn::ImportValue: !Sub ${StackName}-PublicALBTargetGroup

  SampleCloudFormationBackendECSService:
    Type: AWS::ECS::Service
    Properties:
    Cluster:
      Fn::ImportValue: !Sub ${StackName}-BackendEcsCluster
    DesiredCount: !Ref DesiredCount
    TaskDefinition:
      Fn::ImportValue: !Sub ${StackName}-BackendEcsTaskDefinition
    LaunchType: EC2
    LoadBalancers:
      - ContainerName: sample-ecs-backend
        ContainerPort: 8081
        TargetGroupArn:
          Fn::ImportValue: !Sub ${StackName}-PrivateALBTargetGroupDefault

Outputs:
  SampleCloudFormationFrontendECSService:
    Description: Frontend ECS Service
    Value: !Ref SampleCloudFormationFrontendECSService
    Export:
      Name: !Sub ${StackName}-FrontendEcsService
  SampleCloudFormationBackendECSService:
    Description: Backend ECS Service
    Value: !Ref SampleCloudFormationBackendECSService
    Export:
      Name: !Sub ${StackName}-BackendEcsService
RDSStackの作成
プライベートサブネットに配置されたECSクラスタからアクセスされるRDSを作成するスタックを構築する。テンプレートは以下の通り。
AWSTemplateFormatVersion: '2010-09-09'

Description: Sample CloudFormation template with YAML - RDS Definition

Parameters:
  StackName:
    Description: Target VPC Stack Name
    Type: String
    MinLength: 1
    MaxLength: 255
    AllowedPattern: ^[a-zA-Z][-a-zA-Z0-9]*$
    Default: sample-cloudformation-vpc-1

  RdsUser:
    Description: Database Master User Name
    Type: String
    Default: postgresql

  RdsPassword:
    Description: Database Master User Password
    Type: String
    Default: postgresql

Resources:
  SampleCloudFormationRDSInstance:
    Type: AWS::RDS::DBInstance
    DeletionPolicy: Snapshot
    Properties:
    DBInstanceIdentifier: sample-cloudformation-postgresql
    DBName: SampleCloudFormationPostgreSQL
    Engine: postgres
    MultiAZ: false
    MasterUsername: !Ref RdsUser
    MasterUserPassword: !Ref RdsPassword
    DBInstanceClass: db.t2.micro
    AllocatedStorage: '20'
    DBSubnetGroupName: !Ref SampleCloudFormationDBSubnetGroup
    MonitoringInterval: 10
    MonitoringRoleArn: !GetAtt SampleCloudFormationDBMonitorRole.Arn
    VPCSecurityGroups:
      - Fn::ImportValue: !Sub ${StackName}-SecurityGroupRdsPostgres

  SampleCloudFormationDBSubnetGroup:
    Type: AWS::RDS::DBSubnetGroup
    Properties:
      DBSubnetGroupDescription: DB Subnet Group for Private Subnet
      SubnetIds:
        - Fn::ImportValue: !Sub ${StackName}-PrivateSubnet1
        - Fn::ImportValue: !Sub ${StackName}-PrivateSubnet2

  SampleCloudFormationDBMonitorRole:
    Type: AWS::IAM::Role
    Properties:
      Path: "/"
      ManagedPolicyArns:
        - arn:aws:iam::aws:policy/service-role/AmazonRDSEnhancedMonitoringRole
      AssumeRolePolicyDocument:
        Version: 2012-10-17
        Statement:
          - Effect: Allow
            Principal:
              Service:
                - monitoring.rds.amazonaws.com
            Action:
              - sts:AssumeRole

Outputs:
  SampleCloudFormationRDSInstance:
    Description: RDS
    Value: !Ref SampleCloudFormationRDSInstance
    Export:
      Name: !Sub ${StackName}-RDS
DynamoDBStackの作成
Note
事前に認証情報をもつユーザにDyanamoDBのアクセス権限を付与しておく。
ECSクラスタからアクセスされるDynamoDBを作成するスタックを構築する。テンプレートは以下の通り。
AWSTemplateFormatVersion: '2010-09-09'

Description: Sample CloudFormation template with YAML - DynamoDB Definition

Parameters:
  StackName:
    Description: Target VPC Stack Name
    Type: String
    MinLength: 1
    MaxLength: 255
    AllowedPattern: ^[a-zA-Z][-a-zA-Z0-9]*$
    Default: sample-cloudformation-vpc-1

Resources:
  SampleCloudFormationDynamoDBSampleTable:
    Type: AWS::DynamoDB::Table
    Properties:
      TableName: SampleCloudFormationSampleTable
      BillingMode: PROVISIONED
      AttributeDefinitions:
        - AttributeName: samplePartitionKey
          AttributeType: S
        - AttributeName: sampleSortKey
          AttributeType: S
      KeySchema:
        - AttributeName: samplePartitionKey
          KeyType: HASH
        - AttributeName: sampleSortKey
          KeyType: RANGE
      ProvisionedThroughput:
        ReadCapacityUnits: 5
        WriteCapacityUnits: 5

Outputs:
  SampleCloudFormationDynamoDB:
    Description: DynamoDB SampleTable
    Value: !Ref SampleCloudFormationDynamoDBSampleTable
    Export:
      Name: !Sub ${StackName}-DynamoDBSampleTable
Warning
AttributeDefinitionsとKeySchemaの属性は一致させること(AttributeにはHASHキーとRANGEキー以外は指定しないこと)。DynamoDBはスキーマレスの構成なのでキー以外の属性定義はエラーとなる。
ElastiCacheStackの作成
Note
事前に認証情報をもつユーザにDyanamoDBのアクセス権限を付与しておく。
パブリックサブネットにあるECSクラスタからアクセスされるElastiCacheを作成するスタックを構築する。テンプレートは以下の通り。
AWSTemplateFormatVersion: '2010-09-09'

Description: Sample CloudFormation template with YAML - ElastiCache Definition

Parameters:
  StackName:
    Description: Target VPC Stack Name
    Type: String
    MinLength: 1
    MaxLength: 255
    AllowedPattern: ^[a-zA-Z][-a-zA-Z0-9]*$
    Default: sample-cloudformation-vpc-1
  CacheInstanceType:
    Description: Cache instance type
    Type: String
    Default: cache.t2.micro

Resources:
  SampleCloudFormationElastiCacheSubnetGroup:
    Type: AWS::ElastiCache::SubnetGroup
    Properties:
      CacheSubnetGroupName: SampleCloudFormationElastiCacheSubnetGroup
      Description: SampleCloudFormation ElastiCacheSubnetGroup
      SubnetIds:
        - Fn::ImportValue: !Sub ${StackName}-PublicSubnet1
        - Fn::ImportValue: !Sub ${StackName}-PublicSubnet2

  SampleCloudFormationElastiCacheParameterGroup:
    Type: AWS::ElastiCache::ParameterGroup
    Properties:
      CacheParameterGroupFamily: redis5.0
      Description: SampleCloudFormation ElastiCacheParameterGroup
      Properties:
        cluster-enabled: "no"

  SampleCloudFormationElastiCacheRedis:
    Type: AWS::ElastiCache::ReplicationGroup
    Properties:
      ReplicationGroupId: samplecloudformation-1
      Engine: redis
      ReplicationGroupDescription: SampleCloudFormation RedisCluster
      EngineVersion: 5.0.3
      Port: 6379
      CacheParameterGroupName: !Ref SampleCloudFormationElastiCacheParameterGroup
      CacheNodeType: !Ref CacheInstanceType
      ReplicasPerNodeGroup: 2
      AutomaticFailoverEnabled: true
      CacheSubnetGroupName: !Ref SampleCloudFormationElastiCacheSubnetGroup
      SecurityGroupIds:
        - Fn::ImportValue: !Sub ${StackName}-SecurityGroupElastiCacheRedis

Outputs:
  SampleCloudFormationElastiCacheRedis:
    Description: ElastiCache Redis
    Value: !Ref SampleCloudFormationElastiCacheRedis
    Export:
      Name: !Sub ${StackName}-ElastiCacheRedis

  SampleCloudFormationElastiCacheRedisEndPoint:
    Description: ElastiCache Redis EndPoint
    Value: !GetAtt SampleCloudFormationElastiCacheRedis.PrimaryEndPoint.Address
    Export:
      Name: !Sub ${StackName}-ElastiCacheRedisEndPoint
S3BucketStackの作成
Note
事前に認証情報をもつユーザにS3のアクセス権限を付与しておく。
S3上にバケットを作成するスタックを構築する。テンプレートは以下の通り。
AWSTemplateFormatVersion: '2010-09-09'

Description: Sample CloudFormation template with YAML - S3 Bucket Definition

Parameters:
  S3BucketName:
    Description: Type of this BacketName.
    Type: String
    Default: debugroom-sample-cloudformation-bucket

Resources:
  SampleCloudFormationS3Bucket:
    Type: AWS::S3::Bucket
    Properties:
      BucketName: !Sub ${S3BucketName}
      AccessControl: Private
      PublicAccessBlockConfiguration:
        BlockPublicAcls: True
        BlockPublicPolicy: True
        IgnorePublicAcls: True
        RestrictPublicBuckets: True

Outputs:
  SampleCloudFormationS3Bucket:
    Value: !Ref SampleCloudFormationS3Bucket
SQSStackの作成
Note
事前に認証情報をもつユーザにSQSのアクセス権限を付与しておく。
SQSのキューを作成するスタックを構築する。テンプレートは以下の通り。
AWSTemplateFormatVersion: '2010-09-09'

Description: Sample CloudFormation template with YAML - SQS Definition

Parameters:
  StackName:
    Description: Target VPC Stack Name
    Type: String
    MinLength: 1
    MaxLength: 255
    AllowedPattern: ^[a-zA-Z][-a-zA-Z0-9]*$
    Default: sample-cloudformation-vpc-1

Resources:
  SampleCloudFormationSQSSampleQueue:
    Type: AWS::SQS::Queue
    Properties:
      QueueName: SampleCloudFormationSampleQueue
      VisibilityTimeout: 30
#       FifoQueue: false
      DelaySeconds: 5
      MaximumMessageSize: 26144
      MessageRetentionPeriod: 345600
      ReceiveMessageWaitTimeSeconds: 0

Outputs:
  SampleCloudFormationSQSSampleQueue:
    Description: SQS Sample Queue.
    Value: !Ref SampleCloudFormationSQSSampleQueue
    Export:
      Name: !Sub ${StackName}-SQSSampleQueue
CodeBuildStackの作成
Note
事前に認証情報をもつユーザにCodeBuildのアクセス権限を付与しておく。
Warning
CodeBuildの実行時にはNATGatewayが設定されたプライベートサブネットを設定しておくこと。
CodeBuildプロジェクトを作成するスタックを構築する。テンプレートは以下の通り。
AWSTemplateFormatVersion: '2010-09-09'

Description: Sample CloudFormation template with YAML - CodeBuild

Parameters:
  StackName:
    Description: Target VPC Stack Name
    Type: String
    MinLength: 1
    MaxLength: 255
    AllowedPattern: ^[a-zA-Z][-a-zA-Z0-9]*$
    Default: sample-cloudformation-vpc-1
  CodeBuildCIBFFProjectName:
    Description: CI CodeBuild Project Name
    Type: String
    MinLength: 1
    MaxLength: 255
    AllowedPattern: ^[a-zA-Z][-a-zA-Z0-9]*$
    Default: SampleCloudFormationCodeBuildCIBFF
  CodeBuildCIBackendProjectName:
    Description: CI CodeBuild Project Name
    Type: String
    MinLength: 1
    MaxLength: 255
    AllowedPattern: ^[a-zA-Z][-a-zA-Z0-9]*$
    Default: SampleCloudFormationCodeBuildCIBackend

Resources:
  SampleCloudFormationCodeBuildBFF:
    Type: AWS::CodeBuild::Project
    Properties:
      Name: !Ref CodeBuildCIBFFProjectName
      Source:
        Type: GITHUB
        Location: https://github.com/debugroom/sample-aws-cloudformation.git
        GitCloneDepth: 1
        BuildSpec: bff-app/src/main/codebuild/dev/buildspec.yml
      Triggers:
        Webhook: true
        FilterGroups:
          - - Type: EVENT
              Pattern: PUSH
            - Type: HEAD_REF
#              Pattern: ^refs/heads/feature/.*
              Pattern: ^refs/heads/master
      Environment:
        Type: LINUX_CONTAINER
        Image: aws/codebuild/standard:2.0
        ComputeType: BUILD_GENERAL1_SMALL
      ServiceRole: !Ref SampleCloudFormationCodeBuildBFFServiceRole
      VpcConfig:
        VpcId:
          Fn::ImportValue: !Sub ${StackName}-VPCID
        Subnets:
          - Fn::ImportValue: !Sub ${StackName}-PrivateSubnet1
          - Fn::ImportValue: !Sub ${StackName}-PrivateSubnet2
        SecurityGroupIds:
          - Fn::ImportValue: !Sub ${StackName}-SecurityGroupCodeBuild
      Artifacts:
        Type: NO_ARTIFACTS
      LogsConfig:
        CloudWatchLogs:
          Status: ENABLED
          GroupName: !Sub ${CodeBuildCIBFFProjectName}-CloudWatchLogs-BuildLogGroup-Name

  SampleCloudFormationCodeBuildBackend:
    Type: AWS::CodeBuild::Project
    Properties:
      Name: !Ref CodeBuildCIBackendProjectName
      Source:
        Type: GITHUB
        Location: https://github.com/debugroom/sample-aws-cloudformation.git
        GitCloneDepth: 1
        BuildSpec: backend-app/src/main/codebuild/dev/buildspec.yml
      Triggers:
        Webhook: true
        FilterGroups:
          - - Type: EVENT
              Pattern: PUSH
            - Type: HEAD_REF
#              Pattern: ^refs/heads/feature/.*
              Pattern: ^refs/heads/master
      Environment:
        Type: LINUX_CONTAINER
        Image: aws/codebuild/standard:2.0
        ComputeType: BUILD_GENERAL1_SMALL
      ServiceRole: !Ref SampleCloudFormationCodeBuildBackendServiceRole
      VpcConfig:
        VpcId:
          Fn::ImportValue: !Sub ${StackName}-VPCID
        Subnets:
          - Fn::ImportValue: !Sub ${StackName}-PrivateSubnet1
          - Fn::ImportValue: !Sub ${StackName}-PrivateSubnet2
        SecurityGroupIds:
          - Fn::ImportValue: !Sub ${StackName}-SecurityGroupCodeBuild
      Artifacts:
        Type: NO_ARTIFACTS
      LogsConfig:
        CloudWatchLogs:
          Status: ENABLED
          GroupName: !Sub ${CodeBuildCIBackendProjectName}-CloudWatchLogs-BuildLogGroup-Name

  SampleCloudFormationCodeBuildBFFServiceRole:
    Type: AWS::IAM::Role
    Properties:
      Path: /
      AssumeRolePolicyDocument:
        Statement:
          - Effect: Allow
            Principal:
              Service:
                - codebuild.amazonaws.com
            Action:
              - sts:AssumeRole
      Policies:
        - PolicyName: !Sub ${CodeBuildCIBFFProjectName}-codebuild-base-policy
          PolicyDocument:
            Version: 2012-10-17
            Statement:
              - Effect: Allow
                Resource:
                  - !Sub arn:aws:logs:${AWS::Region}:${AWS::AccountId}:log-group:${CodeBuildCIBFFProjectName}-CloudWatchLogs-BuildLogGroup-Name
                  - !Sub arn:aws:logs:${AWS::Region}:${AWS::AccountId}:log-group:${CodeBuildCIBFFProjectName}-CloudWatchLogs-BuildLogGroup-Name:*
                Action:
                  - logs:CreateLogGroup
                  - logs:CreateLogStream
                  - logs:PutLogEvents
              - Effect: Allow
                Resource:
                  - !Sub arn:aws:s3:::codepipeline-${AWS::Region}-*
                Action:
                  - s3:PutObject
                  - s3:GetObject
                  - s3:GetObjectVersion
                  - s3:GetBucketAcl
                  - s3:GetBucketLocation
        - PolicyName: !Sub ${CodeBuildCIBFFProjectName}-codebuild-vpc-policy
          PolicyDocument:
            Version: 2012-10-17
            Statement:
              - Effect: Allow
                Resource:
                  - "*"
                Action:
                  - ec2:CreateNetworkInterface
                  - ec2:DescribeDhcpOptions
                  - ec2:DescribeNetworkInterfaces
                  - ec2:DeleteNetworkInterface
                  - ec2:DescribeSubnets
                  - ec2:DescribeSecurityGroups
                  - ec2:DescribeVpcs
              - Effect: Allow
                Resource:
                  - !Sub arn:aws:ec2:${AWS::Region}:${AWS::AccountId}:network-interface/*
                Action:
                  - ec2:CreateNetworkInterfacePermission
                Condition:
                  StringEquals:
                    ec2:Subnet:
                      - Fn::ImportValue: !Sub ${StackName}-PrivateSubnet1Arn
                      - Fn::ImportValue: !Sub ${StackName}-PrivateSubnet2Arn
                    ec2:AuthorizedService: codebuild.amazonaws.com
        - PolicyName: !Sub ${CodeBuildCIBFFProjectName}-ssm-parameterstore-policy
          PolicyDocument:
            Version: 2012-10-17
            Statement:
              - Effect: Allow
                Resource:
                  - "*"
                Action:
                  - ssm:DescribeParameters
              - Effect: Allow
                Resource:
                  - !Sub arn:aws:ssm:${AWS::Region}:${AWS::AccountId}:parameter/*
                Action:
                  - ssm:GetParameters

  SampleCloudFormationCodeBuildBackendServiceRole:
    Type: AWS::IAM::Role
    Properties:
      Path: /
      AssumeRolePolicyDocument:
        Statement:
          - Effect: Allow
            Principal:
              Service:
                - codebuild.amazonaws.com
            Action:
              - sts:AssumeRole
      Policies:
        - PolicyName: !Sub ${CodeBuildCIBackendProjectName}-codebuild-base-policy
          PolicyDocument:
            Version: 2012-10-17
            Statement:
              - Effect: Allow
                Resource:
                  - !Sub arn:aws:logs:${AWS::Region}:${AWS::AccountId}:log-group:${CodeBuildCIBackendProjectName}-CloudWatchLogs-BuildLogGroup-Name
                  - !Sub arn:aws:logs:${AWS::Region}:${AWS::AccountId}:log-group:${CodeBuildCIBackendProjectName}-CloudWatchLogs-BuildLogGroup-Name:*
                Action:
                  - logs:CreateLogGroup
                  - logs:CreateLogStream
                  - logs:PutLogEvents
              - Effect: Allow
                Resource:
                  - !Sub arn:aws:s3:::codepipeline-${AWS::Region}-*
                Action:
                  - s3:PutObject
                  - s3:GetObject
                  - s3:GetObjectVersion
                  - s3:GetBucketAcl
                  - s3:GetBucketLocation
        - PolicyName: !Sub ${CodeBuildCIBackendProjectName}-codebuild-vpc-policy
          PolicyDocument:
            Version: 2012-10-17
            Statement:
              - Effect: Allow
                Resource:
                  - "*"
                Action:
                  - ec2:CreateNetworkInterface
                  - ec2:DescribeDhcpOptions
                  - ec2:DescribeNetworkInterfaces
                  - ec2:DeleteNetworkInterface
                  - ec2:DescribeSubnets
                  - ec2:DescribeSecurityGroups
                  - ec2:DescribeVpcs
              - Effect: Allow
                Resource:
                  - !Sub arn:aws:ec2:${AWS::Region}:${AWS::AccountId}:network-interface/*
                Action:
                  - ec2:CreateNetworkInterfacePermission
                Condition:
                  StringEquals:
                    ec2:Subnet:
                      - Fn::ImportValue: !Sub ${StackName}-PrivateSubnet1Arn
                      - Fn::ImportValue: !Sub ${StackName}-PrivateSubnet2Arn
                    ec2:AuthorizedService: codebuild.amazonaws.com
        - PolicyName: !Sub ${CodeBuildCIBackendProjectName}-ssm-parameterstore-policy
            PolicyDocument:
              Version: 2012-10-17
              Statement:
                - Effect: Allow
                  Resource:
                    - "*"
                  Action:
                    - ssm:DescribeParameters
                - Effect: Allow
                  Resource:
                    - !Sub arn:aws:ssm:${AWS::Region}:${AWS::AccountId}:parameter/*
                  Action:
                    - ssm:GetParameters

Outputs:
  SampleCloudFormationCodeBuildBFF:
    Description: CI CodeBuild Project for BFF
    Value: !Ref SampleCloudFormationCodeBuildBFF
    Export:
      Name: !Sub ${StackName}-CodeBuildBFF

  SampleCloudFormationCodeBuildBackend:
    Description: CI CodeBuild Project for Backend
    Value: !Ref SampleCloudFormationCodeBuildBackend
    Export:
      Name: !Sub ${StackName}-CodeBuildBackend
CodePipelineの作成
Note
事前に認証情報をもつユーザにCodePipelineのアクセス権限(GetPipelineなど)を付与しておく。
Note
事前に対象となるGitHubレポジトリへのオーナー権限をもつユーザのパーソナルアクセストークンを払い出しておく。トークンに付与する権限(Select scopes)はRepoおよび、admin:repo_hookの2つを付与する。
Warning
パイプライン中に実行されるCodeBuildの実行時にはNATGatewayが設定されたプライベートサブネットを設定しておくこと。
AWSTemplateFormatVersion: '2010-09-09'

Description: Sample CloudFormation template with YAML - CodePipeline

Parameters:
  StackName:
    Description: Target VPC Stack Name
    Type: String
    MinLength: 1
    MaxLength: 255
    AllowedPattern: ^[a-zA-Z][-a-zA-Z0-9]*$
    Default: sample-cloudformation-vpc-1
  CodePipelineProjectName:
    Description: CodePipeline CD Project Name
    Type: String
    MinLength: 1
    MaxLength: 255
    AllowedPattern: ^[a-zA-Z][-a-zA-Z0-9]*$
    Default: SampleCloudFormationCodePipeline
  CodeBuildBFFStagingContaierBuildProjectName:
    Description: CI CodeBuild Project Name
    Type: String
    MinLength: 1
    MaxLength: 255
    AllowedPattern: ^[a-zA-Z][-a-zA-Z0-9]*$
    Default: SampleCloudFormationCodeBuildCDBFF
  CodeBuildBackendStagingContainerBuildProjectName:
    Description: CI CodeBuild Project Name
    Type: String
    MinLength: 1
    MaxLength: 255
    AllowedPattern: ^[a-zA-Z][-a-zA-Z0-9]*$
    Default: SampleCloudFormationCodeBuildCDBackend
  S3BucketName:
    Description: Type of this BacketName.
    Type: String
    Default: debugroom-sample-cloudformation-codepipeline

Resources:
  SampleCloudFormationCodePipelineProject:
    Type: AWS::CodePipeline::Pipeline
    DependsOn: SampleCloudFormationS3BucketForCodePipeline
    Properties:
      Name: SampleCloudFormationCodePipeline
      RoleArn: !GetAtt SampleCloudFormationCodePipelineServiceRole.Arn
      Stages:
        - Name: SourceStage
          Actions:
            - Name: SourceAction
              ActionTypeId:
                Category: Source
                Owner: ThirdParty
                Provider: GitHub
                Version: "1"
              OutputArtifacts:
                - Name: SourceOutput
              Configuration:
                Owner: "{{resolve:ssm:GitHubRepositoryOwnerName:1}}"
                Repo: sample-aws-cloudformation
                Branch: master
                OAuthToken: "{{resolve:ssm:GitHubOAuthToken:1}}"
              RunOrder: 1
        - Name: BackendStagingBuildStage
          Actions:
            - Name: BackendStagingBuildAction
              InputArtifacts:
                - Name: SourceOutput
              ActionTypeId:
                Category: Build
                Owner: AWS
                Provider: CodeBuild
                Version: "1"
              OutputArtifacts:
                - Name: BuildBackendStagingArtifact
              Configuration:
                ProjectName: !Ref SampleCloudFormationCodeBuildBackendStagingBuildContainer
      ArtifactStore:
        Location: !Ref S3BucketName
        Type: S3


  SampleCloudFormationCodePipelineServiceRole:
    Type: AWS::IAM::Role
    Properties:
      Path: /
      AssumeRolePolicyDocument:
        Version: 2012-10-17
        Statement:
          - Effect: Allow
            Principal:
              Service:
                - codepipeline.amazonaws.com
            Action:
              - sts:AssumeRole
      Policies:
        - PolicyName: !Sub ${CodePipelineProjectName}-codepipeline-base-policy
          PolicyDocument:
            Version: 2012-10-17
            Statement:
              - Action:
                  - elasticbeanstalk:*
                  - ec2:*
                  - elasticloadbalancing:*
                  - autoscaling:*
                  - cloudwatch:*
                  - s3:*
                  - sns:*
                  - cloudformation:*
                  - rds:*
                  - sqs:*
                  - ecs:*
                Resource: "*"
                Effect: Allow
              - Action:
                  - codecommit:GetBranch
                  - codecommit:GetCommit
                  - codecommit:GetUploadArchiveStatus
                  - codecommit:UploadArchive
                  - codecommit:CancelUploadArchive
                Resource: "*"
                Effect: Allow
              - Action:
                  - codedeploy:CreateDeployment
                  - codedeploy:GetApplicationRevision
                  - codedeploy:GetDeployment
                  - codedeploy:GetDeploymentConfig
                  - codedeploy:RegisterApplicationRevision
                Resource: "*"
                Effect: Allow
              - Action:
                  - codebuild:BatchGetBuilds
                  - codebuild:StartBuild
                Resource: "*"
                Effect: Allow
              - Action:
                  - iam:PassRole
                Resource: "*"
                Effect: Allow
                Condition:
                  StringEqualsIfExists:
                    iam:PassedToService:
                      - cloudformation.amazonaws.com
                      - elasticbeanstalk.amazonaws.com
                      - ec2.amazonaws.com
                      - ecs-tasks.amazonaws.com
              - Action:
                  - lambda:InvokeFunction
                  - lambda:ListFunctions
                Resource: "*"
                Effect: Allow
              - Action:
                  - opsworks:CreateDeployment
                  - opsworks:DescribeApps
                  - opsworks:DescribeCommands
                  - opsworks:DescribeDeployments
                  - opsworks:DescribeInstances
                  - opsworks:DescribeStacks
                  - opsworks:UpdateApp
                  - opsworks:UpdateStack
                Resource: "*"
                Effect: Allow
              - Action:
                  - devicefarm:ListProjects
                  - devicefarm:ListDevicePools
                  - devicefarm:GetRun
                  - devicefarm:GetUpload
                  - devicefarm:CreateUpload
                  - devicefarm:ScheduleRun
                Resource: "*"
                Effect: Allow
              - Action:
                  - servicecatalog:ListProvisioningArtifacts
                  - servicecatalog:CreateProvisioningArtifacts
                  - servicecatalog:DescribeProvisioningArtifacts
                  - servicecatalog:DeleteProvisioningArtifacts
                  - servicecatalog:UpdateProduct
                Resource: "*"
                Effect: Allow
              - Action:
                  - ecr:DescribeImages
                Resource: "*"
                Effect: Allow
        - PolicyName: !Sub ${CodePipelineProjectName}-ssm-parameterstore-policy
          PolicyDocument:
            Version: 2012-10-17
            Statement:
              - Effect: Allow
                Resource:
                  - "*"
                Action:
                  - ssm:DescribeParameters
              - Effect: Allow
                Resource:
                  - !Sub arn:aws:ssm:${AWS::Region}:${AWS::AccountId}:parameter/*
                Action:
                  - ssm:GetParameters

  SampleCloudFormationCodePipelineWebhook:
    Type: AWS::CodePipeline::Webhook
    Properties:
      Name: SampleCloudFormationGitHubWebHook
      Authentication: GITHUB_HMAC
      AuthenticationConfiguration:
        SecretToken: "{{resolve:ssm:GitHubSecret:1}}"
      Filters:
        - JsonPath: "$.ref"
          MatchEquals: refs/heads/{Branch}
      TargetPipeline: !Ref SampleCloudFormationCodePipelineProject
      TargetAction: SourceAction
      TargetPipelineVersion: !GetAtt SampleCloudFormationCodePipelineProject.Version
      RegisterWithThirdParty: True

  SampleCloudFormationCodeBuildBackendStagingBuildContainer:
    Type: AWS::CodeBuild::Project
    Properties:
      Name: !Ref CodeBuildBackendStagingContainerBuildProjectName
      Source:
        Type: CODEPIPELINE
        GitCloneDepth: 1
        BuildSpec: backend-app/src/main/codebuild/staging/buildspec.yml
      Environment:
        PrivilegedMode: True
        Type: LINUX_CONTAINER
        Image: aws/codebuild/standard:2.0
        ComputeType: BUILD_GENERAL1_SMALL
      ServiceRole: !Ref SampleCloudFormationCodeBuildBackendStagingServiceRole
      VpcConfig:
        VpcId:
          Fn::ImportValue: !Sub ${StackName}-VPCID
        Subnets:
          - Fn::ImportValue: !Sub ${StackName}-PrivateSubnet1
          - Fn::ImportValue: !Sub ${StackName}-PrivateSubnet2
        SecurityGroupIds:
          - Fn::ImportValue: !Sub ${StackName}-SecurityGroupCodeBuild
      Artifacts:
        Type: CODEPIPELINE
      LogsConfig:
        CloudWatchLogs:
          Status: ENABLED
          GroupName: !Sub ${CodeBuildBackendStagingContainerBuildProjectName}-CloudWatchLogs-BuildLogGroup-Name

  SampleCloudFormationCodeBuildBackendStagingServiceRole:
    Type: AWS::IAM::Role
    Properties:
      Path: /
      AssumeRolePolicyDocument:
        Statement:
          - Effect: Allow
            Principal:
              Service:
                - codebuild.amazonaws.com
            Action:
              - sts:AssumeRole
      Policies:
        - PolicyName: !Sub ${CodeBuildBackendStagingContainerBuildProjectName}-codebuild-base-policy
          PolicyDocument:
            Version: 2012-10-17
            Statement:
              - Effect: Allow
                Resource:
                  - !Sub arn:aws:logs:${AWS::Region}:${AWS::AccountId}:log-group:${CodeBuildBackendStagingContainerBuildProjectName}-CloudWatchLogs-BuildLogGroup-Name
                  - !Sub arn:aws:logs:${AWS::Region}:${AWS::AccountId}:log-group:${CodeBuildBackendStagingContainerBuildProjectName}-CloudWatchLogs-BuildLogGroup-Name:*
                Action:
                  - logs:CreateLogGroup
                  - logs:CreateLogStream
                  - logs:PutLogEvents
              - Effect: Allow
                Resource:
                  - !Sub arn:aws:s3:::${S3BucketName}/*
                Action:
                  - s3:PutObject
                  - s3:GetObject
                  - s3:GetObjectVersion
                  - s3:GetBucketAcl
                  - s3:GetBucketLocation
        - PolicyName: !Sub ${CodeBuildBackendStagingContainerBuildProjectName}-codebuild-vpc-policy
          PolicyDocument:
            Version: 2012-10-17
            Statement:
              - Effect: Allow
                Resource:
                  - "*"
                Action:
                  - ec2:CreateNetworkInterface
                  - ec2:DescribeDhcpOptions
                  - ec2:DescribeNetworkInterfaces
                  - ec2:DeleteNetworkInterface
                  - ec2:DescribeSubnets
                  - ec2:DescribeSecurityGroups
                  - ec2:DescribeVpcs
              - Effect: Allow
                Resource:
                  - !Sub arn:aws:ec2:${AWS::Region}:${AWS::AccountId}:network-interface/*
                Action:
                  - ec2:CreateNetworkInterfacePermission
                Condition:
                  StringEquals:
                    ec2:Subnet:
                      - Fn::ImportValue: !Sub ${StackName}-PrivateSubnet1Arn
                      - Fn::ImportValue: !Sub ${StackName}-PrivateSubnet2Arn
                    ec2:AuthorizedService: codebuild.amazonaws.com
        - PolicyName: !Sub ${CodeBuildBackendStagingContainerBuildProjectName}-ssm-parameterstore-policy
          PolicyDocument:
            Version: 2012-10-17
            Statement:
              - Effect: Allow
                Resource:
                  - "*"
                Action:
                  - ssm:DescribeParameters
              - Effect: Allow
                Resource:
                  - !Sub arn:aws:ssm:${AWS::Region}:${AWS::AccountId}:parameter/*
                Action:
                  - ssm:GetParameters

  SampleCloudFormationS3BucketForCodePipeline:
    Type: AWS::S3::Bucket
    Properties:
      BucketName: !Sub ${S3BucketName}
      AccessControl: Private
      PublicAccessBlockConfiguration:
        BlockPublicAcls: True
        BlockPublicPolicy: True
        IgnorePublicAcls: True
        RestrictPublicBuckets: True
Stackの削除
Stackを削除することで、構築していたAWSリソースごと削除が可能である。
#!/usr/bin/env bash

stack_name="sample-cloudformation-vpc-1"

aws cloudformation delete-stack --stack-name ${stack_name}
taskcatを用いたCloudFormationテンプレートのテスト
AWS Quickstartはtaskcatという、CLoudformationのテストを自動化するためのツールをオープンソースで公開している。 taskcatは複数のAWSリージョンで任意に実行が可能で、各リージョンごとにテストが正常に終了したかどうかのレポートの出力が可能である。 テンプレートに渡すパラメータも細かく制御可能であり、テスト実行後は自動的にスタックが削除される。
taskcatのインストール
taskcatはpythonおよびpipを使ったインストールのみをサポートしている。事前にHomebrewなどでpython3およびpip3の環境構築などを行っておくこと。
Note
dockerを用いたインストール手順も準備中の模様。
Warning
taskcatはWindowsはサポートしていない。Windows Subsystem for Linux (WSL) などを使ってWindow10でLinuxを使用した環境などを準備すること。
pip3を使ってtaskcatをインストールする。
# pip3 install taskcat --user

Collecting taskcat
Downloading https://files.pythonhosted.org/packages/fe/a7/cc58c276c77b0e15529fcf5d67d2f3004deed8003667b6dec50e76d6138f/taskcat-0.9.8-py3-none-any.whl (73kB)
  100% |████████████████████████████████| 81kB 2.4MB/s

// omit

Successfully installed backports.shutil-get-terminal-size-1.0.0 dataclasses-0.7 dataclasses-jsonschema-2.12.0 docker-3.7.3 dulwich-0.19.14 mock-2.0.0 mypy-extensions-0.4.3 pbr-5.4.4 reprint-0.5.2 requests-2.22.0 tabulate-0.8.6 taskcat-0.9.8 typing-extensions-3.7.4.1

# taskcat --version
 _            _             _
| |_ __ _ ___| | _____ __ _| |_
| __/ _` / __| |/ / __/ _` | __|
| || (_| \__ \   < (_| (_| | |_
 \__\__,_|___/_|\_\___\__,_|\__|

version 0.9.8
0.9.8
Note
–userオプションをつけない場合、パッケージのインストールに失敗する場合がある。下記のメッセージが出力された場合は、–userオプションを付与しておくこと。
Consider using the –user option or check the permissions.
Note
taskcatは2020年1月時点で最新バージョンが0.9.8であるが、0.8系以前のバージョンとCLIのインターフェースが異なる。v0.8.xではtaskcat -c xxxx/taskcat.ymlというコマンドが、0.9ではtaskcat test runなど。その他設定ファイルの書き方なども変更されているので、正しいパラメータは 公式のページ を確認すること。
taskcatを使ったテストの実行
作成したCloudformationテンプレートがあるプロジェクト配下に.taskcat.ymlというファイルを作成する。 ここでは例として、 VPCStackの作成 で作成した、VPC作成テンプレートを北カリフォルニア(us-west-1)リージョンでテストする前提で作成する。
project:
  name: sample-aws-cloudformation
  regions:
    - us-west-1
tests:
  vpc-test:
    template: ./sample-vpc-cfn.yaml
設定ファイルを作成したら、taskcat test runコマンドを実行する。ここでは、同じプロジェクト配下にtest.shスクリプトを作成し、コマンド実行する。
#!/usr/bin/env bash

taskcat test run
実行後は以下のように結果が出力される。
 _            _             _
| |_ __ _ ___| | _____ __ _| |_
| __/ _` / __| |/ / __/ _` | __|
| || (_| \__ \   < (_| (_| | |_
 \__\__,_|___/_|\_\___\__,_|\__|


version 0.9.8
[INFO   ] : Lint passed for test vpc-test on template /Users/xxxxxxx/sample-aws-cloudformation/sample-vpc-cfn.yaml
[S3: -> ] s3://tcat-sample-aws-cloudformation-2qe824bz/sample-aws-cloudformation/sample-codebuild-cfn.yml

[INFO   ] : ┏ stack Ⓜ tCaT-sample-aws-cloudformation-vpc-test-8e49ba5f18e440f8ac91455e5ea935af
[INFO   ] : ┣ region: us-west-1
[INFO   ] : ┗ status: CREATE_COMPLETE
[INFO   ] : Collecting CloudFormation Logs
[INFO   ] : Collecting logs for tCaT-sample-aws-cloudformation-vpc-test-8e49ba5f18e440f8ac91455e5ea935af
[INFO   ] :   |StackName: tCaT-sample-aws-cloudformation-vpc-test-8e49ba5f18e440f8ac91455e5ea935af
[INFO   ] :   |Region: us-west-1
[INFO   ] :   |Logging to: /Users/xxxxx/sample-aws-cloudformation/taskcat_outputs/tCaT-sample-aws-cloudformation-vpc-test-8e49ba5f18e440f8ac91455e5ea935af-us-west-1-cfnlogs.txt
[INFO   ] :   |Tested on: Tuesday, 07. January 2020 04:15AM
[INFO   ] : ------------------------------------------------------------------------------------------
[INFO   ] : ResourceStatusReason:
[INFO   ] : Stack launch was successful
[INFO   ] : ==========================================================================================
[INFO   ] : Reporting on arn:aws:cloudformation:us-west-1:576249913131:stack/tCaT-sample-aws-cloudformation-vpc-test-8e49ba5f18e440f8ac91455e5ea935af/b904d9c0-30b8-11ea-b55a-02e70048949f
[INFO   ] : Deleting stack: arn:aws:cloudformation:us-west-1:576249913131:stack/tCaT-sample-aws-cloudformation-vpc-test-8e49ba5f18e440f8ac91455e5ea935af/b904d9c0-30b8-11ea-b55a-02e70048949f
[INFO   ] : ┏ stack Ⓜ tCaT-sample-aws-cloudformation-vpc-test-8e49ba5f18e440f8ac91455e5ea935af
[INFO   ] : ┣ region: us-west-1
[INFO   ] : ┗ status: DELETE_COMPLETE
 Not in terminal, reprint now using normal build-in print function.

  ┏ stack Ⓜ tCaT-sample-aws-cloudformation-vpc-test-8e49ba5f18e440f8ac91455e5ea935af
  ┣ region: us-west-1
  ┗ status: DELETE_IN_PROGRESS
  // omit

 Process finished with exit code 0
実行が完了すると、プロジェクトは以下にtaskcat_outputsディレクトリが作成され、結果を出力したレポートが出力される。
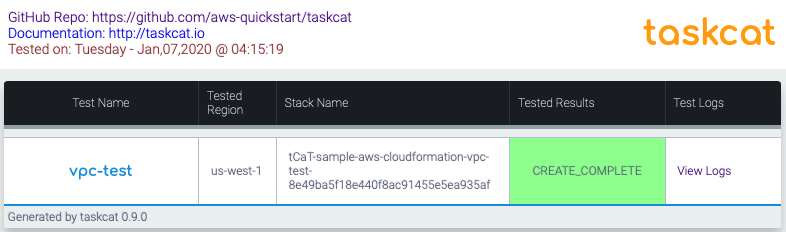
Note
taskcatではパラメータを指定できるが、トークンパラメータも用意されている。詳細は こちらのガイド を参考のこと。
Elastic Beanstalk
Elastic Beanstalkは、Webアプリケーションを自動デプロイ、スケーリングするサービスである。
Todo
Elastic Beanstalkについて詳述。
AWS CDK(AWS Cloud Development Kit)
AWS CDKはインフラをPython、TypeScriptなどの言語で記述する言語である。
Note
2019.9時点でGA中のサービス。
Todo
CDKについて詳述。
Workspaces
Overview
Amazon Workspacesはクラウド上に構築する仮想デスクトップサービスである。仮想デスクトップOSとしてAmazonLinuxやWindowsを選択でき、ハードウェアスペックやソフトウェア構成を複数選択できる。 料金は月額単位の固定料金と時間単位のオンデマンドオプションを選択できる。
Workspacesでは認証のためのディレクトリおよび、ヴァーチャルマシンに相当するイメージ、イメージとハードウェアを組み合わせたバンドルを選択して構築する。
事前環境設定
workspacesを構築するために事前にVPCおよびパブリックサブネット、ルートテーブル、インターネットゲートウェイを構築する。ここでは、CloudFormationを使い、環境の構築を行う。
AWSTemplateFormatVersion: '2010-09-09'

Description: Sample CloudFormation template with YAML - VPC

Parameters:
  VPCName:
    Description: Target VPC Stack Name
    Type: String
    MinLength: 1
    MaxLength: 255
    AllowedPattern: ^[a-zA-Z][-a-zA-Z0-9]*$
    Default: sample-cloudformation-vpc
  VPCCiderBlock:
    Description: CiderBlock paramater for VPC
    Type: String
    MinLength: 9
    MaxLength: 18
    AllowedPattern: (\d{1,3})\.(\d{1,3})\.(\d{1,3})\.(\d{1,3})/(\d{1,2})
    Default: 172.200.0.0/16
  PublicSubnet1CiderBlock:
    Description: CiderBlock paramater for VPC
    Type: String
    MinLength: 9
    MaxLength: 18
    AllowedPattern: (\d{1,3})\.(\d{1,3})\.(\d{1,3})\.(\d{1,3})/(\d{1,2})
    Default: 172.200.1.0/24
  PublicSubnet2CiderBlock:
    Description: CiderBlock paramater for VPC
    Type: String
    MinLength: 9
    MaxLength: 18
    AllowedPattern: (\d{1,3})\.(\d{1,3})\.(\d{1,3})\.(\d{1,3})/(\d{1,2})
    Default: 172.200.2.0/24
  PrivateSubnet1CiderBlock:
    Description: CiderBlock paramater for VPC
    Type: String
    MinLength: 9
    MaxLength: 18
    AllowedPattern: (\d{1,3})\.(\d{1,3})\.(\d{1,3})\.(\d{1,3})/(\d{1,2})
    Default: 172.200.3.0/24
  PrivateSubnet2CiderBlock:
    Description: CiderBlock paramater for VPC
    Type: String
    MinLength: 9
    MaxLength: 18
    AllowedPattern: (\d{1,3})\.(\d{1,3})\.(\d{1,3})\.(\d{1,3})/(\d{1,2})
    Default: 172.200.4.0/24


Resources:
  VPC:
    Type: AWS::EC2::VPC
    Properties:
      CidrBlock: !Sub ${VPCCiderBlock}
      InstanceTenancy: default
      EnableDnsSupport: true
      EnableDnsHostnames: true
      Tags:
        - Key: Name
          Value: !Sub ${VPCName}

  PublicSubnet1:
    Type: AWS::EC2::Subnet
    Properties:
      CidrBlock: !Sub ${PublicSubnet1CiderBlock}
      VpcId: !Ref VPC
      AvailabilityZone: !Select [ 0, !GetAZs '' ]
      Tags:
        - Key: Name
          Value: !Sub ${VPCName}-PublicSubnet1

  PublicSubnet2:
    Type: AWS::EC2::Subnet
    Properties:
      CidrBlock: !Sub ${PublicSubnet2CiderBlock}
      VpcId: !Ref VPC
      AvailabilityZone: !Select [ 1, !GetAZs '' ]
      Tags:
        - Key: Name
          Value: !Sub ${VPCName}-PublicSubnet2

  PrivateSubnet1:
    Type: AWS::EC2::Subnet
    Properties:
      CidrBlock: !Sub ${PrivateSubnet1CiderBlock}
      VpcId: !Ref VPC
      AvailabilityZone: !Select [ 0, !GetAZs '' ]
      Tags:
        - Key: Name
          Value: !Sub ${VPCName}-PrivateSubnet1

  PrivateSubnet2:
    Type: AWS::EC2::Subnet
    Properties:
      CidrBlock: !Sub ${PrivateSubnet2CiderBlock}
      VpcId: !Ref VPC
      AvailabilityZone: !Select [ 1, !GetAZs '' ]
      Tags:
        - Key: Name
          Value: !Sub ${VPCName}-PrivateSubnet2

  IGW:
    Type: AWS::EC2::InternetGateway
    Properties:
      Tags:
        - Key: Name
          Value: !Sub ${VPCName}-IGW

  IGWAttach:
    Type: AWS::EC2::VPCGatewayAttachment
    Properties:
      InternetGatewayId: !Ref IGW
      VpcId: !Ref VPC

  CustomRouteTable:
    Type: AWS::EC2::RouteTable
    Properties:
      VpcId: !Ref VPC
      Tags:
        - Key: Name
          Value: !Sub ${VPCName}-PublicRoute

  CustomRoute:
    Type: AWS::EC2::Route
    Properties:
      RouteTableId: !Ref CustomRouteTable
      DestinationCidrBlock: 0.0.0.0/0
      GatewayId: !Ref IGW

  PublicSubnet1Association:
    Type: AWS::EC2::SubnetRouteTableAssociation
    Properties:
      SubnetId: !Ref PublicSubnet1
      RouteTableId: !Ref CustomRouteTable

  PublicSubnet2Association:
    Type: AWS::EC2::SubnetRouteTableAssociation
    Properties:
      SubnetId: !Ref PublicSubnet2
      RouteTableId: !Ref CustomRouteTable

Outputs:
  VPC:
    Description: VPC ID
    Value: !Ref VPC
    Export:
      Name: !Sub ${VPCName}-VPCID

  PublicSubnet1:
    Description: PublicSubnet1
    Value: !Ref PublicSubnet1
    Export:
      Name: !Sub ${VPCName}-PublicSubnet1

  PublicSubnet1Arn:
    Description: PublicSubnet1Arn
    Value: !Sub
      - arn:aws:ec2:${AWS::Region}:${AWS::AccountId}:subnet/${PublicSubnet1}
      - PublicSubnet1: !Ref PublicSubnet1
    Export:
      Name: !Sub ${VPCName}-PublicSubnet1Arn

  PublicSubnet2:
    Description: PublicSubnet2
    Value: !Ref PublicSubnet2
    Export:
      Name: !Sub ${VPCName}-PublicSubnet2

  PublicSubnet2Arn:
    Description: PublicSubnet2Arn
    Value: !Sub
      - arn:aws:ec2:${AWS::Region}:${AWS::AccountId}:subnet/${PublicSubnet2}
      - PublicSubnet2: !Ref PublicSubnet2
    Export:
      Name: !Sub ${VPCName}-PublicSubnet2Arn

  PrivateSubnet1:
    Description: PrivateSubnet1
    Value: !Ref PrivateSubnet1
    Export:
      Name: !Sub ${VPCName}-PrivateSubnet1

  PrivateSubnet1Arn:
    Description: PrivateSubnet1Arn
    Value: !Sub
      - arn:aws:ec2:${AWS::Region}:${AWS::AccountId}:subnet/${PrivateSubnet1}
      - PrivateSubnet1: !Ref PrivateSubnet1
    Export:
      Name: !Sub ${VPCName}-PrivateSubnet1Arn

  PrivateSubnet2:
    Description: PrivateSubnet2
    Value: !Ref PrivateSubnet2
    Export:
      Name: !Sub ${VPCName}-PrivateSubnet2

  PrivateSubnet2Arn:
    Description: PrivateSubnet2Arn
      Value: !Sub
        - arn:aws:ec2:${AWS::Region}:${AWS::AccountId}:subnet/${PrivateSubnet2}
        - PrivateSubnet2: !Ref PrivateSubnet2
  Export:
    Name: !Sub ${VPCName}-PrivateSubnet2Arn
スタック名とテンプレートパスを指定してCLIスクリプトを実行する。
#!/usr/bin/env bash

stack_name="sample-vpc"
template_path="sample-vpc-cfn.yml"

aws cloudformation deploy --stack-name ${stack_name} --template-file ${template_path} --parameter-overrides ${parameters} --capabilities CAPABILITY_IAM
Workspaces環境の構築
AWSコンソール上からWorkspacesを利用する環境を構築する。仮想マシンとしてAmazonLinuxを選択する。サービスメニュー「workspaces」で、「詳細設定」の「起動」ボタンを押下する。

ディレクトリタイプでは「SimpleAD」を選択する。
組織名およびDNS名、管理者パスワードを入力する。
workspacesを構築するVPCおよびパブリックサブネットを入力する。
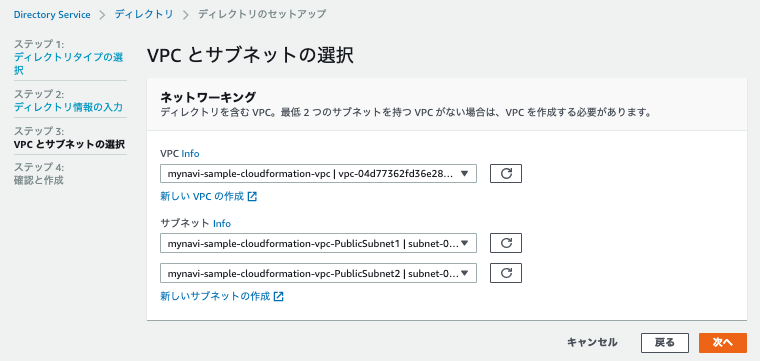
設定内容を確認し、「ディレクトリの作成」ボタンを押下する。
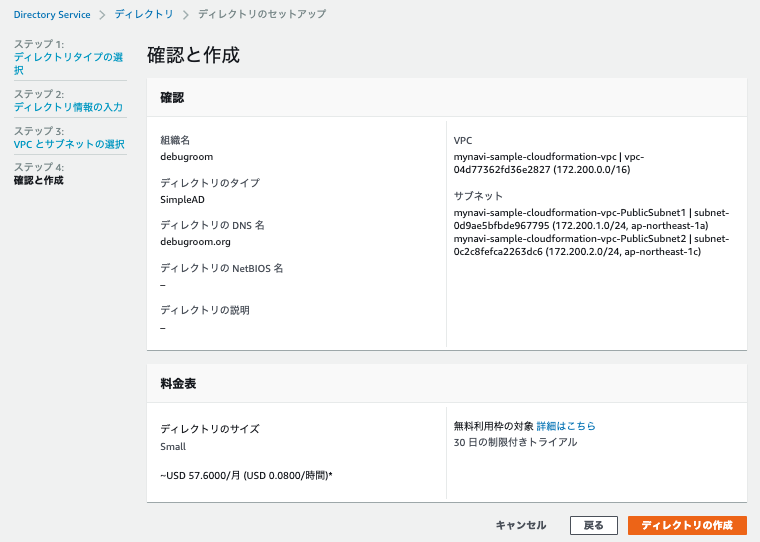
ディレクトリのステータスがRequestedで作成中の状態になる。
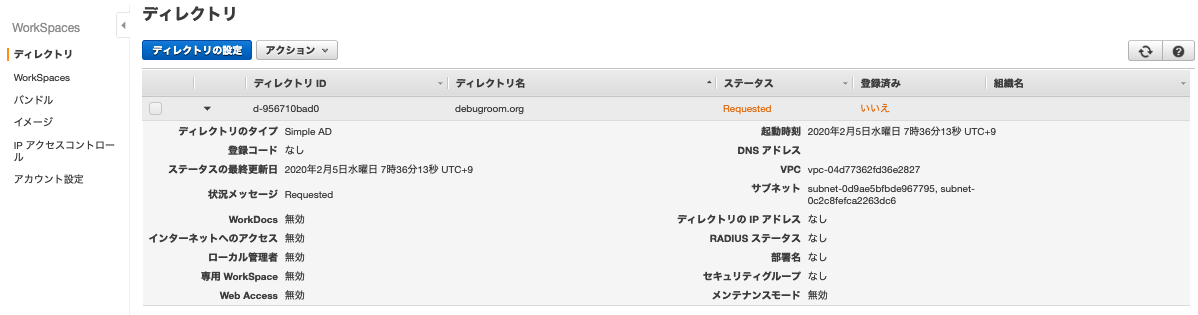
ディレクトリのステータスがActiveに変わるのを待つ。
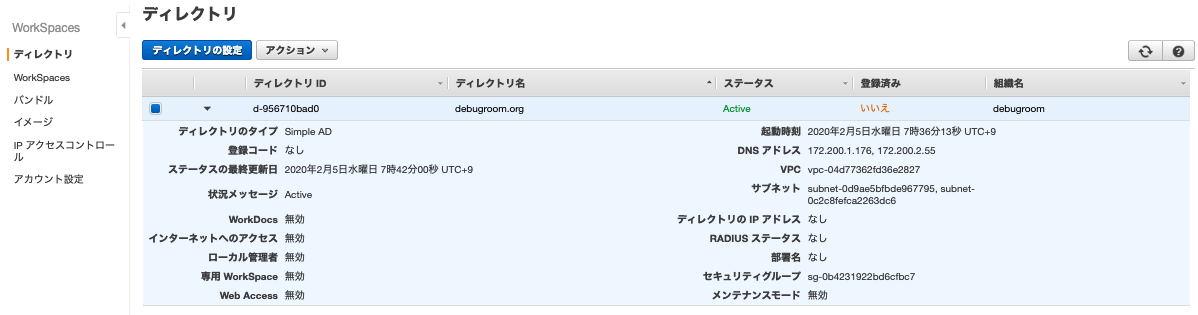
アクションボタンから「登録」を選択し、パブリックサブネットを2つ選択して、「セルフサービスアクセス許可の有効化」および、「Amazon WorkDocsの有効化」を「はい」でチェックしておく。
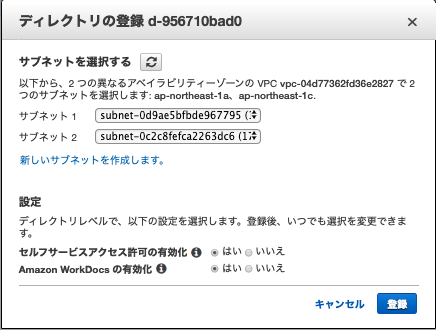
Workspacesメニューから、「Workspacesの起動」ボタンを押下する。
上記で作成したディレクトリを選択する。
ユーザを作成して追加する。
ディレクトリからユーザを選択し、「次のステップ」ボタンを押下する。
起動するOS・スペックバンドルを選択する。
実行モードを「AutoStop」にして「次のステップ」ボタンを押下し、WorkSpacesを起動する。メールが届くのでその後案内に従い、WorkSpacesクライアントをローカル端末に導入する。
Note
OSとして起動されるAmazonLinuxにDockerインストール後、Docker buildコマンドを実行する等で通信エラーが発生する。Docker起動ファイル /usr/lib/systemd/system/docker.serviceの起動コマンドにDNSの設定(–dns=8.8.8.8を追加)を行う。
sudo vi /usr/lib/systemd/system/docker.service

ExecStart=/usr/bin/dockerd -H fd:// --dns=8.8.8.8 $DOCKER_NETWORK_OPTIONS

sudo systemctl daemon-reload
sudo systemctl restart docker