【第39回】AWS CloudFormationを用いた基盤自動化(19)ECSサービスの構築
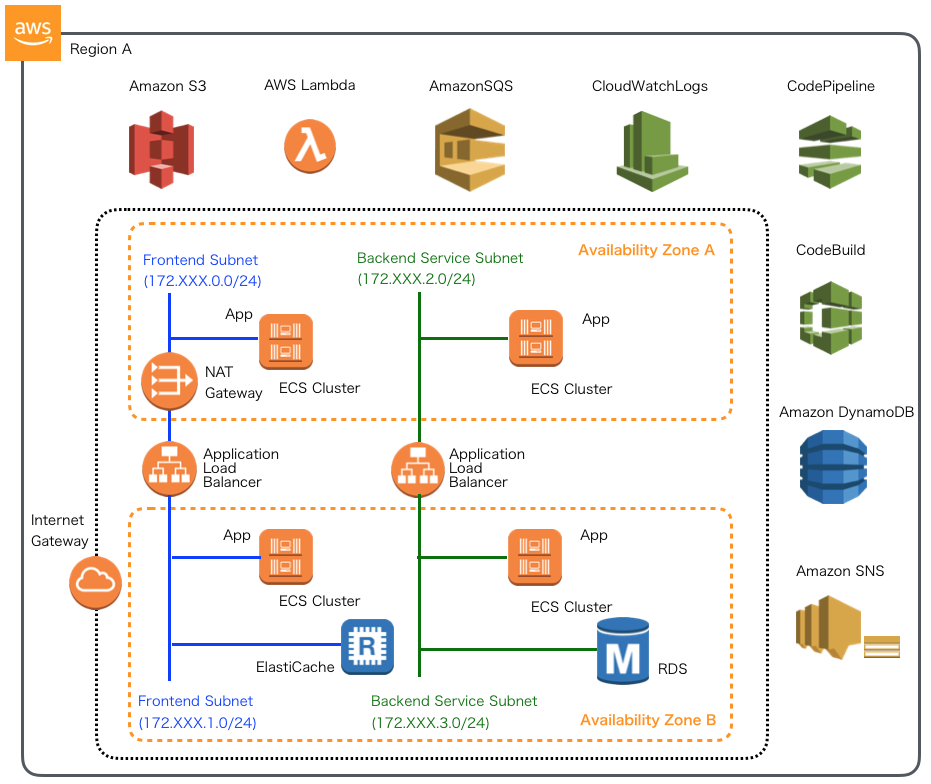
本連載では、以下のイメージの構成にあるAWSリソース基盤自動化環境の構築を実践しています。

前回は、タスク定義したコンテナで実行されるアプリケーションが使用するAWSリソースへのアクセスポリシーを定義し、前回作成したECSタスクのIAMロールへアタッチするCloudFormationテンプレートを実装しました。 今回はECSサービスをCloudFormationテンプレートを使って構築します。実際のソースコードは GitHub 上にコミットしています。 ソースコード中で本質的でない記述を一部省略しているので、実行コードを作成する場合は、必要に応じて適宜GitHub上のソースコードも参照してください。
ECSサービススタック構築テンプレート
ECSサービス構築は クラウドネイティブ基本第10回 で実施した要領と同等のものを構築します。 ECSサービスをCloudFormationで構築する場合、リソースタイプが、 AWS::ECS::Service が必要です。 プロパティとして設定可能な属性は、上記リンク先の通りですが、加えて、ECSを商用環境、ステージング環境、開発環境という3つのパターンに分けて作成するようにします。 また、同一のECSタスク定義で、ターゲットグループごとに実行コンテナを分けて複数サービスを実行してみます。
ECSサービスを構築するテンプレートのサンプルは以下の通りです。
AWSTemplateFormatVersion: '2010-09-09'

// omit

Parameters:
// omit
  EnvType:
    Description: Which environments to deploy your service.
    Type: String
    AllowedValues: ["Dev", "Staging", "Production"]
    Default: Dev

Mappings:
  BackendUserServiceMap:                                                           #(A)
    Production:
      "DesiredCount": 1
      "ContainerName": "mynavi-sample-cloudformation-ecs-backend-service"
      "ContainerPort": 8080
    Staging:
      "DesiredCount": 1
      "ContainerName": "mynavi-sample-cloudformation-ecs-backend-service"
      "ContainerPort": 8080
    Dev:
      "DesiredCount": 1
      "ContainerName": "mynavi-sample-cloudformation-ecs-backend-service"
      "ContainerPort": 8080
  BackendSampleServiceMap:                                                         #(B)
    Production:
      "DesiredCount" : 1
      "ContainerName" : "mynavi-sample-cloudformation-ecs-backend-service"
      "ContainerPort" : 8080
    Staging:
      "DesiredCount" : 1
      "ContainerName" : "mynavi-sample-cloudformation-ecs-backend-service"
      "ContainerPort" : 8080
    Dev:
      "DesiredCount" : 1
      "ContainerName" : "mynavi-sample-cloudformation-ecs-backend-service"
      "ContainerPort" : 8080
  FrontendWebAppMap:                                                               #(C)
    Production:
      "DesiredCount": 1
      "ContainerName" : "mynavi-sample-cloudformation-ecs-frontend-app"
      "ContainerPort" : 8080
    Staging:
      "DesiredCount": 1
      "ContainerName" : "mynavi-sample-cloudformation-ecs-frontend-app"
      "ContainerPort" : 8080
    Dev:
      "DesiredCount": 1
      "ContainerName" : "mynavi-sample-cloudformation-ecs-frontend-app"
      "ContainerPort" : 8080

Resources:
  FrontendWebAppService:                                                           #(D)
    Type: AWS::ECS::Service
    Properties:
      Cluster:
        Fn::ImportValue: !Sub ${VPCName}-FrontendEcsCluster-${EnvType}
      DesiredCount: !FindInMap [FrontendWebAppMap, !Ref EnvType, DesiredCount]
      HealthCheckGracePeriodSeconds: 60
      TaskDefinition:
        Fn::ImportValue: !Sub ${VPCName}-FrontendEcsTaskDefinition-${EnvType}
      LaunchType: EC2
      LoadBalancers:
        - ContainerName: !FindInMap [FrontendWebAppMap, !Ref EnvType, ContainerName]
          ContainerPort: !FindInMap [FrontendWebAppMap, !Ref EnvType, ContainerPort]
          TargetGroupArn:
            Fn::ImportValue: !Sub ${VPCName}-Frontend-FrontendWebApp-TargetGroup-${EnvType}

  BackendUserService:                                                              #(E)
    Type: AWS::ECS::Service
    Properties:
      Cluster:
        Fn::ImportValue: !Sub ${VPCName}-BackendEcsCluster-${EnvType}
      DesiredCount: !FindInMap [BackendUserServiceMap, !Ref EnvType, DesiredCount]
      HealthCheckGracePeriodSeconds: 60
      TaskDefinition:
        Fn::ImportValue: !Sub ${VPCName}-BackendEcsTaskDefinition-${EnvType}
      LaunchType: EC2
      LoadBalancers:
        - ContainerName: !FindInMap [BackendUserServiceMap, !Ref EnvType, ContainerName]
          ContainerPort: !FindInMap [BackendUserServiceMap, !Ref EnvType, ContainerPort]
          TargetGroupArn:
            Fn::ImportValue: !Sub ${VPCName}-Backend-BackendUserService-TargetGroup-${EnvType}

  BackendSampleService:                                                            #(F)
    Type: AWS::ECS::Service
    Properties:
      Cluster:
        Fn::ImportValue: !Sub ${VPCName}-BackendEcsCluster-${EnvType}
      DesiredCount: !FindInMap [BackendSampleServiceMap, !Ref EnvType, DesiredCount]
      TaskDefinition:
        Fn::ImportValue: !Sub ${VPCName}-BackendEcsTaskDefinition-${EnvType}
      LaunchType: EC2
      LoadBalancers:
        - ContainerName: !FindInMap [BackendSampleServiceMap, !Ref EnvType, ContainerName]
          ContainerPort: !FindInMap [BackendSampleServiceMap, !Ref EnvType, ContainerPort]
          TargetGroupArn:
            Fn::ImportValue: !Sub ${VPCName}-Backend-BackendSampleService-TargetGroup-${EnvType}
ECSサービスを構築するテンプレートの記述の基本となるポイントは(A)〜(F)の通りです。
| 記述 | 説明 |
| パラメータEnvTypeに応じて、Backend Serviceアプリケーションの1つとして構築するBackendUserServiceの定義を切り替えます。 | |
| パラメータEnvTypeに応じて、Backend Serviceアプリケーションの1つとして構築するBackendSampleServiceの定義を切り替えます。 | |
| パラメータEnvTypeに応じて、Frontend Webアプリケーションの定義を切り替えます。 | |
| Frontend WebアプリケーションのECSサービスを定義します。詳細は AWS::ECS::Service を参照してください。 | |
| Backend Serviceアプリケーションの一つとしてBackendUserServiceをECSサービスとして定義します。詳細は AWS::ECS::Service を参照してください。実行されるコンテナイメージは同じでも、ターゲットグループに指定したパスにより異なるコンテナへルーティングするよう設定します。 | |
| Backend Serviceアプリケーションの一つとしてBackendSampleServiceをECSサービスとして定義します。詳細は AWS::ECS::Service を参照してください。実行されるコンテナイメージは同じでも、ターゲットグループに指定したパスにより異なるコンテナへルーティングするよう設定します。 |
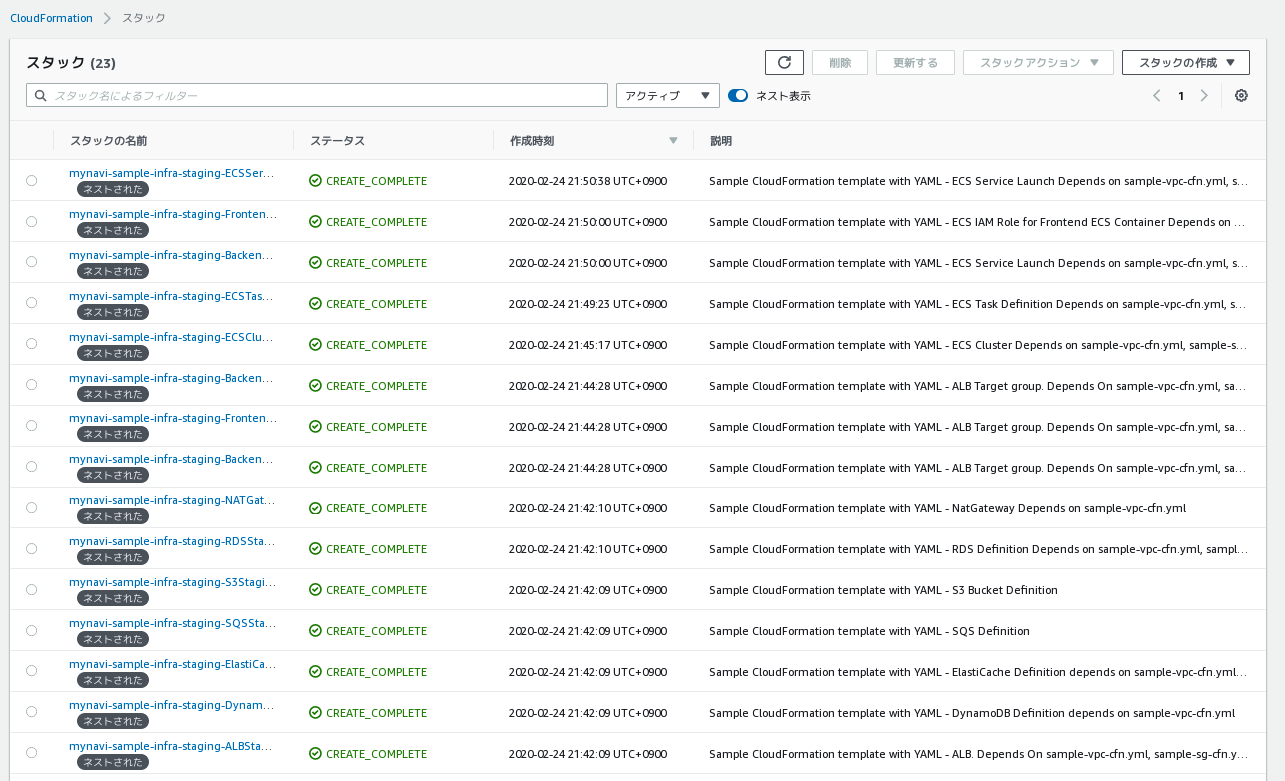
ECSサービスの構築には、これまで構築してきたALBやターゲットグループ、ECSクラスタ、タスク定義等様々なリソースを事前に起動しておかなければなりません(ElastiCacheやS3なども未作成だとアプリケーション起動時に失敗します)。そこで、複数のテンプレートをまとめて実行するネストされた親テンプレートで起動するようにします。 これまで構築してきたリソースも含め、構築順序関係を定義して、ステージング環境として一括構築するようテンプレートを実装します。なお、VPCとセキュリティグループは事前に構築されていることが前提とします。サンプルとなるテンプレートは以下の通りです。
AWSTemplateFormatVersion: '2010-09-09'

// omit

Parameters:
  VPCName:
    Description: Target VPC Stack Name
    Type: String
    MinLength: 1
    MaxLength: 255
    AllowedPattern: ^[a-zA-Z][-a-zA-Z0-9]*$
    Default: mynavi-sample-cloudformation-vpc
  EnvType:
    Description: Which environments to deploy your service.
    Type: String
    AllowedValues: ["Staging"]
    Default: Staging

Resources:
  NATGatewayStagingStack:                                                    #(A)
    Type: AWS::CloudFormation::Stack
    Properties:
      TemplateURL: ./sample-ng-cfn.yml
      Parameters:
        VPCName: !Sub ${VPCName}

  ALBStagingStack:                                                           #(B)
    Type: AWS::CloudFormation::Stack
    Properties:
      TemplateURL: ./sample-alb-cfn.yml
      Parameters:
        VPCName: !Sub ${VPCName}
        EnvType: !Sub ${EnvType}

  BackendUserServiceTargetGroupStagingStack:                                 #(C)
    Type: AWS::CloudFormation::Stack
    DependsOn: ALBStagingStack
    Properties:
      TemplateURL: ./sample-tg-cfn.yml
      Parameters:
        VPCName: !Sub ${VPCName}
        EnvType: !Sub ${EnvType}
        SubnetType: Backend
        ServiceName: BackendUserService

  BackendSampleServiceTargetGroupStagingStack:                               #(D)
    Type: AWS::CloudFormation::Stack
    DependsOn: ALBStagingStack
    Properties:
      TemplateURL: ./sample-tg-cfn.yml
      Parameters:
        VPCName: !Sub ${VPCName}
        EnvType: !Sub ${EnvType}
        SubnetType: Backend
        ServiceName: BackendSampleService

  FrontendWebAppTargetGroupStagingStack:                                     #(E)
    Type: AWS::CloudFormation::Stack
    DependsOn: ALBStagingStack
    Properties:
      TemplateURL: ./sample-tg-cfn.yml
      Parameters:
        VPCName: !Sub ${VPCName}
        EnvType: !Sub ${EnvType}
        SubnetType: Frontend
        ServiceName: FrontendWebApp

  RDSStagingStack:                                                           #(F)
    Type: AWS::CloudFormation::Stack
    Properties:
      TemplateURL: ./sample-rds-cfn.yml
      Parameters:
        VPCName: !Sub ${VPCName}
        EnvType: !Sub ${EnvType}

  DynamoDBStagingStack:                                                      #(G)
    Type: AWS::CloudFormation::Stack
    Properties:
      TemplateURL: ./sample-dynamodb-cfn.yml
      Parameters:
        VPCName: !Sub ${VPCName}
        EnvType: !Sub ${EnvType}

  ElastiCacheStagingStack:                                                   #(H)
    Type: AWS::CloudFormation::Stack
    Properties:
      TemplateURL: ./sample-elasticache-cfn.yml
      Parameters:
        VPCName: !Sub ${VPCName}
        EnvType: !Sub ${EnvType}

  S3StagingStack:                                                            #(I)
    Type: AWS::CloudFormation::Stack
    Properties:
      TemplateURL: ./sample-s3-cfn.yml
      Parameters:
        EnvType: !Sub ${EnvType}

  SQSStagingStack:                                                           #(J)
    Type: AWS::CloudFormation::Stack
    Properties:
      TemplateURL: ./sample-sqs-cfn.yml
      Parameters:
        EnvType: !Sub ${EnvType}

  ECSClusterStagingStack:                                                    #(K)
    Type: AWS::CloudFormation::Stack
    DependsOn: NATGatewayStagingStack
    Properties:
      TemplateURL: ./sample-ecs-cluster-cfn.yml
      Parameters:
        EnvType: !Sub ${EnvType}

  ECSTaskDefinitionStagingStack:                                             #(L)
    Type: AWS::CloudFormation::Stack
    DependsOn:
      - ECSClusterStagingStack
    Properties:
      TemplateURL: ./sample-ecs-task-cfn.yml
      Parameters:
        EnvType: !Sub ${EnvType}

  BackendECSTaskRoleStagingStack:                                            #(M)
    Type: AWS::CloudFormation::Stack
    DependsOn:
      - ECSTaskDefinitionStagingStack
    Properties:
      TemplateURL: ./sample-ecs-taskrole-backend-cfn.yml
      Parameters:
        EnvType: !Sub ${EnvType}

  FrontendECSTaskRoleStagingStack:                                           #(N)
    Type: AWS::CloudFormation::Stack
    DependsOn:
      - ECSTaskDefinitionStagingStack
    Properties:
      TemplateURL: ./sample-ecs-taskrole-frontend-cfn.yml
      Parameters:
        EnvType: !Sub ${EnvType}

  ECSServiceStagingStack:                                                    #(O)
    Type: AWS::CloudFormation::Stack
    DependsOn:
      - BackendECSTaskRoleStagingStack
      - FrontendECSTaskRoleStagingStack
      - BackendSampleServiceTargetGroupStagingStack
      - BackendUserServiceTargetGroupStagingStack
      - FrontendWebAppTargetGroupStagingStack
    Properties:
      TemplateURL: ./sample-ecs-service-cfn.yml
      Parameters:
        EnvType: !Sub ${EnvType}
ステージング環境を一括構築するテンプレートの記述の基本となるポイントは(A)〜(F)の通りです。
| 記述 | 説明 |
| NATGatewayテンプレートをリソースとして定義します。パラメータとしてVPCNameを子テンプレートに渡します。 | |
| ALBテンプレートをリソースとして定義します。パラメータとしてVPCName、EnvTypeを子テンプレートに渡します。 | |
| BackendUserService向けのターゲットグループとして、リソース定義します。パラメータとしてVPCName、EnvType、SubnetType、ServiceNameを子テンプレートに渡します。テンプレートの実行にはALBを事前に構築しておく必要があるので、DependsOn属性で(B)ALBのスタックを定義しておきましょう。 | |
| BackendSampleService向けのターゲットグループとして、リソース定義します。パラメータとしてVPCName、EnvType、SubnetType、ServiceNameを子テンプレートに渡します。テンプレートの実行にはALBを事前に構築しておく必要があるので、DependsOn属性で(B)ALBのスタックを定義しておきましょう。 | |
| FrontendWebApp向けのターゲットグループとして、リソース定義します。パラメータとしてVPCName、EnvType、SubnetType、ServiceNameを子テンプレートに渡します。テンプレートの実行にはALBを事前に構築しておく必要があるので、DependsOn属性で(B)ALBのスタックを定義しておきましょう。 | |
| RDSテンプレートをリソースとして定義します。パラメータとしてVPCName、EnvTypeを子テンプレートに渡します。 | |
| DynamoDBテンプレートをリソースとして定義します。パラメータとしてVPCName、EnvTypeを子テンプレートに渡します。 | |
| ElastiCacheテンプレートをリソースとして定義します。パラメータとしてVPCName、EnvTypeを子テンプレートに渡します。 | |
| S3テンプレートをリソースとして定義します。パラメータとしてEnvTypeを子テンプレートに渡します。 | |
| SQSテンプレートをリソースとして定義します。パラメータとしてEnvTypeを子テンプレートに渡します。 | |
| ECSクラスタテンプレートをリソースとして定義します。パラメータとしてEnvTypeを子テンプレートに渡します。テンプレートの実行にはNATGatewayを事前に構築しておく必要があるので、DependsOn属性で(A)NATGatewayのスタックを定義しておきましょう。 | |
| ECSタスク定義テンプレートをリソースとして定義します。パラメータとしてEnvTypeを子テンプレートに渡します。テンプレートの実行にはECSクラスタを事前に構築しておく必要があるので、DependsOn属性で(K)ECSクラスタのスタックを定義しておきましょう。 | |
| BackendService向けのECSタスクロール定義テンプレートをリソースとして定義します。パラメータとしてEnvTypeを子テンプレートに渡します。テンプレートの実行にはECSタスクを事前に構築しておく必要があるので、DependsOn属性で(L)ECSタスクのスタックを定義しておきましょう。 | |
| FrontendWebApp向けのECSタスクロール定義テンプレートをリソースとして定義します。パラメータとしてEnvTypeを子テンプレートに渡します。テンプレートの実行にはECSタスクを事前に構築しておく必要があるので、DependsOn属性で(L)ECSタスクのスタックを定義しておきましょう。 | |
| ECSサービス構築テンプレートをリソースとして定義します。パラメータとしてEnvTypeを子テンプレートに渡します。テンプレートの実行にはロール定義やターゲットグループを事前に構築しておく必要があるので、DependsOn属性で(C)、(D)、(E)のスタックを定義しておきましょう。 |
NestedStackの作成 でも解説した通り、NestedStackとして作成したテンプレートで指定した子のテンプレートのURLは本来S3にアップロードしてそのオブジェクトキーを指定しなければなりません。AWS CLIの"aws cloudformation package"コマンドで、特定のS3バケットを指定し実行することで、バケットへのアップロードおよびURLをオブジェクトキーに置き換えたテンプレートを生成できます。
事前にアップロード先のバケットを作成した上で(ここでは クラウドネイティブ第25回 と同様の手順で、debugroom-mynavi-sample-cloudformation-packageというバケットを事前に作成しておきます)、パッケージを実行するヘルパースクリプトを以下のように作成して実行します。
#!/usr/bin/env bash

template_path="sample-infra-staging-cfn.yml"
output_template="sample-infra-staging-package-cfn.yml"
s3_bucket="debugroom-mynavi-sample-cloudformation-package"

aws cloudformation package --template-file ${template_path} --s3-bucket ${s3_bucket} --output-template-file ${output_template}
実行が正常に終了すると、URLのパスが置き換わったテンプレート(ample-infra-staging-package-cfn.yml)が作成されます。
作成したテンプレートに対して、ヘルパースクリプトを以下のように、スタック名とテンプレートパスを変更して実行します。
#!/usr/bin/env bash

stack_name="mynavi-sample-infra-staging"
template_path="sample-infra-staging-package-cfn.yml"

parameters="EnvType=Staging"

aws cloudformation deploy --stack-name ${stack_name} --template-file ${template_path} --parameter-overrides ${parameters} --capabilities CAPABILITY_IAM
実行が正常に終了すると、ECSサービスが実行されます。

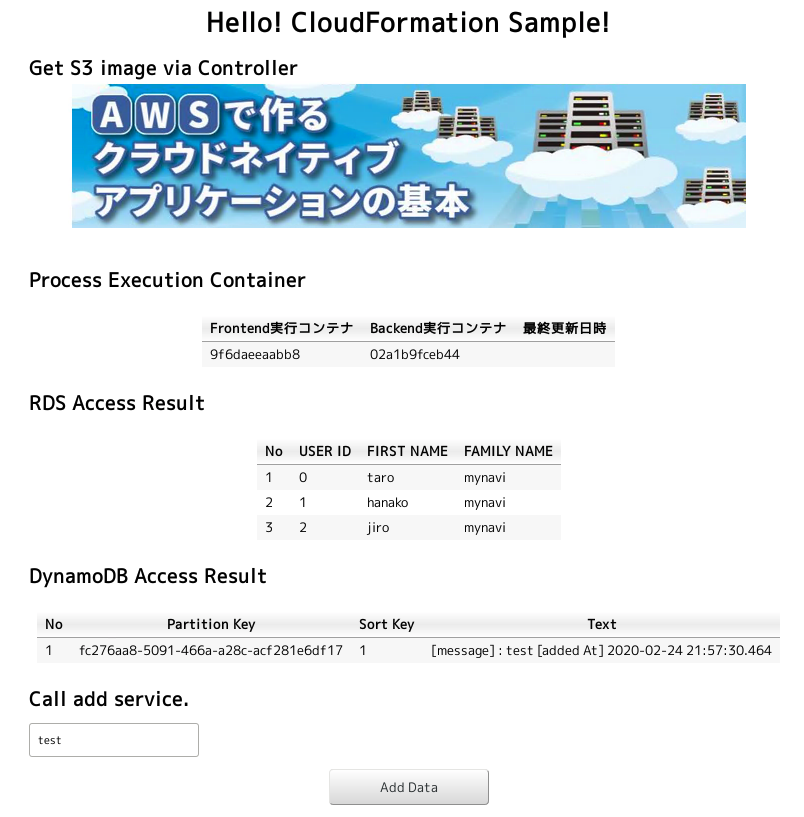
また、構築したアプリケーションにアクセスしてみましょう。Frontend ALBのURLにアプリケーションのパス/frontend/portalを加えてアクセスすると今回構築したアプリケーションにアクセスできます。

今回はECSサービスを構築するCloudFormationテンプレートを実装しました。次回は、CodeBuildを使ったCI環境を構築するCloudFormationテンプレートを作成します。
著者紹介
川畑 光平(KAWABATA Kohei) - NTTデータ 課長代理

金融機関システム業務アプリケーション開発・システム基盤担当を経て、現在はソフトウェア開発自動化関連の研究開発・推進に従事。
Red Hat Certified Engineer、Pivotal Certified Spring Professional、AWS Certified Solutions Architect Professional等の資格を持ち、アプリケーション基盤・クラウドなど様々な開発プロジェクト支援にも携わる。