【第6回】ECSコンテナAP開発(3)SpringBootアプリケーション実装
クラウド時代が到来し、ますます広がりを見せつつあるコンテナ技術。第2回は、AWS ECS上でSpringアプリケーションを構築する方法を説明します。本稿は以下のステップに沿って、解説しています。
- VPC(Virtual Private Cloud)環境の構築
- アプリケーションロードバランサ(ALB)の作成
- Springを使用したコンテナアプリケーションの実装方法
- Dockerコンテナの作成・DockerHubへのプッシュ
- ECSクラスタの作成
- ECSタスクの定義
- ECSサービスの実行
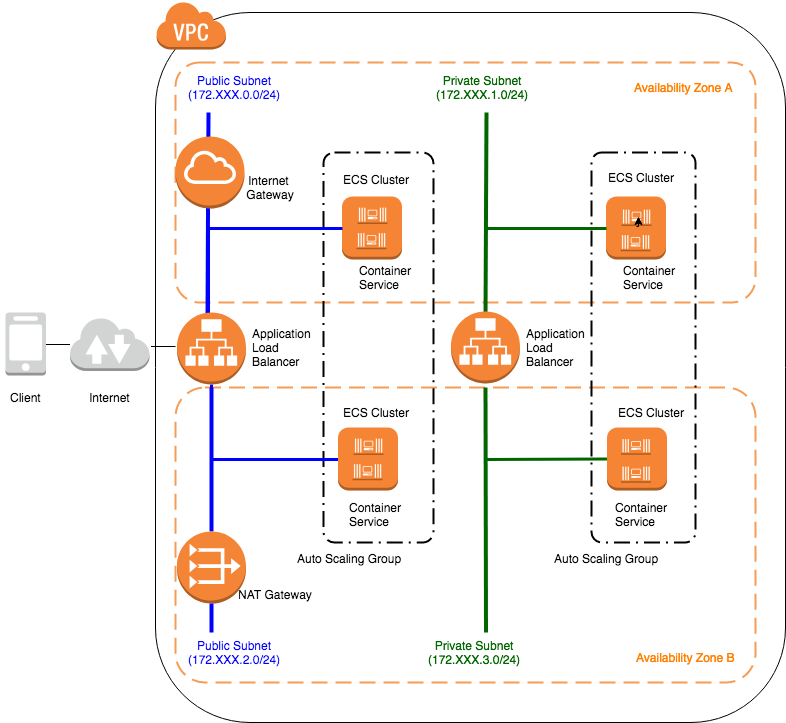
前回の記事「 【第5回】ECSコンテナAP開発(2)ALB構築 」までに、以下イメージの構成に沿って、VPC環境・ALBを構築しました。今回は「3. Springを使用したコンテナアプリケーションの実装方法」です。
(3)Springを使用したコンテナアプリケーションの実装方法
ECSの実態はDockerコンテナなので、ECSで実行するSpringアプリケーションは、単純にLinuxベースのOSで実行するアプリケーションをSpring Bootを使って実装し、ExcutableJar形式で実行するコンテナイメージを作成する方法が簡易です。 ただ、ECSを用いると、単にDockerをEC2上で実行する場合に比べて、クラスタのポートの管理やコンテナ実行がAWSのマネージドになり、コンテナアプリケーション間のサービス連携はALB(アプリケーションロードバランサー)を介して行う方がよいので こうしたECSの特徴を理解して、アプリケーションを実装しておく必要があります。
なお、実際に作成したアプリケーションは GitHub 上にコミットしています。 以降、解説で記載されているソースコードで、インポート文など本質的でない記述を省略している部分がありますので、実行コードを作成する場合は、必要に応じて適宜GitHubソースコードも参照してください。
Spring Bootを使用してアプリケーションを構築するには、まず、Mavenプロジェクトのpom.xmlで必要なライブラリの依存性を定義します。 今回は、プライベートサブネットに配置する、単純なAPIをもつアプリケーション(Backend)と、パブリックサブネットに配置する、簡単なHTMLを返すWebアプリケーション(Backend For Frontend:以降BFF)を作成するので、 各アプリケーションプロジェクトには、以下のライブラリを定義します。どちらもspring-boot-starter-webが必須ですが、BFFアプリケーションはHTMLページを生成するので、テンプレートエンジンであるThymeleafも含めておきましょう。 また、BFFでは、ALBのDNS名をプロパティファイルに記述するので、spring-boot-configuration-processorも依存関係に含めておいてください。
<dependencies>
  <dependency>
    <groupId>org.springframework.boot</groupId>
    <artifactId>spring-boot-starter-web</artifactId>
  </dependency>
</dependencies>
<dependencies>
  <dependency>
     <groupId>org.springframework.boot</groupId>
     <artifactId>spring-boot-starter-web</artifactId>
  </dependency>
  <dependency>
     <groupId>org.springframework.boot</groupId>
     <artifactId>spring-boot-starter-thymeleaf</artifactId>
  </dependency>
  <dependency>
    <groupId>org.springframework.boot</groupId>
    <artifactId>spring-boot-configuration-processor</artifactId>
    <optional>true</optional>
  </dependency>
</dependencies>
また、アプリケーションをExcutableJar実行形式とするために、spring-boot-maven-pluginもpom.xmlのビルドオプションへ含んでおく必要があります。
<build>
  <plugins>
    <plugin>
      <groupId>org.springframework.boot</groupId>
      <artifactId>spring-boot-maven-plugin</artifactId>
    </plugin>
  </plugins>
</build>
では、アプリケーションを実装していきます。まず、プライベートサブネットでバックエンドAPIサーバとして、/api/v1/usersというURLのパスでリクエストを受け取り、ユーザのリストを返却する簡単なアプリケーションを作成しておきます。 SpringBootでこれを実装するには、Controllerクラスと起動・設定ファイルクラスが最低限必要です。
- Backendアプリケーションのリクエストを受け付けるControllerクラス
package org.debugroom.mynavi.sample.ecs.backend.app.web;

import org.debugroom.mynavi.sample.ecs.backend.app.model.User;
import org.springframework.web.bind.annotation.GetMapping;
import org.springframework.web.bind.annotation.RequestMapping;
import org.springframework.web.bind.annotation.RestController;

@RestController
@RequestMapping("/api/v1")
public class BackendRestController {

    @GetMapping("/users")
    public List<User> getUsers(){
        List<User> users = new ArrayList<>();
        users.add(User.builder().userId("1").userName("Taro").build());
        users.add(User.builder().userId("2").userName("Jiro").build());
        return users;
    }
}
- BackendアプリケーションのSpirngBoot起動クラス
package org.debugroom.mynavi.sample.ecs.backend.config;

import org.springframework.boot.SpringApplication;
import org.springframework.boot.autoconfigure.SpringBootApplication;
import org.springframework.context.annotation.ComponentScan;

@SpringBootApplication
public class App {

    public static void main(String[] args) {
        SpringApplication.run(App.class, args);
    }

}
また、Controllerクラスを読み取り、REST APIとして動作させるために、以下の通り、WebMvcConfigurerを実装し、@ComponentScanでコントローラのパッケージを設定したクラスを上記2の起動クラスと同じパッケージに配置しておきましょう。
- BackendアプリケーションのWebMVC設定クラス
package org.debugroom.mynavi.sample.ecs.backend.config;

import org.springframework.context.annotation.ComponentScan;
import org.springframework.context.annotation.Configuration;
import org.springframework.web.servlet.config.annotation.WebMvcConfigurer;

@Configuration
@ComponentScan("org.debugroom.mynavi.sample.ecs.backend.app.web")
public class MvcConfig implements WebMvcConfigurer {
}
ここまではSpringBootで作るシンプルなREST APIアプリケーションですが、ポイントとして、前回(2)で設定したプライベートサブネットのアプリケーションロードバランサー(ALB)がルーティングしてくるパスを アプリケーションコンテキストパスとするよう、application.ymlに、server.servlet.context-pathプロパティを設定しておいてください。
server:
  servlet:
   context-path: /backend
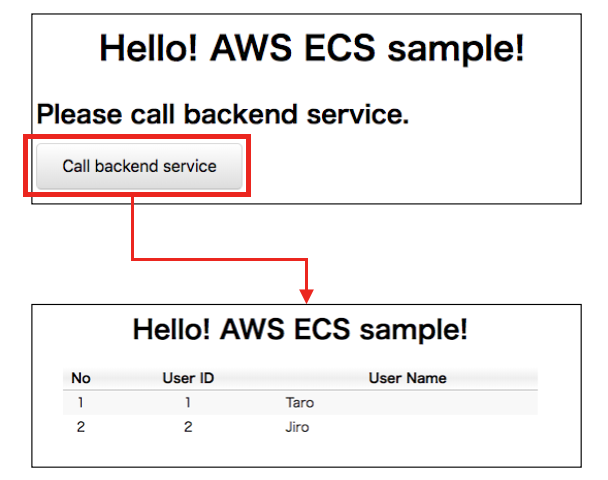
続いて、パブリックサブネットに配置するBFFアプリケーションを実装します。アプリケーションの完成イメージは下記の通り、index.htmlページにある、ボタンを押下すると、 BackendアプリケーションのGET API(/backend/api/v1/users)を呼び出し、結果をHTMLページに埋め込んで返す処理を行います。
index.htmlページから送信したリクエストを受け付けるBFFアプリケーションのControllerは次の通りになります。 SpringBoot起動クラスの構成はBackendとほぼ同じですが、Controllerでは、Backendアプリケーションを呼び出し、結果をThymeleafのテンプレートに渡してHTMLページを返却する点が異なります。
- index.htmlからのリクエストを受け、BackendのAPIを呼び出し、戻った結果をusers.htmlに出力して、クライアントにHTMLページを返却するControllerクラス
package org.debugroom.mynavi.sample.ecs.backendforfrontend.app.web;

import org.springframework.beans.factory.annotation.Autowired;
import org.springframework.stereotype.Controller;
import org.springframework.ui.Model;
import org.springframework.web.bind.annotation.RequestMapping;
import org.springframework.web.bind.annotation.RequestMethod;
import org.springframework.web.client.RestOperations;

@Controller
public class BackendForFrontendController {

    @Autowired
    RestOperations restOperations;

    @RequestMapping(method = RequestMethod.GET, value = "users")
    public String getUsers(Model model){
        String service = "/backend/api/v1/users";
        model.addAttribute("users",
            restOperations.getForObject(service, User[].class));
        return "users";
    }
}
ここでは、RestTemplateのインターフェースであるorg.springframework.web.client.RestOperationsを使用してBackendサービスを呼び出しています。 ここで実装を工夫して、ALBのDNSドメインをプロパティファイルから取得して設定する形にしていれば、Javaソースコード上でAWS環境に依存しないアプリケーション実装にしておくことができます。
service:
  dns: http://internal-mynavi-sample-private-alb-XXXXXXX.ap-northeast-1.elb.amazonaws.com
プロパティの取得はorg.springframework.boot.context.properties.ConfigurationPropertiesなどを使って、ymlに定義したプロパティ定義を自動でBeanにインジェクションするようにしておけば簡易です。
 package org.debugroom.mynavi.sample.ecs.backendforfrontend.app.web;

 import org.springframework.boot.context.properties.ConfigurationProperties;
 import org.springframework.stereotype.Component;

 @Component
 @ConfigurationProperties(prefix="service")
 public class ServiceProperties {

   private String dns;

}
また、RestOpearationsの生成時に設定クラス上でorg.springframework.boot.web.client.RestTemplateBuilderのrootUri()メソッドで、下記のように、ALBのルートとなるURLをプロパティから取得して設定しておけば、URL設定の記述も1箇所で済みます。
package org.debugroom.mynavi.sample.ecs.backendforfrontend.config;

import org.debugroom.mynavi.sample.ecs.backendforfrontend.app.web.ServiceProperties;
import org.springframework.beans.factory.annotation.Autowired;
import org.springframework.boot.web.client.RestTemplateBuilder;
import org.springframework.context.annotation.Bean;
import org.springframework.context.annotation.ComponentScan;
import org.springframework.context.annotation.Configuration;
import org.springframework.web.client.RestOperations;
import org.springframework.web.servlet.config.annotation.WebMvcConfigurer;

@ComponentScan("org.debugroom.mynavi.sample.ecs.backendforfrontend.app.web")
@Configuration
public class MvcConfig implements WebMvcConfigurer {

    @Autowired
    ServiceProperties properties;

    @Bean
    public RestOperations restOperations(RestTemplateBuilder restTemplateBuilder){
       return restTemplateBuilder.rootUri(properties.getDns()).build();
    }
 }
上記のポイントを踏まえ、アプリケーションを実装しておけば、パブリックサブネットのBFFアプリケーションからプライベートサブネット内のBackendのAPIの呼び出しを ごく少量のコーディングで実現することができます。また、AWS環境に依存した内容は設定ファイルのALBのURL1箇所に限定されるので、ポータリビリティの高いアプリケーションにしておくことができます。
これで、アプリケーションを実装できました。次回は、実装したSpringアプリケーションのDockerコンテナイメージを作り、レジストリへプッシュします。