【第19回】Amazon Cognito + Spring Sercurityを使ったOAuth2 Loginの実装(8)
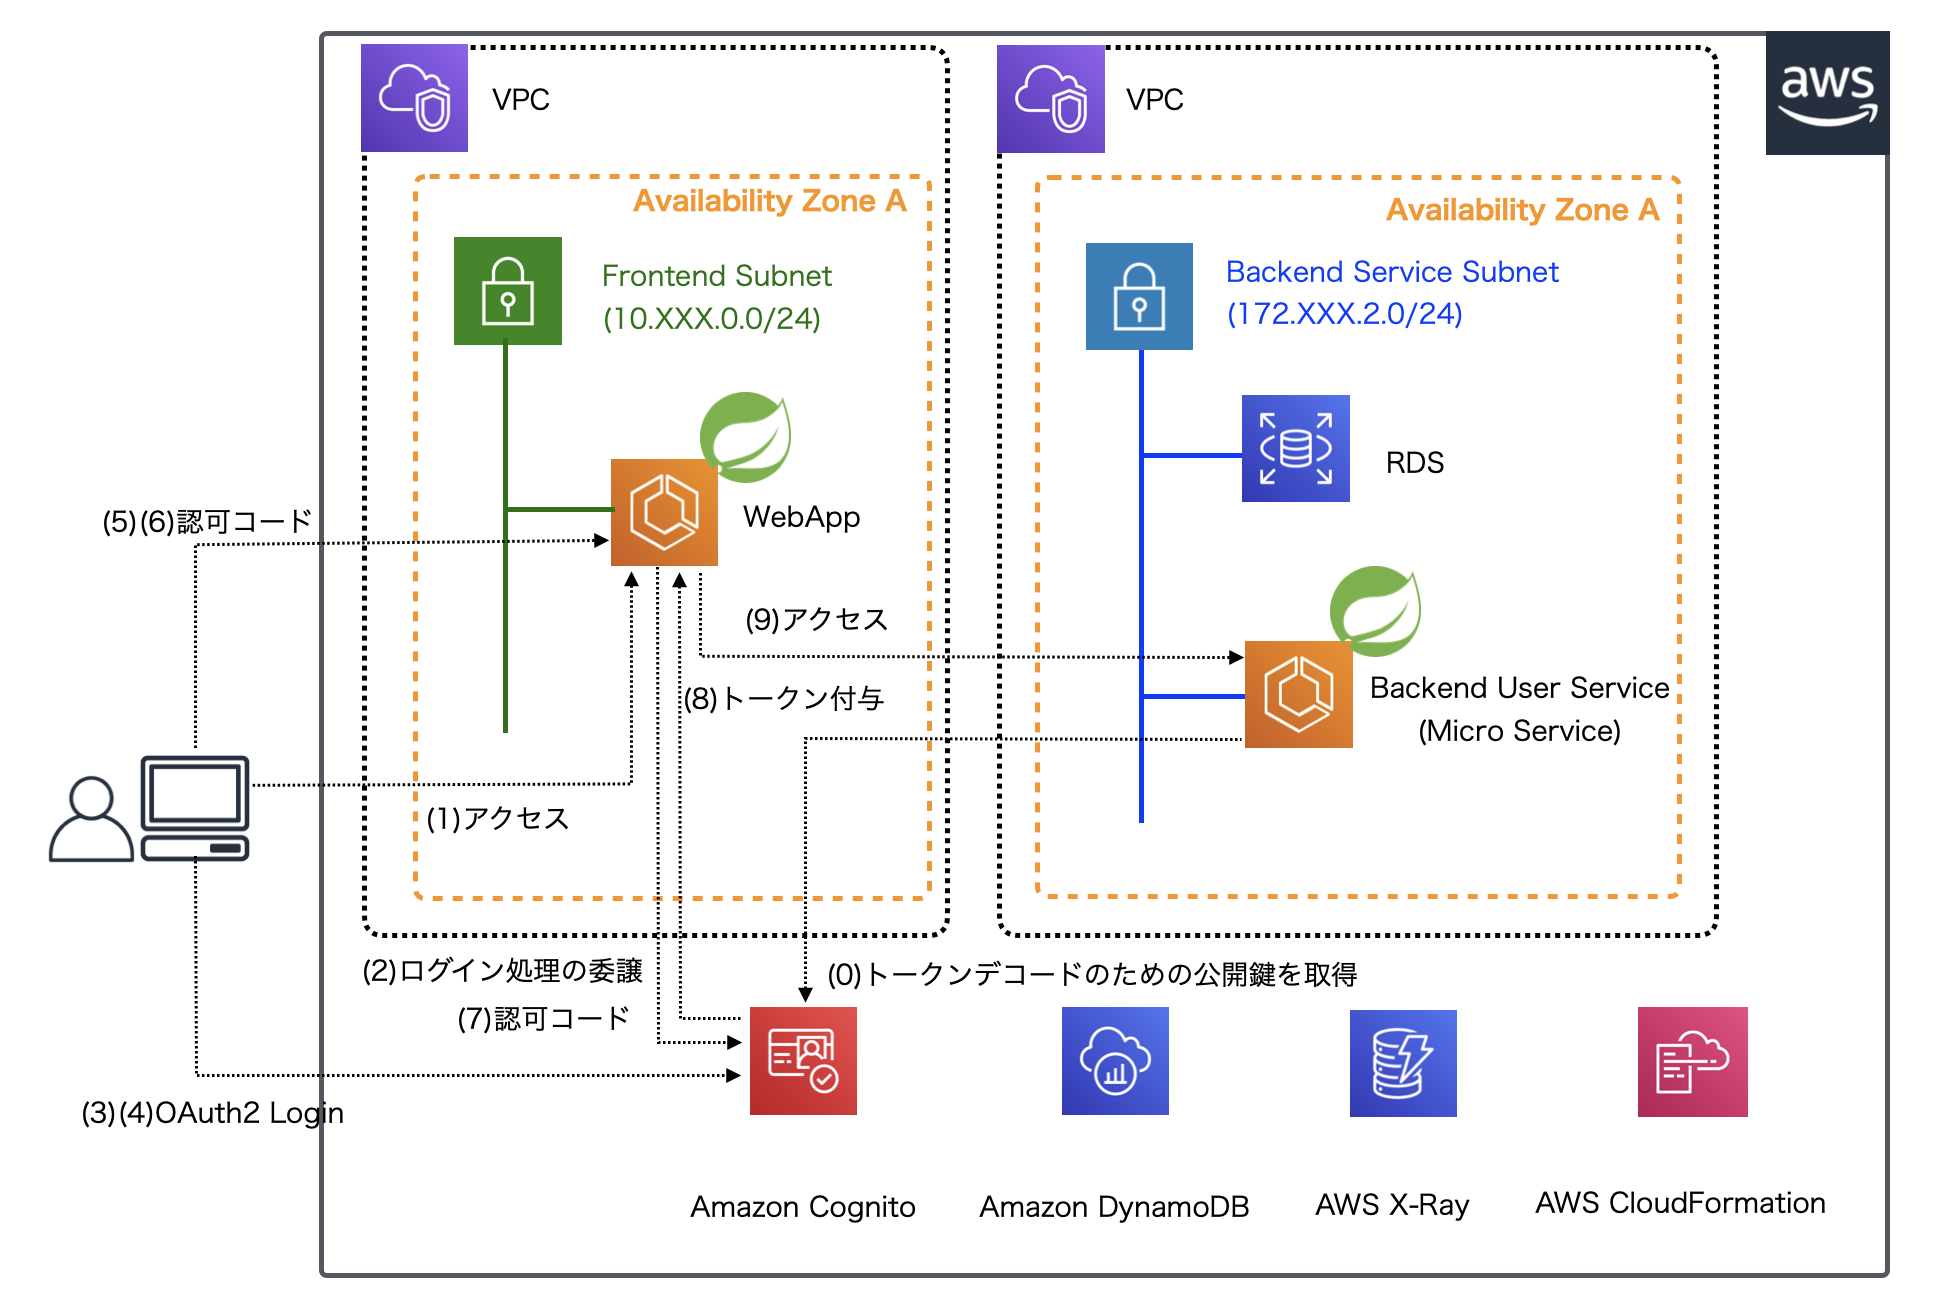
前回から、以下のイメージのようにOAuth2 Loginをベースとしたアーキテクチャを想定した環境構築を進めています。

前回は、Cognitoへユーザ登録し、サインアップステータスを変更するLambdaファンクションをカスタムリソースとして登録し、実行しました。 今回は、Cognitoを認証プロバイダとするSpring Securityの実装方法を解説していきます。
なお、実際のソースコードは GitHub 上にコミットしています。以降のソースコードでは本質的でない記述を一部省略しているので、実行コードを作成する場合は、必要に応じて適宜GitHub上のソースコードも参照してください。
Spring SecurityにおけるOAuth2 Login設定クラスの実装
Spring SecurityはOIDC(Oppen ID Connect)に準拠した認証プロバイダとの OAuth2.0 Loginの完全な自動構成機能を提供 しています。
ロジックを作成せずとも、設定クラスや設定ファイルを作成するだけで、認証プロバイダと統合することができます。 ただし、今回認証プロバイダとして利用するCognitoは、OIDCに完全に準拠したAPIエンドポイントをいくつか提供していません。 そのため、Spring Securityのデフォルトの設定方法をカスタムすることが必要になります。
また、第15回 でも解説した通り、Cognitoの環境は CloudFormationを使って構築しています。そのため、各種エンドポイントやクライアントIDなどは、 CloudFormationのスタック情報から参照できます。加えて、第16回 で、 クライアントシークレットなどの秘匿情報をSystems Manager Parameter Storeに格納しています。 このような環境依存のパラメータをソースコードにハードコーディングしないよう、AWS SDKを使って動的に切り替えるように実装していきます。
Spring Securityでは、application.ymlなどの設定ファイルに認証プロバイダの情報を記述すれば設定をより簡潔にできますが、 SDKを使って、パラメータを動的に取得するために、今回は以下の通り、Cognitoに対してOAuth2Loginを行うための設定クラスを作成します。 Spring Securityの概要や基本的な設定などは、第3回 と 第4回 でも解説しているので、そちらも合わせて参照してください。
package org.debugroom.mynavi.sample.aws.microservice.frontend.webapp.config;

// omit

import com.amazonaws.services.simplesystemsmanagement.AWSSimpleSystemsManagement;
import com.amazonaws.services.simplesystemsmanagement.AWSSimpleSystemsManagementClientBuilder;
import com.amazonaws.services.simplesystemsmanagement.model.GetParameterRequest;

import org.springframework.beans.factory.annotation.Autowired;
import org.springframework.context.annotation.Bean;
import org.springframework.context.annotation.Configuration;
import org.springframework.security.config.annotation.web.builders.HttpSecurity;
import org.springframework.security.config.annotation.web.configuration.EnableWebSecurity;
import org.springframework.security.config.annotation.web.configuration.WebSecurityConfigurerAdapter;
import org.springframework.security.core.GrantedAuthority;
import org.springframework.security.core.authority.SimpleGrantedAuthority;
import org.springframework.security.core.authority.mapping.GrantedAuthoritiesMapper;
import org.springframework.security.oauth2.client.oidc.userinfo.OidcUserService;
import org.springframework.security.oauth2.client.registration.ClientRegistration;
import org.springframework.security.oauth2.client.registration.ClientRegistrationRepository;
import org.springframework.security.oauth2.client.registration.InMemoryClientRegistrationRepository;
import org.springframework.security.oauth2.client.userinfo.CustomUserTypesOAuth2UserService;
import org.springframework.security.oauth2.client.userinfo.OAuth2UserService;
import org.springframework.security.oauth2.core.AuthorizationGrantType;
import org.springframework.security.oauth2.core.ClientAuthenticationMethod;
import org.springframework.security.oauth2.core.oidc.user.OidcUserAuthority;
import org.springframework.security.oauth2.core.user.OAuth2User;
import org.springframework.security.web.authentication.logout.LogoutSuccessHandler;

import org.debugroom.mynavi.sample.aws.microservice.common.apinfra.cloud.aws.CloudFormationStackResolver;
import org.debugroom.mynavi.sample.aws.microservice.frontend.webapp.app.web.security.CognitoLogoutSuccessHandler;
import org.debugroom.mynavi.sample.aws.microservice.frontend.webapp.app.web.security.CognitoOAuth2User;
import org.debugroom.mynavi.sample.aws.microservice.frontend.webapp.domain.ServiceProperties;

@EnableWebSecurity  //(A)
public class CognitoOAuth2LoginSecurityConfig
                    extends WebSecurityConfigurerAdapter //(B){

    @Bean
    public AWSSimpleSystemsManagement awsSimpleSystemsManagement(){
        return AWSSimpleSystemsManagementClientBuilder.defaultClient(); //(C)
    }

    @Bean
    public ClientRegistrationRepository clientRegistrationRepository(){
        return new InMemoryClientRegistrationRepository(
            cognitoClientRegistration());  //(D)
    }

    @Override
    protected void configure(HttpSecurity http) throws Exception {
        http.authorizeRequests(
          authorize -> authorize
                  .antMatchers("/favicon.ico").permitAll()
                  .antMatchers("/webjars/*").permitAll()
                  .antMatchers("/static/*").permitAll()
                  .anyRequest().authenticated()) //(E)
          .oauth2Login(oauth2 -> oauth2          //(F)
                  .defaultSuccessUrl("/oauth2LoginSuccess", true) //(G)
                  .userInfoEndpoint(userInfoEndpointConfig -> userInfoEndpointConfig //(H)
                  .userAuthoritiesMapper(authoritiesMapper()) //(I)
                  .oidcUserService(oidcUserService())))       //(J)
          .logout(logout -> logout
          .logoutUrl("/logout")    //(K)
          .logoutSuccessHandler(oidcLogoutSuccessHandler()));//(L)
    }

    private LogoutSuccessHandler oidcLogoutSuccessHandler(){
        CognitoLogoutSuccessHandler cognitoLogoutSuccessHandler =
          new CognitoLogoutSuccessHandler(clientRegistrationRepository());
        cognitoLogoutSuccessHandler.setPostLogoutRedirectUri("{baseUrl}");
        return cognitoLogoutSuccessHandler;//(M)
    }

    private OidcUserService oidcUserService(){
        OidcUserService oidcUserService = new OidcUserService();
        oidcUserService.setOauth2UserService(oAuth2UserService());
        return oidcUserService; //(N)
    }

    private OAuth2UserService oAuth2UserService(){
        Map<String, Class<? extends OAuth2User>> customUserTypes = new HashMap<>();
        customUserTypes.put("cognito", CognitoOAuth2User.class);
        return new CustomUserTypesOAuth2UserService(customUserTypes); //(O)
    }

    private GrantedAuthoritiesMapper authoritiesMapper(){
        return authorities -> { //(P)
            List<GrantedAuthority> grantedAuthorities = new ArrayList<>();
            for (GrantedAuthority grantedAuthority : authorities){
                grantedAuthorities.add(grantedAuthority);
                if(OidcUserAuthority.class.isInstance(grantedAuthority)){
                    Map<String, Object> attributes = ((OidcUserAuthority)grantedAuthority).getAttributes();
                    JSONArray groups = (JSONArray) attributes.get("cognito:groups");
                    String isAdmin = (String) attributes.get("custom:isAdmin"); //(Q)
                    if(Objects.nonNull(groups) && groups.contains("admin")){ //(R)
                        grantedAuthorities.add( new SimpleGrantedAuthority("ROLE_ADMIN"));
                    }else if (Objects.nonNull(isAdmin) && Objects.equals(isAdmin, "1")){
                        grantedAuthorities.add( new SimpleGrantedAuthority("ROLE_ADMIN"));
                    }
                }
             }
             return grantedAuthorities;
        };
    }

    private ClientRegistration cognitoClientRegistration(){ //(S)
        String clientId = cloudFormationStackResolver.getExportValue(
          serviceProperties.getCloudFormation().getCognito().getAppClientId());
        String clientSecret = getParameterFromPrameterStore(
          serviceProperties.getSystemsManagerParameterStore().getCognito().getAppClientSecret(), true);
        String domain = cloudFormationStackResolver.getExportValue(
          serviceProperties.getCloudFormation().getCognito().getDomain());
        String redirectUri = cloudFormationStackResolver.getExportValue(
          serviceProperties.getCloudFormation().getCognito().getRedirectUri());
        String jwkSetUri = cloudFormationStackResolver.getExportValue(
          serviceProperties.getCloudFormation().getCognito().getJwkSetUri());
        Map<String, Object> configurationMetadata = new HashMap<>();
        configurationMetadata.put("end_session_endpoint", domain + "/logout"); //(T)
        return ClientRegistration.withRegistrationId("cognito")
          .clientId(clientId)
          .clientSecret(clientSecret)
          .clientAuthenticationMethod(ClientAuthenticationMethod.BASIC)
          .authorizationGrantType(AuthorizationGrantType.AUTHORIZATION_CODE)
          .redirectUriTemplate(redirectUri)
          .scope("openid","profile")
          .tokenUri(domain + "/oauth2/token")
          .authorizationUri(domain + "/oauth2/authorize")
          .userInfoUri(domain + "/oauth2/userInfo")
          .userNameAttributeName("cognito:username") //(U)
          .jwkSetUri(jwkSetUri)
          .clientName("Cognito")
          .providerConfigurationMetadata(configurationMetadata)
          .build();
    }
    private String getParameterFromPrameterStore(String paramName, boolean isEncripted){
        GetParameterRequest request = new GetParameterRequest();
        request.setName(paramName);
        request.setWithDecryption(isEncripted);
        return awsSimpleSystemsManagement().getParameter(request).getParameter().getValue(); //(V)
    }
}
設定クラス実装のポイントになる箇所は以下の(A)〜(V)です。
| 項番 | 説明 |
| A | @EnalbleWebSecurityアノテーションを設定クラスへ付与します。このアノテーションにより、SpringSecurityの設定クラスとして認識されます。 |
| B | SpringSecurityの設定クラスとなるクラスにはorg.springframework.security.config.annotation.web.configuration.WebSecurityConfigurerAdapterを継承します。継承したクラスの設定用のメソッドをオーバーライドすることでSpringSecurityの基本設定やカスタマイズを行います |
| C | Systems Manager Parameter Storeからクライアントシークレットなどのパラメータを取得するためのSDKクライアントをBean定義します。 |
| D | OIDC認証プロバイダにアクセスするためのクライアントレポジトリクラスをBean定義します。認証プロバイダの設定は(S)で行います。 |
| E | セキュリティ設定はビルダークラスであるHttpSecurityに対して、リクエストは全て認証が必要となるように設定します。SpringSecurityのチェック対象外とするパスをpermitAll()で設定し、これらのリソースに対するリクエストは認証処理の対象外とするよう設定します。 |
| F | Spring SecurityのOAuth2 Login設定を有効化する定義を行います。 |
| G | OIDCプロバイダ認証が成功した後にフォワードするアプリケーションのパスを指定します。 |
| H | 第13回 では、Cognitoのユーザプールを作成した際に、ユーザ情報にカスタムのパラメータである「isAdmin」などを追加しています。これらのカスタムパラメータを取得するためにUserInfoエンドポイントのカスタム設定を行います。この設定はオプションです。 |
| I | カスタムパラメータを取得するためのMapperを作成します。なお、実際のマッピングロジックは(P)で実装しています。 |
| J | 通常、Spring Securityでは認証プロバイダから取得したユーザ情報をorg.springframework.security.oauth2.core.user.OAuth2Userに設定します。カスタムパラメータを追加したこの拡張クラスをorg.debugroom.mynavi.sample.aws.microservice.frontend.webapp.app.web.security.CognitoOAuth2Userという名前で作成します。カスタムユーザタイプは(O)で設定します。 |
| K | ログアウト処理を実行するアプリケーションのパスを設定します。このパスへの遷移が実行されると、Cognitoのログアウトエンドポイントへ処理を委任するようカスタム設定を行います。 |
| L | ログアウトが成功した後の処理を実装するLogoutSuccessHandlerを実装します。なお、Cognitoがissue-uriに相当するエンドポイントを提供していないため、「end_session_endpoint」を正しく取得できるよう、LogoutSuccessHanlderクラスを拡張して設定する必要があります。LogoutSuccessHandlerの詳細は後述します。 |
| M | LogoutSuccessHandlerクラスを実装します。実装はSpring Security公式リファレンスの OpenID Connect 1.0 ログアウト も参照してください。 |
| N | カスタムユーザタイプを設定したOidcUserServiceを生成します。 |
| O | カスタムユーザタイプを設定したOAuth2UserServiceを生成します。詳細は Spring Security 公式リファレンスの OAuth2UserServiceを使用した委譲ベースの戦略 も参照してください。 |
| P | カスタムパラメータ「isAdmin」に応じて、ユーザの権限を変更します。詳細は Spring Security 公式リファレンスの GrantedAuthroitiesMapperを使用する も参照してください。 |
| Q | カスタムパラメータはCognitoでは「custom:xxxx」形式でJSONで表現されています。Jacksonのライブラリを使って、Javaのオブジェクトにシリアライズします。 |
| R | Cognitoでadminグループに属している時も同様に、管理者となる権限を付与するように実装します。 |
| S | 認証プロバイダとなるクライアントの情報を設定します。設定が必要な項目は、Cognitoで設定したアプリケーションのクライアントID、クライアントシークレット、Cognitoの認証エンドポイントURL、トークンエンドポイントURL、UserInfoエンドポイントURL、アプリケーションのリダイレクトURL、公開鍵のURL、スコープ、IDとなるユーザ属性が必須です。 その他、認証グラントタイプやログアウトエンドポイントの情報が設定されたメタデータを設定しておきます。これらのパラメータを、CloudFormationのスタック情報やSystems Manager Parameter Store、プロパティファイルなどから取得するよう適宜実装します。 |
| T | (L)でも記述した通り、Cognitoにはissue-uriに相当するエンドポイントが提供されていないため(ログアウトエンドポイントは提供されている)、「end_session_endpoint」パラメータにログアウトエンドポイントを設定したメタデータを作成します。これはCognitoを使用する場合に必要な設定です。 |
| U | CognitoでユーザIDに相当するパラメータを指定します。これは必須パラメータです。 |
| V | Systems Manager Parameter Storeからパラメータを取得する実装です。 |
また、カスタムパラメータを含むように拡張したOidcUserクラスや、ログアウト実行後のハンドラクラスも以下の通り作成します。属性はOIDCのユーザクレイムをもとに定義しています。
package org.debugroom.mynavi.sample.aws.microservice.frontend.webapp.app.web.security;

// omit

import com.fasterxml.jackson.annotation.JsonProperty;
import org.springframework.security.core.GrantedAuthority;
import org.springframework.security.oauth2.core.user.OAuth2User;

public class CognitoOAuth2User implements OAuth2User, Serializable {

    private Set<GrantedAuthority> authorities;
    private Map<String, Object> attributes;
    private String nameAttributeKey;
    private String sub;
    private String email_verified;
    private String name;
    private String given_name;
    private String family_name;
    private String email;
    private String username;
    @JsonProperty("custom:isAdmin")
    private int isAdmin;

    // omit

}
LogoutSuccessHandlerは、デフォルトで使用されている、org.springframework.security.oauth2.client.oidc.web.logout.OidcClientInitiatedLogoutSuccessHandler を元に実装します。 ログアウトURIが機能するよう、以下の箇所を修正したCognitoLogoutSuccessHandlerを実装します。
package org.debugroom.mynavi.sample.aws.microservice.frontend.webapp.app.web.security;

import org.springframework.security.core.Authentication;
import org.springframework.security.oauth2.client.authentication.OAuth2AuthenticationToken;
import org.springframework.security.oauth2.client.registration.ClientRegistration;
import org.springframework.security.oauth2.client.registration.ClientRegistrationRepository;
import org.springframework.security.oauth2.core.oidc.user.OidcUser;
import org.springframework.security.web.authentication.logout.SimpleUrlLogoutSuccessHandler;
import org.springframework.security.web.util.UrlUtils;

public class CognitoLogoutSuccessHandler extends SimpleUrlLogoutSuccessHandler {

    // omit

    private String endpointUri(URI endSessionEndpoint, ClientRegistration clientRegistration, URI postLogoutRedirectUri) {
        UriComponentsBuilder builder = UriComponentsBuilder.fromUri(endSessionEndpoint);
        builder.queryParam("client_id", clientRegistration.getClientId());
        if (postLogoutRedirectUri != null) {
            builder.queryParam("logout_uri", postLogoutRedirectUri);
        }
        return builder.encode(StandardCharsets.UTF_8).build().toUriString();
    }

}
続いて、ログインが成功した後の、Controllerを実装します。IDトークンやアクセストークン、ユーザクレイムの情報などを表示するために、Modelクラスへ様々なオブジェクトを渡しておきます。
package org.debugroom.mynavi.sample.aws.microservice.frontend.webapp.app.web;

// omit

import org.springframework.beans.factory.annotation.Autowired;
import org.springframework.security.core.annotation.AuthenticationPrincipal;
import org.springframework.security.oauth2.client.OAuth2AuthorizedClient;
import org.springframework.security.oauth2.client.OAuth2AuthorizedClientService;
import org.springframework.security.oauth2.client.authentication.OAuth2AuthenticationToken;
import org.springframework.security.oauth2.core.oidc.user.OidcUser;
import org.springframework.stereotype.Controller;
import org.springframework.ui.Model;
import org.springframework.web.bind.annotation.GetMapping;

import org.debugroom.mynavi.sample.aws.microservice.frontend.webapp.app.web.security.CustomUserDetails;

@Controller
public class SampleController {

    @Autowired
    OAuth2AuthorizedClientService oAuth2AuthorizedClientService;

    // omit

    @GetMapping(value = "/oauth2LoginSuccess")
    public String oauth2SuccessPortal(@AuthenticationPrincipal OidcUser oidcUser
                      , OAuth2AuthenticationToken oAuth2AuthenticationToken, Model model){
        OAuth2AuthorizedClient oAuth2AuthorizedClient =
          oAuth2AuthorizedClientService.loadAuthorizedClient(
                  oAuth2AuthenticationToken.getAuthorizedClientRegistrationId(),
                  oAuth2AuthenticationToken.getName());
        model.addAttribute("oidcUser", oidcUser);
        model.addAttribute( oAuth2AuthorizedClientService
          .loadAuthorizedClient(
                  oAuth2AuthenticationToken.getAuthorizedClientRegistrationId(),
                  oAuth2AuthenticationToken.getName()));
        model.addAttribute("accessToken", oAuth2AuthorizedClientService
          .loadAuthorizedClient(
                  oAuth2AuthenticationToken.getAuthorizedClientRegistrationId(),
                  oAuth2AuthenticationToken.getName()).getAccessToken());
        return "oauth2Portal";
   }
}
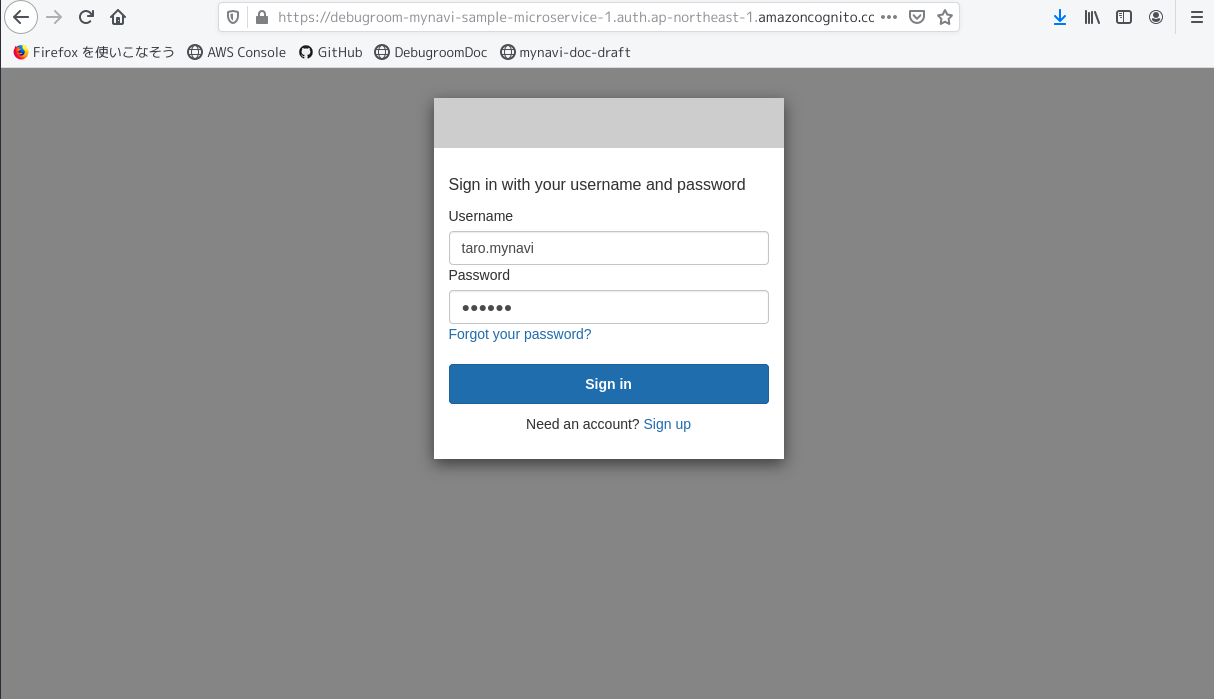
設定の後に、アプリケーションを起動します。認証で保護されたURLへのアクセスは、CognitoのHosted UIにリダイレクトされます。

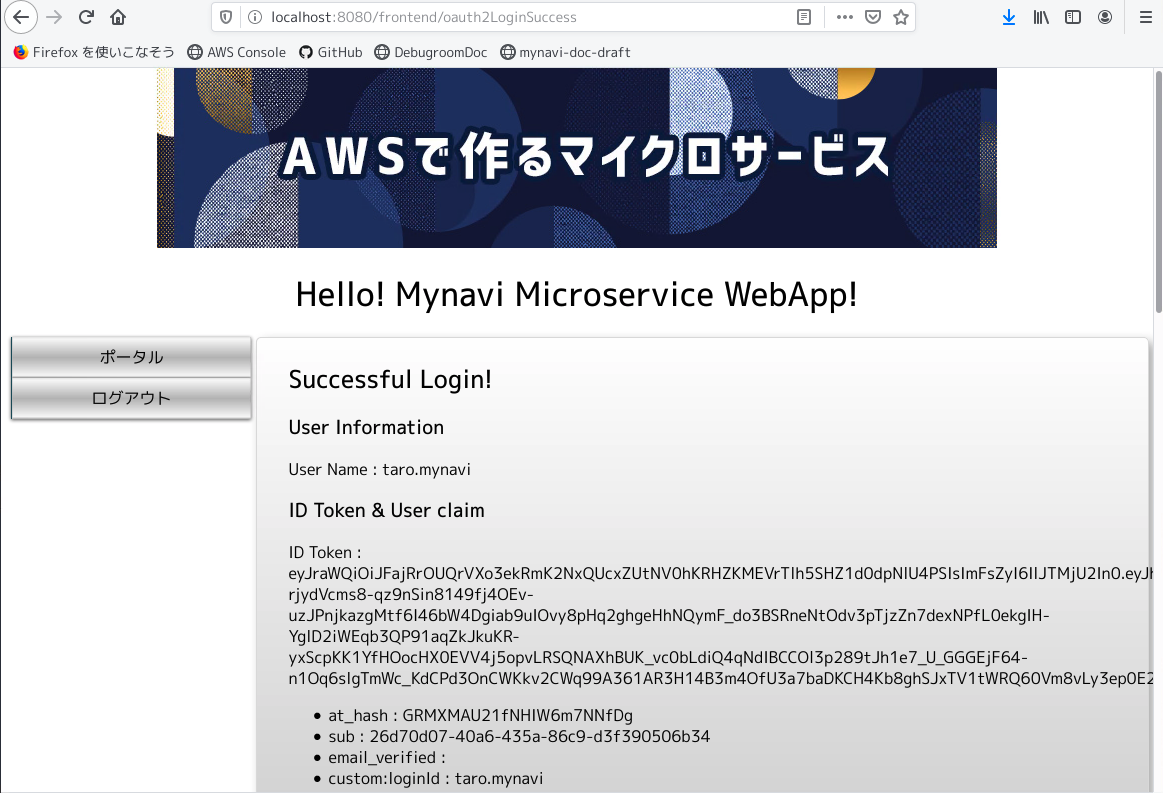
第16回 でCognitoに追加したユーザのIDとパスワードを入力すると、認証が成功し、再びアプリケーションにリダイレクトされます。

一瞬なので何が実行されたのかパッと見、判断はつきませんが、これは冒頭示したフローで、(1)〜(8)までが実行されていることになります。

このように、Spring Securityを使うと認証プロバイダと連携して、認証処理を簡単に外部のサービスに委譲できるように構成することができます。 ユーザ情報のデータベースを管理することはセキュリティ的な観点からも非常に大変な作業で、アプリケーションで認証処理を組み込むことも一手間かかりますが、 外部の認証プロバイダに簡単に委譲することが可能になり、開発の負担を大きく軽減することができます。次回は、最後の画面で表示させたトークンの情報を使って、 バックエンドのマイクロサービスを保護する方法や、呼び出しリクエストのヘッダーにトークンを設定する実装方法について解説していきます。
著者紹介
川畑 光平(KAWABATA Kohei) - NTTデータ エグゼクティブ ITスペシャリスト ソフトウェアアーキテクト・デジタルテクノロジーストラテジスト(クラウド)

金融機関システム業務アプリケーション開発・システム基盤担当、ソフトウェア開発自動化関連の研究開発を経て、デジタル技術関連の研究開発・推進に従事。
Red Hat Certified Engineer、Pivotal Certified Spring Professional、AWS Certified Solutions Architect Professional等の資格を持ち、アプリケーション基盤・クラウドなど様々な開発プロジェクト支援にも携わる。
AWS Top Engineers & Ambassadors 選出。
本連載記事の内容に対するご意見・ご質問は Facebook まで。