【第21回】Amazon Cognito + Spring Sercurityを使ったOAuth2 Loginの実装(10)
前回から、以下のイメージのようにOAuth2 Loginをベースとしたアーキテクチャを想定した環境構築を進めています。
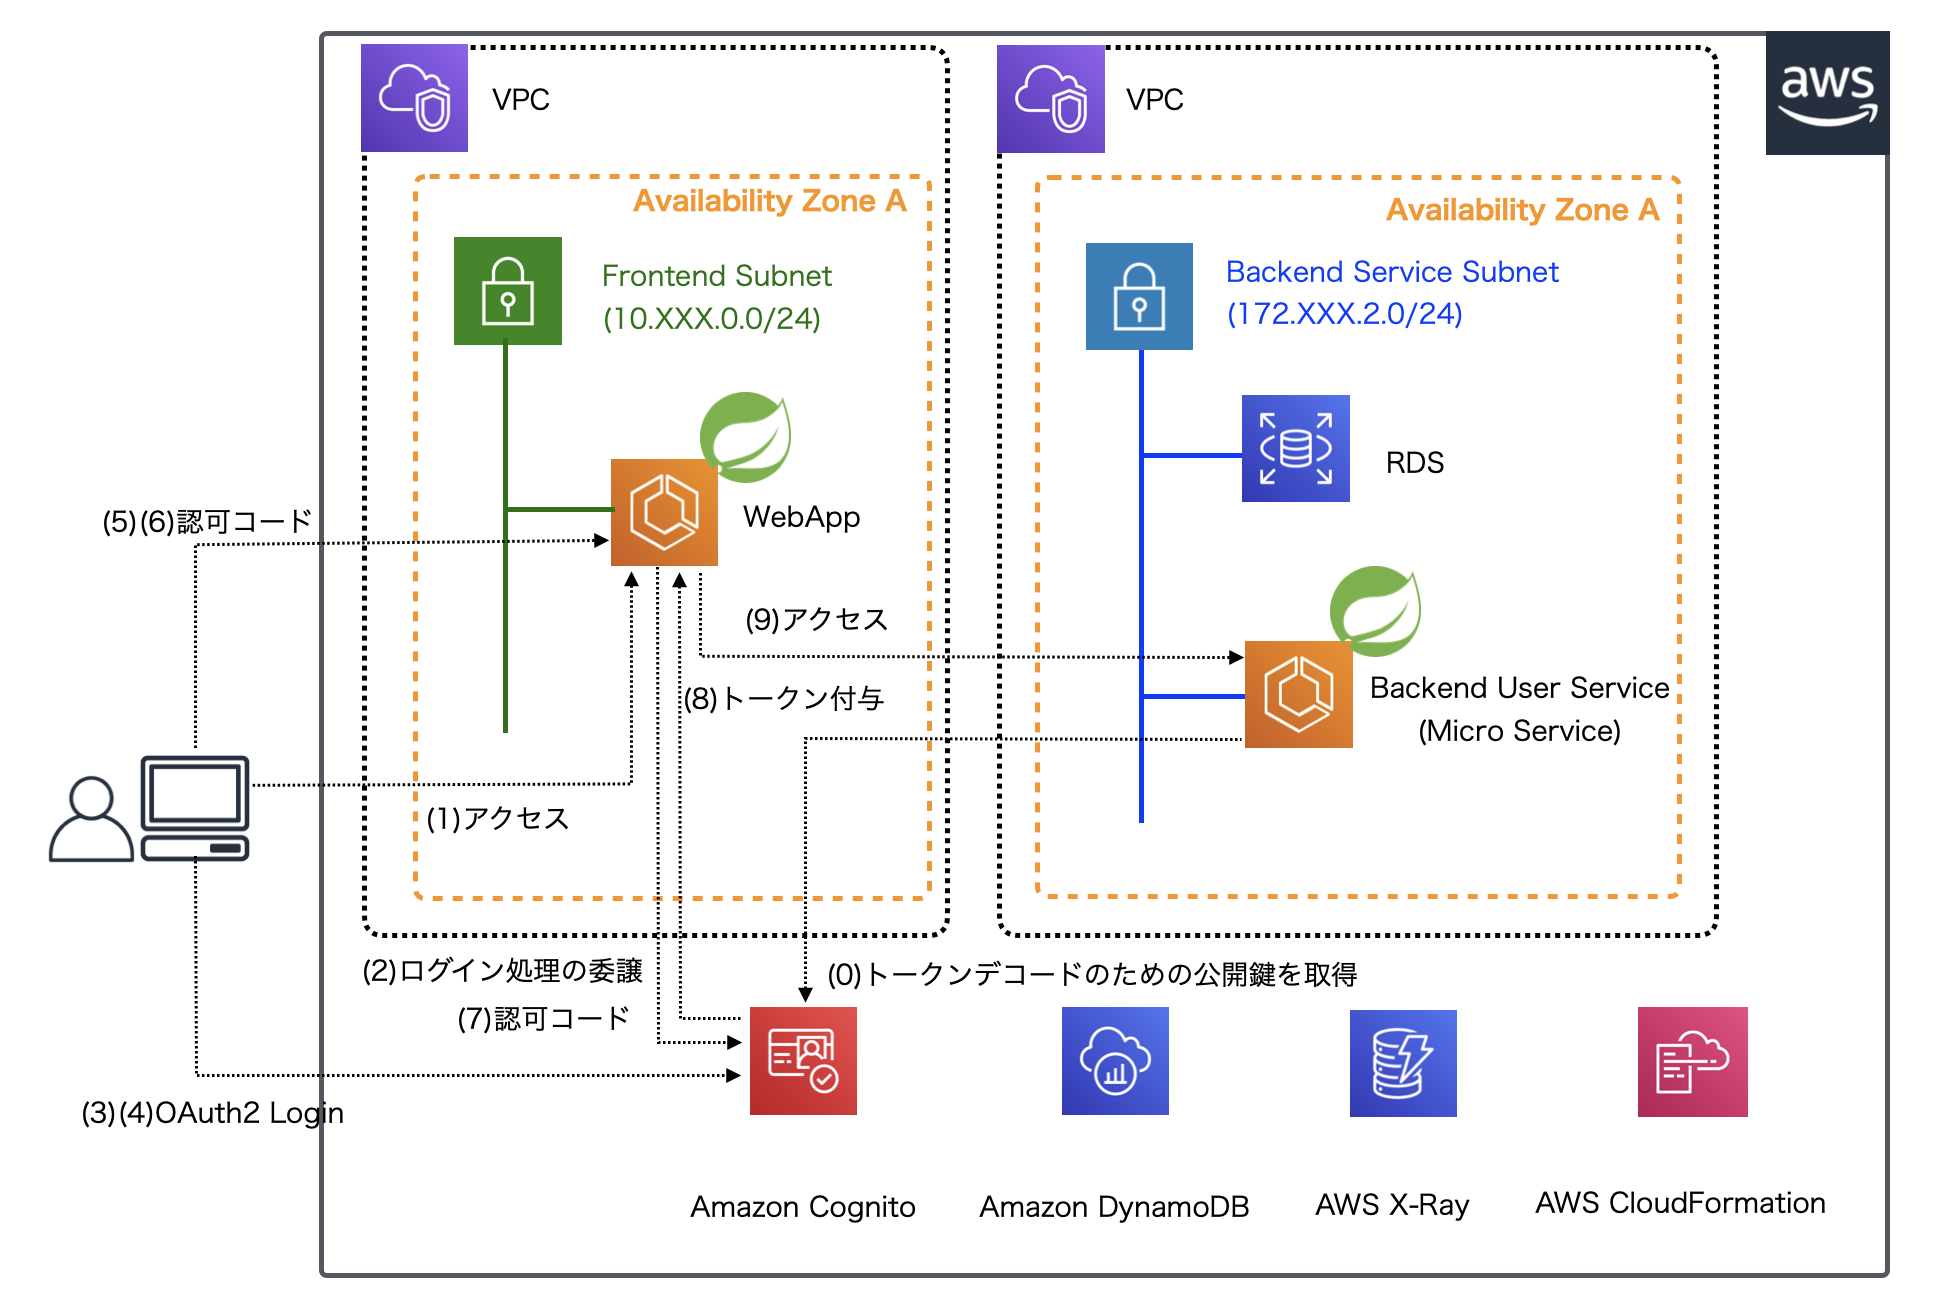
前回は、Frontendのアプリケーションでログイン時にOIDCプロバイダから取得したアクセストークンを、Backendサービスを呼び出すリクエストに付与して送信する実装について解説しました(上記の図で9に相当)。 今回はBackendのサービスで、アクセストークンを検証する認可制御を実装します。上記の図で、(0)の実装方法になります。
なお、実際のソースコードは GitHub 上にコミットしています。以降のソースコードでは本質的でない記述を一部省略しているので、実行コードを作成する場合は、必要に応じて適宜GitHub上のソースコードも参照してください。
バックエンドサービスでアクセストークンを検証する実装
Spring Securityには OAuth2 Resource Server という機能があり、 リクエストヘッダに付与されたアクセストークンの検証による認可制御により、エンドポイントを保護することができます。前回実装したように、リクエストのAuthorizationヘッダに設定されたBear接頭辞のアクセストークンを バックエンドサービスアプリケーションのサーブレットフィルタで検証します。バックエンドサービスでは、以下のような設定クラスを作成します。
package org.debugroom.mynavi.sample.aws.microservice.backend.user.config;

import org.springframework.security.config.annotation.web.builders.HttpSecurity;
import org.springframework.security.config.annotation.web.configuration.EnableWebSecurity;
import org.springframework.security.config.annotation.web.configuration.WebSecurityConfigurerAdapter;

import org.debugroom.mynavi.sample.aws.microservice.backend.user.domain.ServiceProperties;
import org.debugroom.mynavi.sample.aws.microservice.common.apinfra.cloud.aws.CloudFormationStackResolver;

// omit

@EnableWebSecurity
public class CognitoAuthorizationConfig extends WebSecurityConfigurerAdapter {

    ServiceProperties serviceProperties;

    CloudFormationStackResolver cloudFormationStackResolver;

    @Override
    protected void configure(HttpSecurity http) throws Exception {
        String jwkSetUri = cloudFormationStackResolver.getExportValue(
            serviceProperties.getCloudFormation().getCognito().getJwkSetUri());
        http.authorizeRequests(authroze -> authroze.anyRequest().authenticated())
          .oauth2ResourceServer(oauth2 -> oauth2.jwt(
                  jwt -> jwt.jwkSetUri(jwkSetUri)));
    }

}
Spring Securityの設定クラスの基本的な設定は、 第3回 で解説したものと同様ですが、 ここでは、oauth2ResourceServerプロパティにOIDCプロバイダの公開鍵が取得できるURLを設定するのがポイントです。 上記の実装では、CloudFormationのスタックから、CognitoのJWK_SET_URIを取得してjwkSetUriへ設定しています。jwkSetUriは以下の形式で表されるURLです。
https://cognito-idp.{region}.amazonaws.com/{userPoolId}/.well-known/jwks.json
この設定クラスでアプリケーションを起動すると、アクセストークンなしのリクエストを送信してもHTTP 401 Unauthorizedエラーが発生し、APIを呼び出すことはできません。
$ curl -v http://localhost:8081/backend/user/api/v1/users
*   Trying 127.0.0.1:8081...
* Connected to localhost (127.0.0.1) port 8081 (#0)
> GET /backend/user/api/v1/users HTTP/1.1
> Host: localhost:8081
> User-Agent: curl/7.76.1
> Accept: */*
>
* Mark bundle as not supporting multiuse
< HTTP/1.1 401
< Set-Cookie: JSESSIONID=B7E4CAF258E9915051379CDA59CEF318; Path=/backend/user; HttpOnly
< WWW-Authenticate: Bearer
< X-Content-Type-Options: nosniff
< X-XSS-Protection: 1; mode=block
< Cache-Control: no-cache, no-store, max-age=0, must-revalidate
< Pragma: no-cache
< Expires: 0
< X-Frame-Options: DENY
< Content-Length: 0
< Date: Sat, 05 Feb 2022 04:15:09 GMT
前回で実装したFrontendのアプリケーションで取得したアクセストークンをAuthorizationヘッダに設定して送信すると、以下の通り、HTTP 200の正常なレスポンスを取得できるようになります(アクセストークンは長いので省略します)。
$ curl -vH 'Authorization:Bearer eyJra//omit' http://localhost:8081/backend/user/api/v1/users
*   Trying 127.0.0.1:8081...
* Connected to localhost (127.0.0.1) port 8081 (#0)
> GET /backend/user/api/v1/users HTTP/1.1
> Host: localhost:8081
> User-Agent: curl/7.76.1
> Accept: */*
> Authorization:Bearer eyJra//omit

* Mark bundle as not supporting multiuse
< HTTP/1.1 200
< X-Amzn-Trace-Id: Root=1-61fdf98d-0d5906be6a5eab51ee71206e;
< X-Content-Type-Options: nosniff
< X-XSS-Protection: 1; mode=block
< Cache-Control: no-cache, no-store, max-age=0, must-revalidate
< Pragma: no-cache
< Expires: 0
< X-Frame-Options: DENY
< Content-Type: application/json
< Transfer-Encoding: chunked
< Date: Sat, 05 Feb 2022 04:14:05 GMT
< [{"userId":"0","firstName":"taro","familyName":"mynavi","loginId":"taro.mynavi",//omit}] {"tim* transfer closed with outstanding read data remaining
* Closing connection 0
curl: (18) transfer closed with outstanding read data remaining
estamp":"2022-02-05T04:14:05.497+00:00","status":200,"error":"OK","message":"","path":"/backend/user/api/v1/users"}
今回はバックエンドサービスでアクセストークンによりサービスを保護する実装方法について解説しました。 OIDCプロバイダが発行するアクセストークンを使ってマイクロサービスを保護することにより、以下のようなメリットがあります。
- マイクロサービスを利用するクライアントが増えた場合、クライアントの情報管理・確認を簡素化できる。
- JWT形式によるアクセストークンは公開鍵によってデコードするため、OIDCプロバイダにトークンの妥当性を問い合わせることなく、クライアントが増えた場合のスケーラビリティの確保が容易である
- デファクトスタンダードな認可技術の採用により、様々なプロダクトと連携させたり、セキュリティを担保する品質確保や学習・実装コストの低減を図ることができる。
ただし、Financial-grade API に準拠させるような場合は、トークンの有効期限などをプロバイダへ問い合わせるケースもあることに注意が必要です。 次回は、これまでの実装したサービスをAWS環境へIaCを使って構築してみます。
著者紹介
川畑 光平(KAWABATA Kohei) - NTTデータ エグゼクティブ ITスペシャリスト ソフトウェアアーキテクト・デジタルテクノロジーストラテジスト(クラウド)

金融機関システム業務アプリケーション開発・システム基盤担当、ソフトウェア開発自動化関連の研究開発を経て、デジタル技術関連の研究開発・推進に従事。
Red Hat Certified Engineer、Pivotal Certified Spring Professional、AWS Certified Solutions Architect Professional等の資格を持ち、アプリケーション基盤・クラウドなど様々な開発プロジェクト支援にも携わる。
AWS Top Engineers & Ambassadors 選出。
本連載記事の内容に対するご意見・ご質問は Facebook まで。